中文:
Part 1
1 简介(Introduction)
在本教程中,我们将使用Java建立自己的编程语言和编译器(你可以使用任何其他语言,最好是面向对象)。这篇文章的目的是帮助那些正在寻找创建自己的编程语言和编译器的人。这是一个玩具的例子,但它将试图帮助你了解从哪里开始,向哪个方向发展。完整的源代码可以在GitHub上找到。
每种语言从源代码到最终的可执行文件都有几个阶段。每个阶段都以某种方式对传入的数据进行格式化:
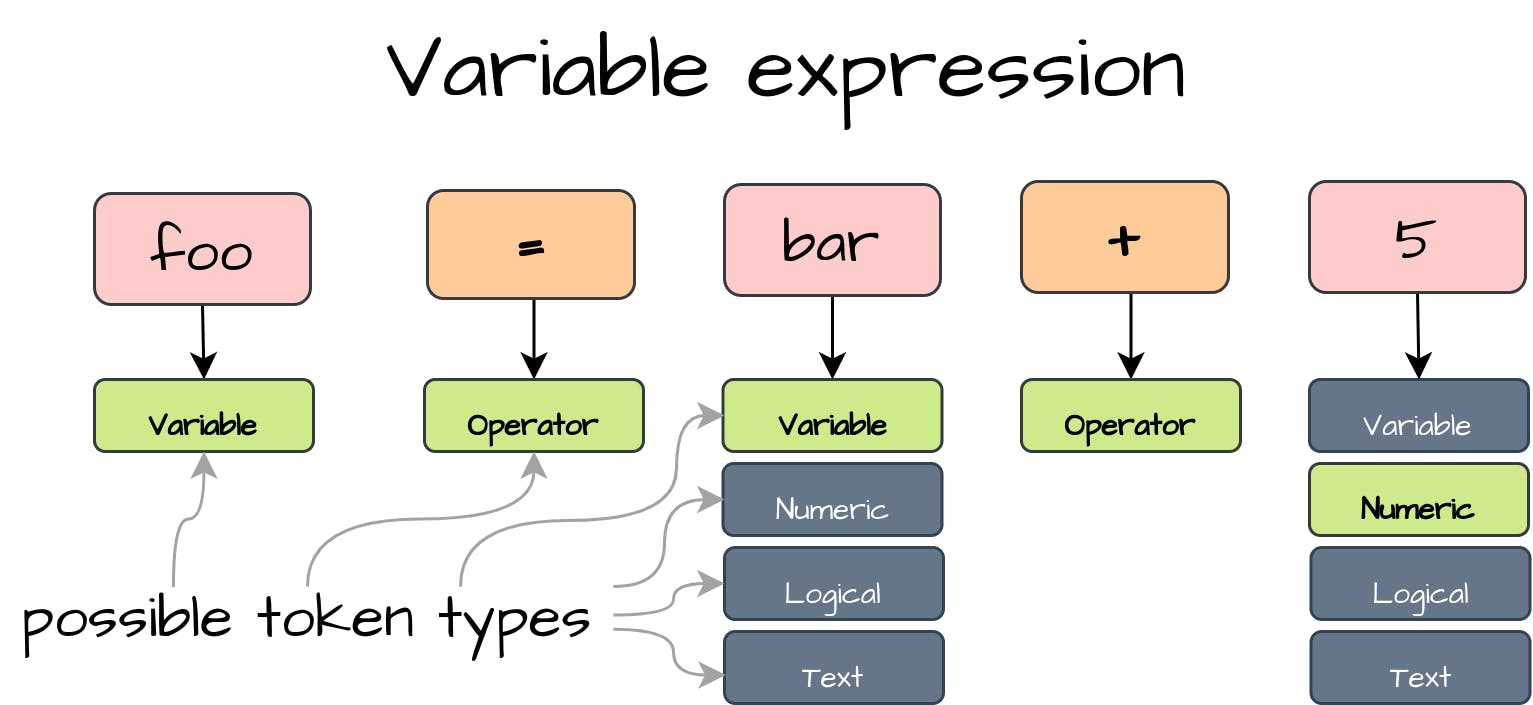
- 词法分析(Lexical analysis),简单地说,就是将源代码划分为标记。每个标记可以包含一个不同的词素:关键词、标识符/变量、带有相应值的运算符等。
- 语法分析或解析器(Syntax analysis or parser)将传入的标记列表转换为抽象语法树(abstract syntax tree (AST),它允许你在结构上呈现所创建语言的规则。这个过程本身很简单,一眼就能看出,但随着语言结构的增加,它可能变得更加复杂。
- 在构建了AST之后,我们就可以生成代码了。代码通常是使用抽象的语法树递归地生成的。我们的编译器为了简单起见将在语法分析过程中产生语句。
我们将创建一个具有以下能力的简单语言:
- 分配变量(数字、逻辑和文本)。
- 声明结构,创建实例和访问字段。
- 进行简单的数学运算(加、减、非)。
- 用数学运算符打印变量、数值和更复杂的表达式。
- 从控制台读取数值、逻辑和文本值。
- 执行if-then语句
有一个我们语言的代码的例子,它是Ruby和Python语法的混合:
 1
 2
 3
 4
 5
 6
 7
 8
 9
10
11
12
13
14
15
16
17
18
19
20
21
22
23
24
25
26
| struct Person
arg name
arg experience
arg is_developer
end
input your_name
input your_experience_in_years
input do_you_like_programming
person = new Person [your_name your_experience_in_years do_you_like_programming == "yes"]
print person
if person :: is_developer then
person_name = person :: name
print "hey " + person_name + "!"
experience = person :: experience
if experience > 0 then
started_in = 2022 - experience
print "you had started your career in " + started_in
end
end
|
2 词法分析(Lexical analysis)
首先,我们将从词法分析开始。让我们想象一下,你从一个朋友那里得到一条信息,内容如下:
这个表达方式有点难读。它只是一组没有任何意义的字母。这是因为我们的自然词法分析器无法从我们的字典中找到任何合适的词。然而,如果我们正确地放置空格,一切都会变得清晰:
1
| "I enjoy reading books"
|
编程语言的词汇分析器的工作原理与此相同。当我们说话时,我们通过语调和停顿来强调个别的词,以了解对方。以同样的方式,我们必须向词汇分析器提供代码以使其理解我们。如果我们写错了,词法分析器将无法将单个词组、单词和句法结构分开。
在词汇分析过程中,我们的编程语言有六个词汇单位(tokens),我们将计算这些词汇:
空格、回车、和其他空白字符
这些词素单位并没有什么意义。你不能通过使用空格来声明任何代码块或函数参数。主要意图是只帮助开发者将他的代码划分为独立的词组。因此,词法分析器首先会寻找空格和换行,以便了解如何在代码中突出所提供的词素。
运算符: +, -, =, <, >, ::
它们可以是更复杂的复合语句的一部分。等号不仅可以表示一个赋值运算符,而且还可以结合一个更复杂的平等比较运算符,由两个=组成。在这种情况下,词法分析器将尝试从左到右读取表达式,试图抓住最长的运算符。
组别分割线: [, ]
组的分隔符可以将两个组的词条相互分开。例如,一个开放的方括号可以用来标记一些特定组的开始,一个封闭的方括号将标记开始组的结束。在我们的语言中,方括号将只用于声明结构实例参数。
关键字:print, input, struct, arg, end, new, if, then
关键字是一组具有某种特定意义的字母字符,由编译器分配。例如,5个字母print的组合构成一个词,它被语言编译器认为是一个控制台输出语句的定义。这个意义不能被程序员改变。这就是关键词的基本思想,它们是语言的公理,我们把它们结合起来,创造我们自己的语句–程序。
变量或标识符
除了关键字之外,我们还需要考虑到变量。变量是由程序员而不是编译器给出的具有某种意义的字符序列。同时,我们需要对变量名称进行某些限制。我们的变量将只包含字母、数字和下划线字符。标识符内的其他字符不能出现,因为我们描述的大多数运算符都是定界符,因此不能成为另一个词素的一部分。在这种情况下,变量不能以数字开头,这是因为词法分析器检测到一个数字后会立即尝试与数字相匹配。另外,需要注意的是,该变量不能用关键词来表达。这意味着,如果我们的语言定义了关键字print,那么程序员就不能引入一个以相同顺序定义的相同字符集的变量。
字面意义
如果给定的字符序列不是一个关键词,也不是一个变量,那么还有最后一种选择——它可以是一个字面常数。我们的语言将能够定义数字、逻辑和文本字面。数字字面是包含数字的特殊变量。为了简单起见,我们将不使用浮点数字(分数),你可以在以后自己实现它。逻辑字面可以包含布尔值:false或true。文本字面是一组任意的字母表中的字符,用双引号(“”)括起来。
现在我们有了关于我们编程语言中所有可能的词素的基本信息,让我们深入到代码中,开始声明我们的标记类型。我们将使用枚举常量,为每个词素类型提供相应的Pattern表达。我将使用Lombok注解来减少模板代码:
 1
 2
 3
 4
 5
 6
 7
 8
 9
10
11
12
13
14
| @RequiredArgsConstructor
@Getter
public enum TokenType {
Whitespace("[\\s\\t\\n\\r]"),
Keyword("(if|then|end|print|input|struct|arg|new)"),
GroupDivider("(\\[|\\])"),
Logical("true|false"),
Numeric("[0-9]+"),
Text("\"([^\"]*)\""),
Variable("[a-zA-Z_]+[a-zA-Z0-9_]*"),
Operator("(\\+|\\-|\\>|\\<|\\={1,2}|\\!|\\:{2})");
private final String regex;
}
|
为了简化字词的解析,我把每一种字词类型划分为一个单独的词组: Numeric, Logical和 Text。对于Text字面,我们设置了一个单独的组([^"]*)来抓取没有双引号的字面值。对于等号,我们声明{1,2}范围。用两个等号==我们希望得到比较运算符而不是赋值。为了访问一个结构域,我们声明了双冒号运算符::。
现在要在我们的代码中找到一个标记,我们只需在我们的源代码上应用正则来迭代和过滤所有TokenType值。为了匹配行的开头,我们在每个正则表达式的开头加上^元字符,创建一个Pattern实例。TokenType将捕获没有引号的值到单独的组中。因此,为了访问不带引号的值,如果我们至少有一个明确的组,我们从索引为1的组中抓取一个值:
1
2
3
4
5
6
7
8
| for (TokenType tokenType : TokenType.values()) {
Pattern pattern = Pattern.compile("^" + tokenType.getRegex());
Matcher matcher = pattern.matcher(sourceCode);
if (matcher.find()) {
// group(1) is used to get text literal without double quotes
String token = matcher.groupCount() > 0 ? matcher.group(1) : matcher.group();
}
}
|
为了存储找到的词条,我们需要声明以下带有类型和值字段的Token类:
1
2
3
4
5
6
| @Builder
@Getter
public class Token {
private final TokenType type;
private final String value;
}
|
现在我们有了创建我们的词法分析器的一切。我们将在构造函数中接收作为字符串的源代码,并初始化tokens List:
 1
 2
 3
 4
 5
 6
 7
 8
 9
10
11
| public class LexicalParser {
private final List<Token> tokens;
private final String source;
public LexicalParser(String source) {
this.source = source;
this.tokens = new ArrayList<>();
}
...
}
|
为了从源代码中检索出所有的标记,我们需要在每个发现的词组之后切割源代码。我们将声明nextToken()方法,该方法将接受源代码的当前索引作为参数,并抓取当前位置之后开始的下一个标记:
 1
 2
 3
 4
 5
 6
 7
 8
 9
10
11
12
13
14
15
16
17
18
19
20
21
| public class LexicalParser {
...
private int nextToken(int position) {
String nextToken = source.substring(position);
for (TokenType tokenType : TokenType.values()) {
Pattern pattern = Pattern.compile("^" + tokenType.getRegex());
Matcher matcher = pattern.matcher(nextToken);
if (matcher.find()) {
if (tokenType != TokenType.Whitespace) {
// group(1) is used to get text literal without double quotes
String value = matcher.groupCount() > 0 ? matcher.group(1) : matcher.group();
Token token = Token.builder().type(tokenType).value(value).build();
tokens.add(token);
}
return matcher.group().length();
}
}
throw new TokenException(String.format("invalid expression: `%s`", nextToken));
}
}
|
成功捕获后,我们创建一个Token实例,并将其累积到tokens列表中。我们将不添加Whitespace词条,因为它们只用于将两个词条相互分割开来。最后,我们返回找到的词组的长度。
为了捕捉源文件中的所有标记,我们创建了parse()方法,其中的while循环在每次捕捉到一个标记时增加源文件的位置:
 1
 2
 3
 4
 5
 6
 7
 8
 9
10
11
12
13
| public class LexicalParser {
...
public List<Token> parse() {
int position = 0;
while (position < source.length()) {
position += nextToken(position);
}
return tokens;
}
...
}
|
3 语法分析(Syntax analysis)
在我们的编译器模型中,语法分析器将从词法分析器接收一个标记列表,并检查这个序列是否可以由语言语法生成。最后,这个语法分析器应该返回一个抽象的语法树。
我们将通过声明Expression接口来启动语法分析器:
1
2
| public interface Expression {
}
|
这个接口将被用来声明字面意义、变量和带有运算符的复合表达式。
3.1 字面值(Literals)
首先,我们为我们语言的字面值类型创建 Expression 的实现:Numeric, Text和 Logical与相应的Java类型: Integer, String 和Boolean。我们将创建具有通用类型的 Value 类,并将其扩展为可比较类型(它将在以后用于比较运算符):
 1
 2
 3
 4
 5
 6
 7
 8
 9
10
11
12
13
14
15
16
17
18
19
20
21
22
23
24
25
26
27
28
| @RequiredArgsConstructor
@Getter
public class Value<T extends Comparable<T>> implements Expression {
private final T value;
@Override
public String toString() {
return value.toString();
}
}
public class NumericValue extends Value<Integer> {
public NumericValue(Integer value) {
super(value);
}
}
public class TextValue extends Value<String> {
public TextValue(String value) {
super(value);
}
}
public class LogicalValue extends Value<Boolean> {
public LogicalValue(Boolean value) {
super(value);
}
}
|
我们还将为我们的结构实例声明StructureValue:
1
2
3
4
5
| public class StructureValue extends Value<StructureExpression> {
public StructureValue(StructureExpression value) {
super(value);
}
}
|
结构化表达(StructureExpression)将在稍后介绍。
3.2 变量(Variables)
变量表达式将有一个代表其名称的单一字段:
1
2
3
4
5
| @AllArgsConstructor
@Getter
public class VariableExpression implements Expression {
private final String name;
}
|
3.3 结构体(Structures)
为了存储一个结构实例,我们需要知道结构定义和参数值,我们将通过这些参数值来创建一个对象。参数值可以表示任何表达式,包括字面值、变量和实现Expression接口的更复杂的表达式。因此,我们将使用Expression作为数值类型:
 1
 2
 3
 4
 5
 6
 7
 8
 9
10
11
12
13
14
15
| @RequiredArgsConstructor
@Getter
public class StructureExpression implements Expression {
private final StructureDefinition definition;
private final List<Expression> values;
}
@RequiredArgsConstructor
@Getter
@EqualsAndHashCode(onlyExplicitlyIncluded = true)
public class StructureDefinition {
@EqualsAndHashCode.Include
private final String name;
private final List<String> arguments;
}
|
值可以是VariableExpression的一个类型。我们需要一种方法来通过其名称访问变量的值。我将把这个责任委托给Function接口,它将接受变量名并返回一个Value对象:
1
2
3
4
5
| ...
public class StructureExpression implements Expression {
...
private final Function<String, Value<?>> variableValue;
}
|
现在我们可以实现一个接口,通过名称检索参数的值,它将被用来访问结构实例的值。getValue()方法将在稍后实现:
 1
 2
 3
 4
 5
 6
 7
 8
 9
10
11
12
13
| ...
public class StructureExpression implements Expression {
…
public Value<?> getArgumentValue(String field) {
return IntStream
.range(0, values.size())
.filter(i -> definition.getArguments().get(i).equals(field))
.mapToObj(this::getValue) //will be implemented later
.findFirst()
.orElse(null);
}
}
|
不要忘了我们的StructureExpression是作为扩展了Comparable的StructureValue通用类型的参数使用的。因此,我们必须为我们的StructureExpression实现Comparable接口:
 1
 2
 3
 4
 5
 6
 7
 8
 9
10
11
12
13
14
15
16
17
18
| ...
public class StructureExpression implements Expression, Comparable<StructureExpression> {
...
@Override
public int compareTo(StructureExpression o) {
for (String field : definition.getArguments()) {
Value<?> value = getArgumentValue(field);
Value<?> oValue = o.getArgumentValue(field);
if (value == null && oValue == null) continue;
if (value == null) return -1;
if (oValue == null) return 1;
//noinspection unchecked,rawtypes
int result = ((Comparable) value.getValue()).compareTo(oValue.getValue());
if (result != 0) return result;
}
return 0;
}
}
|
我们也可以重写标准的toString()方法。如果我们想在控制台中打印整个结构实例,这将是非常有用的:
 1
 2
 3
 4
 5
 6
 7
 8
 9
10
11
12
13
14
15
| ...
public class ObjectExpression implements Expression, Comparable<ObjectExpression> {
...
@Override
public String toString() {
return IntStream
.range(0, values.size())
.mapToObj(i -> {
Value<?> value = getValue(i); //will be implemented later
String fieldName = definition.getArguments().get(i);
return fieldName + " = " + value;
})
.collect(Collectors.joining(", ", definition.getName() + " [ ", " ]"));
}
}
|
3.4 运算符(Operators)
在我们的语言中,我们将有带1个操作数的单数运算符和带2个操作数的二元运算符。

让我们为我们的每个运算符实现表达式接口。我们声明OperatorExpression接口,并为单运算符和双运算符创建基础实现:
 1
 2
 3
 4
 5
 6
 7
 8
 9
10
11
12
13
14
15
| public interface OperatorExpression extends Expression {
}
@RequiredArgsConstructor
@Getter
public class UnaryOperatorExpression implements OperatorExpression {
private final Expression value;
}
@RequiredArgsConstructor
@Getter
public class BinaryOperatorExpression implements OperatorExpression {
private final Expression left;
private final Expression right;
}
|
我们还需要为我们的每个运算符的实现声明一个抽象的calc()方法,并有相应的值操作数。这个方法将根据每个运算符的本质,从操作数中计算出值。操作数从表达式到值的转换将在稍后介绍。
 1
 2
 3
 4
 5
 6
 7
 8
 9
10
11
| …
public abstract class UnaryOperatorExpression extends OperatorExpression {
…
public abstract Value<?> calc(Value<?> value);
}
…
public abstract class BinaryOperatorExpression extends OperatorExpression {
…
public abstract Value<?> calc(Value<?> left, Value<?> right);
}
|
在声明了基础运算符类之后,我们可以创建更详细的实现:
3.4.1 非(NOT !)
这个操作符只对LogicalValue起作用,返回具有反转值的新LogicalValue实例:
 1
 2
 3
 4
 5
 6
 7
 8
 9
10
11
| public class NotOperator extends UnaryOperatorExpression {
...
@Override
public Value<?> calc(Value<?> value) {
if (value instanceof LogicalValue) {
return new LogicalValue(!((LogicalValue) value.getValue()).getValue());
} else {
throw new ExecutionException(String.format("Unable to perform NOT operator for non logical value `%s`", value));
}
}
}
|
现在我们将切换到有两个操作符的二元操作数表达式的实现:
3.4.2 加(Addition +)
第一个是加法。Calc()方法将对NumericValue对象进行加法。对于其他价值类型,我们将连接toString()值,并返回TextValue实例:
 1
 2
 3
 4
 5
 6
 7
 8
 9
10
11
12
13
14
| public class AdditionOperator extends BinaryOperatorExpression {
public AdditionOperator(Expression left, Expression right) {
super(left, right);
}
@Override
public Value<?> calc(Value<?> left, Value<?> right) {
if (left instanceof NumericValue && right instanceof NumericValue) {
return new NumericValue(((NumericValue) left).getValue() + ((NumericValue) right).getValue());
} else {
return new TextValue(left.toString() + right.toString());
}
}
}
|
3.4.3 减(Subtraction -)
calc()只有在两个值都是NumericValue类型时才会进行getValue()比较。在其他情况下,两个值都将被映射到字符串中,从第一个值中删除第二个值的匹配:
 1
 2
 3
 4
 5
 6
 7
 8
 9
10
11
| public class SubtractionOperator extends BinaryOperatorExpression {
...
@Override
public Value<?> calc(Value<?> left, Value<?> right) {
if (left instanceof NumericValue && right instanceof NumericValue) {
return new NumericValue(((NumericValue) left).getValue() - ((NumericValue) right).getValue());
} else {
return new TextValue(left.toString().replaceAll(right.toString(), ""));
}
}
}
|
3.4.4 相等(Equals ==)
calc()只有在两个值的类型相同时才会进行getValue()比较。在其他情况下,两个值都将被映射为字符串:
 1
 2
 3
 4
 5
 6
 7
 8
 9
10
11
12
13
| public class EqualsOperator extends BinaryOperatorExpression {
...
@Override
public Value<?> calc(Value<?> left, Value<?> right) {
boolean result;
if (Objects.equals(left.getClass(), right.getClass())) {
result = ((Comparable) left.getValue()).compareTo(right.getValue()) == 0;
} else {
result = ((Comparable) left.toString()).compareTo(right.toString()) == 0;
}
return new LogicalValue(result);
}
}
|
3.4.5 小于 和 大于(Less than < and greater than >)
 1
 2
 3
 4
 5
 6
 7
 8
 9
10
11
12
13
14
15
16
17
18
19
20
21
22
23
24
25
26
27
| public class LessThanOperator extends BinaryOperatorExpression {
...
@Override
public Value<?> calc(Value<?> left, Value<?> right) {
boolean result;
if (Objects.equals(left.getClass(), right.getClass())) {
result = ((Comparable) left.getValue()).compareTo(right.getValue()) < 0;
} else {
result = left.toString().compareTo(right.toString()) < 0;
}
return new LogicalValue(result);
}
}
public class GreaterThanOperator extends BinaryOperatorExpression {
...
@Override
public Value<?> calc(Value<?> left, Value<?> right) {
boolean result;
if (Objects.equals(left.getClass(), right.getClass())) {
result = ((Comparable) left.getValue()).compareTo(right.getValue()) > 0;
} else {
result = left.toString().compareTo(right.toString()) > 0;
}
return new LogicalValue(result);
}
}
|
3.4.6 结构体取值运算符(Structure value operator ::)
要读取结构体参数的值,我们希望将左值作为 StructureValue 类型接收:
1
2
3
4
5
6
7
8
9
| public class StructureValueOperator extends BinaryOperatorExpression {
...
@Override
public Value<?> calc(Value<?> left, Value<?> right) {
if (left instanceof StructureValue)
return ((StructureValue) left).getValue().getArgumentValue(right.toString());
return left;
}
}
|
3.5 Value evaluation
如果我们想把变量或更复杂的表达式实现传递给运算符,包括运算符本身,我们需要一种方法来把表达式对象转换为值。为了做到这一点,我们在我们的表达式接口中声明evaluate()方法:
1
2
3
| public interface Expression {
Value<?> evaluate();
}
|
Value类将只是返回这个实例:
1
2
3
4
5
6
7
| public class Value<T extends Comparable<T>> implements Expression {
...
@Override
public Value<?> evaluate() {
return this;
}
}
|
为了实现VariableExpression的evaluate()方法,首先我们必须提供一种通过变量名称获取Value的能力。我们将这项工作委托给Function字段,它将接受变量名称并返回相应的Value对象:
 1
 2
 3
 4
 5
 6
 7
 8
 9
10
11
12
13
14
| ...
public class VariableExpression implements Expression {
...
private final Function<String, Value<?>> variableValue;
@Override
public Value<?> evaluate() {
Value<?> value = variableValue.apply(name);
if (value == null) {
return new TextValue(name);
}
return value;
}
}
|
为了评估StructureExpression,我们将创建一个StructureValue实例。我们还需要实现缺失的getValue()方法,该方法将接受一个参数索引并根据Expression类型返回值:
 1
 2
 3
 4
 5
 6
 7
 8
 9
10
11
12
13
14
15
16
17
| ...
public class StructureExpression implements Expression, Comparable<StructureExpression> {
...
@Override
public Value<?> evaluate() {
return new StructureValue(this);
}
private Value<?> getValue(int index) {
Expression expression = values.get(index);
if (expression instanceof VariableExpression) {
return variableValue.apply(((VariableExpression) expression).getName());
} else {
return expression.evaluate();
}
}
}
|
对于运算符表达式,我们评估操作数的值并将其传递给calc()方法:
 1
 2
 3
 4
 5
 6
 7
 8
 9
10
11
12
13
14
15
| public abstract class UnaryOperatorExpression extends OperatorExpression {
...
@Override
public Value<?> evaluate() {
return calc(getValue().evaluate());
}
}
public abstract class BinaryOperatorExpression extends OperatorExpression {
...
@Override
public Value<?> evaluate() {
return calc(getLeft().evaluate(), getRight().evaluate());
}
}
|
3.6 语句(Statements)
在我们开始创建我们的语法分析器之前,我们需要为我们的语言的语句引入一个模型。让我们从带有execute()处理方法的Statement接口开始,它将在代码执行期间被调用:
1
2
3
| public interface Statement {
void execute();
}
|
3.6.1 打印语句(Print statement)
我们要实现的第一个语句是PrintStatement。这个语句需要知道要打印的表达式。我们的语言将支持打印字面值、变量和其他实现Expression的表达式,这些表达式将在执行过程中被评估,以计算出Value对象:
3.6.2 赋值(Assign statement)
要声明一个赋值,我们需要知道变量的名字和我们要赋值的表达式。我们的语言将能够赋值字面值、变量和实现Expression接口的更复杂的表达式:
 1
 2
 3
 4
 5
 6
 7
 8
 9
10
11
| @AllArgsConstructor
@Getter
public class AssignStatement implements Statement {
private final String name;
private final Expression expression;
@Override
public void execute() {
...
}
}
|
在执行过程中,我们需要把变量的值储存在某个地方。让我们把这个逻辑委托给BiConsumer字段,它将传递一个变量名和赋值。注意,在进行赋值时,需要对Expression的值进行评估:
 1
 2
 3
 4
 5
 6
 7
 8
 9
10
| ...
public class AssignStatement implements Statement {
...
private final BiConsumer<String, Value<?>> variableSetter;
@Override
public void execute() {
variableSetter.accept(name, expression.evaluate());
}
}
|
为了从控制台读取一个表达式,我们需要知道要赋值的变量名称。在execute()过程中,我们必须从控制台读取一行。这项工作可以委托给Supplier,因此我们将不会创建多个输入流。读取该行后,我们将其解析为相应的Value对象,并将赋值委托给BiConsumer实例,正如我们对AssignStatement所做的那样:
 1
 2
 3
 4
 5
 6
 7
 8
 9
10
11
12
13
14
15
16
17
18
19
20
21
22
23
24
25
| @AllArgsConstructor
@Getter
public class InputStatement implements Statement {
private final String name;
private final Supplier<String> consoleSupplier;
private final BiConsumer<String, Value<?>> variableSetter;
@Override
public void execute() {
//just a way to tell the user in which variable the entered value will be assigned
System.out.printf("enter \"%s\" >>> ", name.replace("_", " "));
String line = consoleSupplier.get();
Value<?> value;
if (line.matches("[0-9]+")) {
value = new NumericValue(Integer.parseInt(line));
} else if (line.matches("true|false")) {
value = new LogicalValue(Boolean.valueOf(line));
} else {
value = new TextValue(line);
}
variableSetter.accept(name, value);
}
}
|
3.6.4 条件语句(Condition statement)
首先,我们将介绍CompositeStatement类,它将包含要执行的内部语句列表:
 1
 2
 3
 4
 5
 6
 7
 8
 9
10
11
12
13
14
| @Getter
public class CompositeStatement implements Statement {
private final List<Statement> statements2Execute = new ArrayList<>();
public void addStatement(Statement statement) {
if (statement != null)
statements2Execute.add(statement);
}
@Override
public void execute() {
statements2Execute.forEach(Statement::execute);
}
}
|
这个类可以在以后我们创建复合语句结构时重复使用。第一个结构将是Condition语句。为了描述条件,我们可以使用字面值、变量和实现Expression接口的更复杂的结构。最后,在执行过程中,我们要计算Expression的值,并确保该值是符合逻辑的,而且里面的结果是真实的。只有在这种情况下,我们才能执行内部语句:
 1
 2
 3
 4
 5
 6
 7
 8
 9
10
11
12
13
14
15
16
17
| @RequiredArgsConstructor
@Getter
public class ConditionStatement extends CompositeStatement {
private final Expression condition;
@Override
public void execute() {
Value<?> value = condition.evaluate();
if (value instanceof LogicalValue) {
if (((LogicalValue) value).getValue()) {
super.execute();
}
} else {
throw new ExecutionException(String.format("Cannot compare non logical value `%s`", value));
}
}
}
|
3.7 语句解析器(Statement parser)
现在我们有了与我们的词库一起工作的语句,我们现在可以建立StatementParser。在这个类中,我们声明了一个标记的列表和可变的标记位置变量:
1
2
3
4
5
6
7
8
9
| public class StatementParser {
private final List<Token> tokens;
private int position;
public StatementParser(List<Token> tokens) {
this.tokens = tokens;
}
...
}
|
然后我们创建parseExpression()方法,它将处理提供的标记并返回一个完整的语句:
1
2
3
| public Statement parseExpression() {
...
}
|
我们的语言表达式只能从声明一个变量或一个关键词开始。因此,首先我们需要读取一个标记,并验证它是否具有Variable或关Keyword的标记类型。为了处理这个问题,我们声明一个单独的next()方法,将token类型varargs作为一个参数,它将验证下一个令牌是否具有相同的类型。在真实的情况下,我们增加StatementParser的position字段并返回找到的token:
 1
 2
 3
 4
 5
 6
 7
 8
 9
10
11
12
13
14
15
16
17
| private Statement parseExpression() {
Token token = next(TokenType.Keyword, TokenType.Variable);
...
}
private Token next(TokenType type, TokenType... types) {
TokenType[] tokenTypes = org.apache.commons.lang3.ArrayUtils.add(types, type);
if (position < tokens.size()) {
Token token = tokens.get(position);
if (Stream.of(tokenTypes).anyMatch(t -> t == token.getType())) {
position++;
return token;
}
}
Token previousToken = tokens.get(position - 1);
throw new SyntaxException(String.format("After `%s` declaration expected any of the following lexemes `%s`", previousToken, Arrays.toString(tokenTypes)));
}
|
在我们找到适当的token后,我们可以根据token类型建立我们的声明。
3.7.1 变量(Variable)
每个变量赋值都以变量标记类型开始,我们已经读过了。我们期待的下一个标记是equals =操作符。你可以重写next()方法,该方法将接受带有字符串操作符表示的 TokenType(例如=),并且只在下一个找到的token具有与请求的相同类型和值时才返回:
 1
 2
 3
 4
 5
 6
 7
 8
 9
10
11
12
13
14
15
16
17
| public Statement parseExpression() {
Token token = next(TokenType.Keyword, TokenType.Variable);
switch (token.getType()) {
case Variable:
next(TokenType.Operator, "="); //skip equals
Expression value;
if (peek(TokenType.Keyword, "new")) {
value = readInstance();
} else {
value = readExpression();
}
return new AssignStatement(token.getValue(), value, variables::put);
}
...
}
|
在等号运算符之后,我们读到一个表达式。当我们实例化一个结构时,一个表达式可以用new关键字开始。我们将在稍后介绍这种情况。为了在不增加位置和抛出错误的情况下消耗一个标记以验证其值,我们将创建一个额外的peek()方法,如果下一个标记与我们期望的相同,它将返回真值:
1
2
3
4
5
6
7
8
9
| ...
private boolean peek(TokenType type, String value) {
if (position < tokens.size()) {
Token token = tokens.get(position);
return type == token.getType() && token.getValue().equals(value);
}
return false;
}
...
|
变量表达式(Variable Expression)
首先,我们将介绍普通的变量表达式读取,它可以是一个字面意思,也可以是另一个变量,或者是一个带有运算符的更复杂的表达式。因此,readExpression()方法将返回具有相应实现的Expression。在这个方法中,我们声明左边的Expression实例。一个表达式只能以一个字面意思或另一个变量开始。因此,我们期望从我们的next()方法中获得Variable, Numeric, Logical or Text标记类型。在读取一个适当的标记后,我们在下面的switch case块内将其转换为适当的表达式对象,并将其分配给左边的Expression变量:
 1
 2
 3
 4
 5
 6
 7
 8
 9
10
11
12
13
14
15
16
17
| private Expression readExpression() {
Expression left;
Token token = next(TokenType.Variable, TokenType.Numeric, TokenType.Logical, TokenType.Text);
String value = token.getValue();
switch (token.getType()) {
case Numeric:
left = new NumericValue(Integer.parseInt(value));
case Logical:
left = new LogicalValue(Boolean.valueOf(value));
case Text:
left = new TextValue(value);
case Variable:
default:
left = new VariableExpression(value, variables::get);
}
...
}
|
在读完左边的变量或字面值后,我们希望能抓到一个Operator词组:
 1
 2
 3
 4
 5
 6
 7
 8
 9
10
11
12
| private Expression readExpression() {
Expression left;
Token token = next(TokenType.Variable, TokenType.Numeric, TokenType.Logical, TokenType.Text);
String value = token.getValue();
switch (token.getType()) {
...
}
Token operation = next(TokenType.Operator);
Class<? extends OperatorExpression> operatorType = Operator.getType(operation.getValue());
...
}
|
然后我们把我们的Operator词组映射到OperatorExpression对象上。要做到这一点,你可以使用一个switch block块,根据标记值返回适当的OperatorExpression类。我将使用枚举常量和一个适当的OperatorExpression类型:
 1
 2
 3
 4
 5
 6
 7
 8
 9
10
11
12
13
14
15
16
17
18
19
20
21
| @RequiredArgsConstructor
@Getter
public enum Operator {
Not("!", NotOperator.class),
Addition("+", AdditionOperator.class),
Subtraction("-", SubtractionOperator.class),
Equality("==", EqualsOperator.class),
GreaterThan(">", GreaterThanOperator.class),
LessThan("<", LessThanOperator.class),
StructureValue("::", StructureValueOperator.class);
private final String character;
private final Class<? extends OperatorExpression> operatorType;
public static Class<? extends OperatorExpression> getType(String character) {
return Arrays.stream(values())
.filter(t -> Objects.equals(t.getCharacter(), character))
.map(Operator::getOperatorType)
.findAny().orElse(null);
}
}
|
最后,我们读取右边的字面值或变量,正如我们对左边的Expression所做的那样。为了不重复代码,我们将读取Expression的内容提取到一个单独的NextExpression()方法中:
 1
 2
 3
 4
 5
 6
 7
 8
 9
10
11
12
13
14
15
| private Expression nextExpression() {
Token token = next(TokenType.Variable, TokenType.Numeric, TokenType.Logical, TokenType.Text);
String value = token.getValue();
switch (token.getType()) {
case Numeric:
return new NumericValue(Integer.parseInt(value));
case Logical:
return new LogicalValue(Boolean.valueOf(value));
case Text:
return new TextValue(value);
case Variable:
default:
return new VariableExpression(value, variables::get);
}
}
|
让我们重构readExpression()方法,用nextExpression()读取正确的词素。但是在我们读取正确的词素之前,我们需要确定我们的操作符支持两个操作数。我们可以检查我们的操作符是否扩展了BinaryOperatorExpression。在其他情况下,如果运算符是单数,我们只用左边的表达式来创建OperatorExpression。要创建一个OperatorExpression对象,我们要检索适合单数或二进制运算符实现的构造函数,然后用获得的早期表达式创建一个实例:
 1
 2
 3
 4
 5
 6
 7
 8
 9
10
11
12
13
14
15
16
17
18
19
20
| @SneakyThrows
private Expression readExpression() {
Expression left = nextExpression();
Token operation = next(TokenType.Operator);
Class<? extends OperatorExpression> operatorType = Operator.getType(operation.getValue());
if (BinaryOperatorExpression.class.isAssignableFrom(operatorType)) {
Expression right = nextExpression();
return operatorType
.getConstructor(Expression.class, Expression.class)
.newInstance(left, right);
} else if (UnaryOperatorExpression.class.isAssignableFrom(operatorType)) {
return operatorType
.getConstructor(Expression.class)
.newInstance(left);
}
return left;
}
|
此外,我们可以提供一个机会,用多个运算符创建一个长表达式,或者根本不用运算符,只用一个字面或变量。让我们把读入while循环的操作包围起来,条件是我们有一个操作符作为下一个词素。每次我们创建一个OperatorExpression,我们就把它分配给左边的表达式,这样就在一个Expression里面创建了一棵后续运算符树,直到我们读完整个表达式。最后,我们返回左边的表达式:
 1
 2
 3
 4
 5
 6
 7
 8
 9
10
11
12
13
14
15
16
17
18
19
20
21
22
23
24
25
26
27
28
29
30
| @SneakyThrows
private Expression readExpression() {
Expression left = nextExpression();
//recursively read an expression
while (peek(TokenType.Operator)) {
Token operation = next(TokenType.Operator);
Class<? extends OperatorExpression> operatorType = Operator.getType(operation.getValue());
if (BinaryOperatorExpression.class.isAssignableFrom(operatorType)) {
Expression right = nextExpression();
left = operatorType
.getConstructor(Expression.class, Expression.class)
.newInstance(left, right);
} else if (UnaryOperatorExpression.class.isAssignableFrom(operatorType)) {
left = operatorType
.getConstructor(Expression.class)
.newInstance(left);
}
}
return left;
}
private boolean peek(TokenType type) {
if (position < tokens.size()) {
Token token = tokens.get(position);
return token.getType() == type;
}
return false;
}
|
结构体实例(Structure instance)
在我们完成readExpression()的实现后,我们可以回到parseExpression(),并完成readInstance()的实现,以实例化一个结构实例:

根据我们语言的语义,我们知道我们的结构实例化是从new关键字开始的,我们可以通过调用next()方法跳过下一个标记。下一个词素将标志着结构名称,我们将其理解为Variable标记类型。在结构名称之后,我们希望收到方括号内的参数作为组的分隔符。在某些情况下,我们的结构可以在没有任何参数的情况下被创建。因此,我们首先使用 peek() 。每个传递给结构的参数可以意味着一个表达式,因此我们调用 readExpression() 并将结果传递到参数列表中。在建立结构参数之后,我们可以初步建立我们的StructureExpression,检索适当的StructureDefinition:
 1
 2
 3
 4
 5
 6
 7
 8
 9
10
11
12
13
14
15
16
17
18
19
20
21
22
23
24
25
| private Expression readInstance() {
next(TokenType.Keyword, "new"); //skip new
Token type = next(TokenType.Variable);
List<Expression> arguments = new ArrayList<>();
if (peek(TokenType.GroupDivider, "[")) {
next(TokenType.GroupDivider, "["); //skip open square bracket
while (!peek(TokenType.GroupDivider, "]")) {
Expression value = readExpression();
arguments.add(value);
}
next(TokenType.GroupDivider, "]"); //skip close square bracket
}
StructureDefinition definition = structures.get(type.getValue());
if (definition == null) {
throw new SyntaxException(String.format("Structure is not defined: %s", type.getValue()));
}
return new StructureExpression(definition, arguments, variables::get);
}
|
为了按名称检索StructureDefinition,我们必须将结构映射声明为StatementParser的字段,我们将在稍后的结构关键字分析中填充它:
 1
 2
 3
 4
 5
 6
 7
 8
 9
10
| public class StatementParser {
...
private final Map<String, StructureDefinition> structures;
public StatementParser(List<Token> tokens) {
...
this.structures = new HashMap<>();
}
...
}
|
3.7.2 关键字(Keyword)
English:
1 Introduction
In this tutorial, we will build our own programming language and compiler using Java (you can use any other language, preferably object-oriented). The purpose of the article is to help people who are looking for a way to create their own programming language and compiler. This is a toy example, but it will try to help you understand where to start and in which direction to move. The full source code is available over on GitHub
Each language has several stages from the source code to the final executable file. Each of the stages formats incoming data in a certain way:
- Lexical analysis in simple terms it’s a division of the source code into tokens. Each token can contain a different lexeme: keyword, identifier/variable, operator with the corresponding value, etc.
- Syntax analysis or parser converts a list of incoming tokens into the abstract syntax tree (AST), which allows you to structurally present the rules of the language being created. The process itself is quite simple as can be seen at the first glance, but with an increase of language constructions, it can become much more complicated.
- After AST has been built we can generate the code. Code is usually generated recursively using an abstract syntax tree. Our compiler for the sake of simplicity will produce statements during the syntax analysis.
We will create a simple language with the following abilities:
- assign the variables (numeric, logical and text)
- declare structures, create instances and accessing fields
- perform simple mathematical operations (addition, subtraction, NOT)
- print variables, values and more complex expressions with mathematical operators
- read numeric, logical and text values from the console
- perform if-then statements
There is an example of our language’s code, it’s a mix of Ruby and Python syntax:
 1
 2
 3
 4
 5
 6
 7
 8
 9
10
11
12
13
14
15
16
17
18
19
20
21
22
23
24
25
26
| struct Person
arg name
arg experience
arg is_developer
end
input your_name
input your_experience_in_years
input do_you_like_programming
person = new Person [your_name your_experience_in_years do_you_like_programming == "yes"]
print person
if person :: is_developer then
person_name = person :: name
print "hey " + person_name + "!"
experience = person :: experience
if experience > 0 then
started_in = 2022 - experience
print "you had started your career in " + started_in
end
end
|
2 Lexical analysis
First of all, we will start with the lexical analysis. Let’s imagine you got a message from a friend with the following content:
This expression is a little difficult to read. It’s just a set of letters without any meaning. This is because our natural lexical analyzer can’t find any appropriate word from our dictionary. However, if we put spaces correctly, everything becomes clear:
1
| “I enjoy reading books”
|
The lexical analyzer of a programming language works by the same principle. When we talk we highlight individual words by intonation and pauses to understand each other. In the same way we must provide the code to the lexical analyzer to make it understand us. If we write it wrong, the lexical analyzer will not be able to separate individual lexemes, words and syntax constructions.
There are six lexemes units (tokens) we will count in our programming language during lexical analysis:
- Space, carriage return, and other whitespace characters
These lexeme units do not make a lot of sense. You can’t declare any code blocks or function parameters by using a space. The main intent is to only help a developer to divide his code into separate lexemes. Therefore, the lexical analyzer will first of all look for spaces and newlines in order to understand how to highlight provided lexemes in the code.
- Operators:
+, -, =, <, >, ::
They can be a part of more complex compound statements. The equals sign can mean not only an assignment operator but can also combine a more complex equality compare operator, consisting of two = in a row. In this case, the lexical analyzer will try to read expressions from left to right trying to catch the longest operator.
- Group dividers:
[, ]
Group dividers can separate two group lexemes from each other. For example, an open square bracket can be used to mark the beginning of some specific group and a close square bracket will mark the end of the started group. In our language square brackets will be only used to declare struct instance arguments.
- Keywords:
print, input, struct, arg, end, new, if, then
A keyword is a set of alphabetic characters with some specific sense assigned by the compiler. For example, a combination of 5 letters print makes one word and it’s perceived by the language compiler as a console output statement definition. This meaning cannot be changed by a programmer. That’s the basic idea of keywords, they are language axioms that we combine to create our own statements - programs.
- Variables or identifiers
In addition to the keywords, we also need to take variables into account. A variable is a sequence of characters with some meaning given by a programmer, not a compiler. At the same time, we need to put certain restrictions on variable names. Our variables will contain only letters, numbers, and underscore characters. Other characters within the identifier cannot occur because most of the operators we described are delimiters and therefore cannot be part of another lexeme. In this case, the variable cannot begin with a digit due to the fact that the lexical analyzer detects a digit and immediately tries to match it with a number. Also, it’s important to note that the variable cannot be expressed by a keyword. It means that if our language defines the keyword print, then the programmer can’t introduce a variable with the same set of characters defined in the same order.
- Literals
If the given sequence of characters is not a keyword and is not a variable, the last option remains - it can be a literal constant. Our language will be able to define numeric, logical and text literals. Numeric literals are special variables containing digits. For the sake of simplicity, we will not use floating-point numbers (fractions), you can implement it yourself later. Logical literals can contain boolean values: false or true. Text literal is an arbitrary set of characters from the alphabet enclosed in double-quotes.
Now that we have the basic information about all possible lexemes in our programming language let’s dive into the code and start declaring our token types. We will use enum constants with the corresponding Pattern expression for each lexeme type. I will use Lombok annotations to minimize the boilerplate code:
 1
 2
 3
 4
 5
 6
 7
 8
 9
10
11
12
13
14
| @RequiredArgsConstructor
@Getter
public enum TokenType {
Whitespace("[\\s\\t\\n\\r]"),
Keyword("(if|then|end|print|input|struct|arg|new)"),
GroupDivider("(\\[|\\])"),
Logical("true|false"),
Numeric("[0-9]+"),
Text("\"([^\"]*)\""),
Variable("[a-zA-Z_]+[a-zA-Z0-9_]*"),
Operator("(\\+|\\-|\\>|\\<|\\={1,2}|\\!|\\:{2})");
private final String regex;
}
|
To simplify literals parsing I divided each of the literal types into a separate lexeme: Numeric, Logical and Text. For the Text literal we set a separate group ([^"]*) to grab literal value without double quotes. For the equals we declare {1,2} range. With two equal signs == we expect to get the compare operator instead of the assignment. To access a structure field we declared the double colon operator ::.
Now to find a token in our code we just iterate and filter all TokenType values applying regex on our source code. To match the beginning of the row we put the ^ meta character in the beginning of each regex expression creating a Pattern instance. The Text token will capture value without quotes into the separate group. Therefore, in order to access value without quotes we grab a value from group with index 1 if we have at least one explicit group:
1
2
3
4
5
6
7
8
| for (TokenType tokenType : TokenType.values()) {
Pattern pattern = Pattern.compile("^" + tokenType.getRegex());
Matcher matcher = pattern.matcher(sourceCode);
if (matcher.find()) {
// group(1) is used to get text literal without double quotes
String token = matcher.groupCount() > 0 ? matcher.group(1) : matcher.group();
}
}
|
To store found lexemes we need to declare the following Token class with type and value fields:
1
2
3
4
5
6
| @Builder
@Getter
public class Token {
private final TokenType type;
private final String value;
}
|
Now we have everything to create our lexical parser. We will receive the source code as a String in the constructor and initialize tokens List:
 1
 2
 3
 4
 5
 6
 7
 8
 9
10
11
| public class LexicalParser {
private final List<Token> tokens;
private final String source;
public LexicalParser(String source) {
this.source = source;
this.tokens = new ArrayList<>();
}
...
}
|
In order to retrieve all tokens from the source code we need to cut the source after each found lexeme. We will declare the nextToken() method that will accept the current index of the source code as an argument and grab the next token starting after the current position:
 1
 2
 3
 4
 5
 6
 7
 8
 9
10
11
12
13
14
15
16
17
18
19
20
21
| public class LexicalParser {
...
private int nextToken(int position) {
String nextToken = source.substring(position);
for (TokenType tokenType : TokenType.values()) {
Pattern pattern = Pattern.compile("^" + tokenType.getRegex());
Matcher matcher = pattern.matcher(nextToken);
if (matcher.find()) {
if (tokenType != TokenType.Whitespace) {
// group(1) is used to get text literal without double quotes
String value = matcher.groupCount() > 0 ? matcher.group(1) : matcher.group();
Token token = Token.builder().type(tokenType).value(value).build();
tokens.add(token);
}
return matcher.group().length();
}
}
throw new TokenException(String.format("invalid expression: `%s`", nextToken));
}
}
|
After successful capture we create a Token instance and accumulate it in the tokens list. We will not add the Whitespace lexemes as they are only used to divide two lexemes from each other. In the end we return the found lexeme’s length.
To capture all tokens in the source we create the parse() method with the while loop increasing source position each time we catch a token:
 1
 2
 3
 4
 5
 6
 7
 8
 9
10
11
12
13
| public class LexicalParser {
...
public List<Token> parse() {
int position = 0;
while (position < source.length()) {
position += nextToken(position);
}
return tokens;
}
...
}
|
3 Syntax analysis
Within our compiler model, the syntax analyzer will receive a list of tokens from the lexical analyzer and check whether this sequence can be generated by the language grammar. In the end this syntax analyzer should return an abstract syntax tree.
We will start the syntax analyzer by declaring the Expression interface:
1
2
| public interface Expression {
}
|
This interface will be used to declare literals, variables and composite expressions with operators.
3.1 Literals
First of all, we create Expression implementations for our language’s literal types: Numeric, Text and Logical with corresponding Java types: Integer, String and Boolean. We will create the base Value class with generic type extending Comparable (it will be used later with comparison operators):
 1
 2
 3
 4
 5
 6
 7
 8
 9
10
11
12
13
14
15
16
17
18
19
20
21
22
23
24
25
26
27
28
| @RequiredArgsConstructor
@Getter
public class Value<T extends Comparable<T>> implements Expression {
private final T value;
@Override
public String toString() {
return value.toString();
}
}
public class NumericValue extends Value<Integer> {
public NumericValue(Integer value) {
super(value);
}
}
public class TextValue extends Value<String> {
public TextValue(String value) {
super(value);
}
}
public class LogicalValue extends Value<Boolean> {
public LogicalValue(Boolean value) {
super(value);
}
}
|
We will also declare StructureValue for our structure instances:
1
2
3
4
5
| public class StructureValue extends Value<StructureExpression> {
public StructureValue(StructureExpression value) {
super(value);
}
}
|
StructureExpression will be covered a bit later.
3.2 Variables
Variable expression will have a single field representing its name:
1
2
3
4
5
| @AllArgsConstructor
@Getter
public class VariableExpression implements Expression {
private final String name;
}
|
3.3 Structures
In order to store a structure instance we will need to know the structure definition and arguments values we are passing to create an object. Argument values can signify any expressions including literals, variables and more complex expressions implementing Expression interface. Therefore, we will use Expression as values type:
 1
 2
 3
 4
 5
 6
 7
 8
 9
10
11
12
13
14
15
| @RequiredArgsConstructor
@Getter
public class StructureExpression implements Expression {
private final StructureDefinition definition;
private final List<Expression> values;
}
@RequiredArgsConstructor
@Getter
@EqualsAndHashCode(onlyExplicitlyIncluded = true)
public class StructureDefinition {
@EqualsAndHashCode.Include
private final String name;
private final List<String> arguments;
}
|
Values can be a type of the VariableExpression. We need a way to access the variable’s value by its name. I will delegate this responsibility to the Function interface which will accept variable name and return a Value object:
1
2
3
4
5
| ...
public class StructureExpression implements Expression {
...
private final Function<String, Value<?>> variableValue;
}
|
Now we can implement an interface to retrieve an argument’s value by name, it will be used to access the structure instance values. The getValue() method will be implemented a bit later:
 1
 2
 3
 4
 5
 6
 7
 8
 9
10
11
12
13
| ...
public class StructureExpression implements Expression {
…
public Value<?> getArgumentValue(String field) {
return IntStream
.range(0, values.size())
.filter(i -> definition.getArguments().get(i).equals(field))
.mapToObj(this::getValue) //will be implemented later
.findFirst()
.orElse(null);
}
}
|
Don’t forget our StructureExpression is used as a parameter for the StructureValue generic type which extends Comparable. Therefore, we must implement Comparable interface for our StructureExpression:
 1
 2
 3
 4
 5
 6
 7
 8
 9
10
11
12
13
14
15
16
17
18
| ...
public class StructureExpression implements Expression, Comparable<StructureExpression> {
...
@Override
public int compareTo(StructureExpression o) {
for (String field : definition.getArguments()) {
Value<?> value = getArgumentValue(field);
Value<?> oValue = o.getArgumentValue(field);
if (value == null && oValue == null) continue;
if (value == null) return -1;
if (oValue == null) return 1;
//noinspection unchecked,rawtypes
int result = ((Comparable) value.getValue()).compareTo(oValue.getValue());
if (result != 0) return result;
}
return 0;
}
}
|
We can also override the standard toString() method. It will be useful if we want to print an entire structure instance in the console:
 1
 2
 3
 4
 5
 6
 7
 8
 9
10
11
12
13
14
15
| ...
public class ObjectExpression implements Expression, Comparable<ObjectExpression> {
...
@Override
public String toString() {
return IntStream
.range(0, values.size())
.mapToObj(i -> {
Value<?> value = getValue(i); //will be implemented later
String fieldName = definition.getArguments().get(i);
return fieldName + " = " + value;
})
.collect(Collectors.joining(", ", definition.getName() + " [ ", " ]"));
}
}
|
3.4 Operators
In our language, we will have unary operators with 1 operand and binary operators with 2 operands.

Let’s implement the Expression interface for each of our operators. We declare OperatorExpression interface and create base implementations for unary and binary operators:
 1
 2
 3
 4
 5
 6
 7
 8
 9
10
11
12
13
14
15
| public interface OperatorExpression extends Expression {
}
@RequiredArgsConstructor
@Getter
public class UnaryOperatorExpression implements OperatorExpression {
private final Expression value;
}
@RequiredArgsConstructor
@Getter
public class BinaryOperatorExpression implements OperatorExpression {
private final Expression left;
private final Expression right;
}
|
We also need to declare an abstract calc() method for each of our operator implementations with corresponding values operands. This method will calculate the Value from operands depending on each operator’s essence. The operand’s transition from the Expression to the Value will be covered a bit later.
 1
 2
 3
 4
 5
 6
 7
 8
 9
10
11
| …
public abstract class UnaryOperatorExpression extends OperatorExpression {
…
public abstract Value<?> calc(Value<?> value);
}
…
public abstract class BinaryOperatorExpression extends OperatorExpression {
…
public abstract Value<?> calc(Value<?> left, Value<?> right);
}
|
After declaring base operator classes we can create more detailed implementations:
3.4.1 NOT !
This operator will only work with the LogicalValue returning the new LogicalValue instance with inverted value:
 1
 2
 3
 4
 5
 6
 7
 8
 9
10
11
| public class NotOperator extends UnaryOperatorExpression {
...
@Override
public Value<?> calc(Value<?> value) {
if (value instanceof LogicalValue) {
return new LogicalValue(!((LogicalValue) value.getValue()).getValue());
} else {
throw new ExecutionException(String.format("Unable to perform NOT operator for non logical value `%s`", value));
}
}
}
|
Now we will switch to the BinaryOperatorExpression implementations with two operands:
3.4.2 Addition +
The first one is addition. calc() method will make the addition of NumericValue objects. For the other Value types we will concat toString() values returning TextValue instance:
 1
 2
 3
 4
 5
 6
 7
 8
 9
10
11
12
13
14
| public class AdditionOperator extends BinaryOperatorExpression {
public AdditionOperator(Expression left, Expression right) {
super(left, right);
}
@Override
public Value<?> calc(Value<?> left, Value<?> right) {
if (left instanceof NumericValue && right instanceof NumericValue) {
return new NumericValue(((NumericValue) left).getValue() + ((NumericValue) right).getValue());
} else {
return new TextValue(left.toString() + right.toString());
}
}
}
|
3.4.3 Subtraction -
calc() will make getValue() comparison only if both values have NumericValue type. In the other case both values will be mapped to the String, removing 2nd value matches from the 1st value:
 1
 2
 3
 4
 5
 6
 7
 8
 9
10
11
| public class SubtractionOperator extends BinaryOperatorExpression {
...
@Override
public Value<?> calc(Value<?> left, Value<?> right) {
if (left instanceof NumericValue && right instanceof NumericValue) {
return new NumericValue(((NumericValue) left).getValue() - ((NumericValue) right).getValue());
} else {
return new TextValue(left.toString().replaceAll(right.toString(), ""));
}
}
}
|
3.4.4 Equals ==
calc() will make getValue() comparison only if both values have the same type. In the other case both values will be mapped to the String:
 1
 2
 3
 4
 5
 6
 7
 8
 9
10
11
12
13
| public class EqualsOperator extends BinaryOperatorExpression {
...
@Override
public Value<?> calc(Value<?> left, Value<?> right) {
boolean result;
if (Objects.equals(left.getClass(), right.getClass())) {
result = ((Comparable) left.getValue()).compareTo(right.getValue()) == 0;
} else {
result = ((Comparable) left.toString()).compareTo(right.toString()) == 0;
}
return new LogicalValue(result);
}
}
|
3.4.5 Less than < and greater than >
 1
 2
 3
 4
 5
 6
 7
 8
 9
10
11
12
13
14
15
16
17
18
19
20
21
22
23
24
25
26
27
| public class LessThanOperator extends BinaryOperatorExpression {
...
@Override
public Value<?> calc(Value<?> left, Value<?> right) {
boolean result;
if (Objects.equals(left.getClass(), right.getClass())) {
result = ((Comparable) left.getValue()).compareTo(right.getValue()) < 0;
} else {
result = left.toString().compareTo(right.toString()) < 0;
}
return new LogicalValue(result);
}
}
public class GreaterThanOperator extends BinaryOperatorExpression {
...
@Override
public Value<?> calc(Value<?> left, Value<?> right) {
boolean result;
if (Objects.equals(left.getClass(), right.getClass())) {
result = ((Comparable) left.getValue()).compareTo(right.getValue()) > 0;
} else {
result = left.toString().compareTo(right.toString()) > 0;
}
return new LogicalValue(result);
}
}
|
3.4.6 Structure value operator ::
To read a structure argument’s value we expect to receive the left value as a StructureValue type:
1
2
3
4
5
6
7
8
9
| public class StructureValueOperator extends BinaryOperatorExpression {
...
@Override
public Value<?> calc(Value<?> left, Value<?> right) {
if (left instanceof StructureValue)
return ((StructureValue) left).getValue().getArgumentValue(right.toString());
return left;
}
}
|
3.5 Value evaluation
If we want to pass variables or more complex Expression implementations to the operators including operators itself, we need a way to transform Expression object to the Value. To do this we declare evaluate() method in our Expression interface:
1
2
3
| public interface Expression {
Value<?> evaluate();
}
|
Value class will just return this instance:
1
2
3
4
5
6
7
| public class Value<T extends Comparable<T>> implements Expression {
...
@Override
public Value<?> evaluate() {
return this;
}
}
|
To implement evaluate() for the VariableExpression first we must provide an ability to get Value by variable’s name. We delegate this work to the Function field which will accept variable name and return corresponding Value object:
 1
 2
 3
 4
 5
 6
 7
 8
 9
10
11
12
13
14
| ...
public class VariableExpression implements Expression {
...
private final Function<String, Value<?>> variableValue;
@Override
public Value<?> evaluate() {
Value<?> value = variableValue.apply(name);
if (value == null) {
return new TextValue(name);
}
return value;
}
}
|
To evaluate the StructureExpression we will create a StructureValue instance. We need also implement the missing getValue() method that will accept an argument index and return value depending on the Expression type:
 1
 2
 3
 4
 5
 6
 7
 8
 9
10
11
12
13
14
15
16
17
| ...
public class StructureExpression implements Expression, Comparable<StructureExpression> {
...
@Override
public Value<?> evaluate() {
return new StructureValue(this);
}
private Value<?> getValue(int index) {
Expression expression = values.get(index);
if (expression instanceof VariableExpression) {
return variableValue.apply(((VariableExpression) expression).getName());
} else {
return expression.evaluate();
}
}
}
|
For the operator expressions we evaluate operand values and pass them to the calc() method:
 1
 2
 3
 4
 5
 6
 7
 8
 9
10
11
12
13
14
15
| public abstract class UnaryOperatorExpression extends OperatorExpression {
...
@Override
public Value<?> evaluate() {
return calc(getValue().evaluate());
}
}
public abstract class BinaryOperatorExpression extends OperatorExpression {
...
@Override
public Value<?> evaluate() {
return calc(getLeft().evaluate(), getRight().evaluate());
}
}
|
3.6 Statements
Before we start creating our syntax analyzer we need to introduce a model for our language’s statements. Let’s start with the Statement interface with the execute() proceeding method which will be called during code execution:
1
2
3
| public interface Statement {
void execute();
}
|
3.6.1 Print statement
The first statement we will implement is the PrintStatement. This statement needs to know the expression to print. Our language will support printing literals, variables and other expressions implementing Expression which will be evaluated during execution to calculate the Value object:
 1
 2
 3
 4
 5
 6
 7
 8
 9
10
11
| @AllArgsConstructor
@Getter
public class PrintStatement implements Statement {
private final Expression expression;
@Override
public void execute() {
Value<?> value = expression.evaluate();
System.out.println(value);
}
}
|
3.6.2 Assign statement
To declare an assignment we need to know the variable’s name and the expression we want to assign. Our language will be able to assign literals, variables and more complex expressions implementing Expression interface:
 1
 2
 3
 4
 5
 6
 7
 8
 9
10
11
| @AllArgsConstructor
@Getter
public class AssignStatement implements Statement {
private final String name;
private final Expression expression;
@Override
public void execute() {
...
}
}
|
During the execution we need to store the variables values somewhere. Let’s delegate this logic to the BiConsumer field which will pass a variable name and the assigning value. Note that Expression value needs to be evaluated while doing an assignment:
 1
 2
 3
 4
 5
 6
 7
 8
 9
10
| ...
public class AssignStatement implements Statement {
...
private final BiConsumer<String, Value<?>> variableSetter;
@Override
public void execute() {
variableSetter.accept(name, expression.evaluate());
}
}
|
In order to read an expression from the console we need to know the variable name to assign value to. During the execute() we must read a line from the console. This work can be delegated to the Supplier, thus we will not create multiple input streams. After reading the line we parse it to the corresponding Value object and delegate assignment to the BiConsumer instance as we did for the AssignStatement:
 1
 2
 3
 4
 5
 6
 7
 8
 9
10
11
12
13
14
15
16
17
18
19
20
21
22
23
24
25
| @AllArgsConstructor
@Getter
public class InputStatement implements Statement {
private final String name;
private final Supplier<String> consoleSupplier;
private final BiConsumer<String, Value<?>> variableSetter;
@Override
public void execute() {
//just a way to tell the user in which variable the entered value will be assigned
System.out.printf("enter \"%s\" >>> ", name.replace("_", " "));
String line = consoleSupplier.get();
Value<?> value;
if (line.matches("[0-9]+")) {
value = new NumericValue(Integer.parseInt(line));
} else if (line.matches("true|false")) {
value = new LogicalValue(Boolean.valueOf(line));
} else {
value = new TextValue(line);
}
variableSetter.accept(name, value);
}
}
|
3.6.4 Condition statement
First, we will introduce the CompositeStatement class which will contain internal list of statements to execute:
 1
 2
 3
 4
 5
 6
 7
 8
 9
10
11
12
13
14
| @Getter
public class CompositeStatement implements Statement {
private final List<Statement> statements2Execute = new ArrayList<>();
public void addStatement(Statement statement) {
if (statement != null)
statements2Execute.add(statement);
}
@Override
public void execute() {
statements2Execute.forEach(Statement::execute);
}
}
|
This class can be reused later in case we create composite statements construction. First of the constructions will be the Condition statement. To describe the condition we can use literals, variables and more complex constructions implementing the Expression interface. In the end during execution we calculate the value of the Expression and make sure the value is Logical and the result inside is truthy. Only in this case we can perform inner statements:
 1
 2
 3
 4
 5
 6
 7
 8
 9
10
11
12
13
14
15
16
17
| @RequiredArgsConstructor
@Getter
public class ConditionStatement extends CompositeStatement {
private final Expression condition;
@Override
public void execute() {
Value<?> value = condition.evaluate();
if (value instanceof LogicalValue) {
if (((LogicalValue) value).getValue()) {
super.execute();
}
} else {
throw new ExecutionException(String.format("Cannot compare non logical value `%s`", value));
}
}
}
|
3.7 Statement parser
Now we have the statements to work with our lexemes, we can now build the StatementParser. Inside the class we declare a list of tokens and mutable tokens’ position variable:
1
2
3
4
5
6
7
8
9
| public class StatementParser {
private final List<Token> tokens;
private int position;
public StatementParser(List<Token> tokens) {
this.tokens = tokens;
}
...
}
|
Then we create the parseExpression() method which will handle provided tokens and return a full-fledged statement:
1
2
3
| public Statement parseExpression() {
...
}
|
Our language expressions can only begin with declaring a variable or a keyword. Therefore, first we need to read a token and validate that it has the Variable or the Keyword token type. To handle this we declare a separate next() method with token types varargs as an argument which will validate that the next token has the same type. In truthy case we increment StatementParser’s position field and return the found token:
 1
 2
 3
 4
 5
 6
 7
 8
 9
10
11
12
13
14
15
16
17
| private Statement parseExpression() {
Token token = next(TokenType.Keyword, TokenType.Variable);
...
}
private Token next(TokenType type, TokenType... types) {
TokenType[] tokenTypes = org.apache.commons.lang3.ArrayUtils.add(types, type);
if (position < tokens.size()) {
Token token = tokens.get(position);
if (Stream.of(tokenTypes).anyMatch(t -> t == token.getType())) {
position++;
return token;
}
}
Token previousToken = tokens.get(position - 1);
throw new SyntaxException(String.format("After `%s` declaration expected any of the following lexemes `%s`", previousToken, Arrays.toString(tokenTypes)));
}
|
After we have found the appropriate token, we can build our statement depending on the token type.
3.7.1 Variable
Each variable assignment starts with the Variable token type, which we already did read. The next token we expect is the equals = operator. You can override the next() method that will accept TokenType with String operator representation (e.g.=) and return the next found token only if it has the same type and value as requested:
 1
 2
 3
 4
 5
 6
 7
 8
 9
10
11
12
13
14
15
16
17
| public Statement parseExpression() {
Token token = next(TokenType.Keyword, TokenType.Variable);
switch (token.getType()) {
case Variable:
next(TokenType.Operator, "="); //skip equals
Expression value;
if (peek(TokenType.Keyword, "new")) {
value = readInstance();
} else {
value = readExpression();
}
return new AssignStatement(token.getValue(), value, variables::put);
}
...
}
|
After the equals operator, we read an expression. An expression can start with the new keyword when we instantiate a structure. We will cover this case a bit later. To consume a token with intent to validate its value without incrementing position and throwing an error we will create an additional peek() method that will return true value if the next token is the same as we expect:
1
2
3
4
5
6
7
8
9
| ...
private boolean peek(TokenType type, String value) {
if (position < tokens.size()) {
Token token = tokens.get(position);
return type == token.getType() && token.getValue().equals(value);
}
return false;
}
...
|
To create an AssignStatement instance we need to pass a BiConsumer object to the constructor. Let’s go to the StatementParser fields declaration and add new Map variables field which will store variable name as a key and variable value as a value:
 1
 2
 3
 4
 5
 6
 7
 8
 9
10
| public class StatementParser {
...
private final Map<String, Value<?>> variables;
public StatementParser(List<Token> tokens) {
...
this.variables = new HashMap<>();
}
...
}
|
Variable Expression

First, we will cover the plain variable expression reading that can be a literal, another variable or a more complex expression with operators. Therefore, the readExpression() method will return the Expression with the corresponding implementations. Inside this method, we declare the left Expression instance. An expression can start only with a literal or with another variable. Thus, we expect to get the Variable, Numeric, Logical or Text token type from our next() method. After reading a proper token we transform it to the appropriate Expression object inside the following switch block and assign it to the left Expression variable:
 1
 2
 3
 4
 5
 6
 7
 8
 9
10
11
12
13
14
15
16
17
| private Expression readExpression() {
Expression left;
Token token = next(TokenType.Variable, TokenType.Numeric, TokenType.Logical, TokenType.Text);
String value = token.getValue();
switch (token.getType()) {
case Numeric:
left = new NumericValue(Integer.parseInt(value));
case Logical:
left = new LogicalValue(Boolean.valueOf(value));
case Text:
left = new TextValue(value);
case Variable:
default:
left = new VariableExpression(value, variables::get);
}
...
}
|
After left variable or literal has been read we expect to catch an Operator lexeme:
 1
 2
 3
 4
 5
 6
 7
 8
 9
10
11
12
| private Expression readExpression() {
Expression left;
Token token = next(TokenType.Variable, TokenType.Numeric, TokenType.Logical, TokenType.Text);
String value = token.getValue();
switch (token.getType()) {
...
}
Token operation = next(TokenType.Operator);
Class<? extends OperatorExpression> operatorType = Operator.getType(operation.getValue());
...
}
|
Then we map our Operator lexeme to the OperatorExpression object. To do it you can use a switch block returning proper OperatorExpression class depending on the token value. I will use enum constants with an appropriate OperatorExpression type:
 1
 2
 3
 4
 5
 6
 7
 8
 9
10
11
12
13
14
15
16
17
18
19
20
21
| @RequiredArgsConstructor
@Getter
public enum Operator {
Not("!", NotOperator.class),
Addition("+", AdditionOperator.class),
Subtraction("-", SubtractionOperator.class),
Equality("==", EqualsOperator.class),
GreaterThan(">", GreaterThanOperator.class),
LessThan("<", LessThanOperator.class),
StructureValue("::", StructureValueOperator.class);
private final String character;
private final Class<? extends OperatorExpression> operatorType;
public static Class<? extends OperatorExpression> getType(String character) {
return Arrays.stream(values())
.filter(t -> Objects.equals(t.getCharacter(), character))
.map(Operator::getOperatorType)
.findAny().orElse(null);
}
}
|
In the end we read the right literal or variable as we did for the left Expression. In order to not duplicate code we extract reading Expression into a separate nextExpression() method:
 1
 2
 3
 4
 5
 6
 7
 8
 9
10
11
12
13
14
15
| private Expression nextExpression() {
Token token = next(TokenType.Variable, TokenType.Numeric, TokenType.Logical, TokenType.Text);
String value = token.getValue();
switch (token.getType()) {
case Numeric:
return new NumericValue(Integer.parseInt(value));
case Logical:
return new LogicalValue(Boolean.valueOf(value));
case Text:
return new TextValue(value);
case Variable:
default:
return new VariableExpression(value, variables::get);
}
}
|
Let’s refactor the readExpression() method and read the right lexeme using nextExpression(). But before we read the right lexeme we need to be sure that our operator supports two operands. We can check if our operator extends the BinaryOperatorExpression. In the other case if the operator is unary we create an OperatorExpression only using the left expression. To create an OperatorExpression object we retrieve suitable constructor for unary or binary operator implementation and then create an instance with obtained earlier expressions:
 1
 2
 3
 4
 5
 6
 7
 8
 9
10
11
12
13
14
15
16
17
18
19
20
| @SneakyThrows
private Expression readExpression() {
Expression left = nextExpression();
Token operation = next(TokenType.Operator);
Class<? extends OperatorExpression> operatorType = Operator.getType(operation.getValue());
if (BinaryOperatorExpression.class.isAssignableFrom(operatorType)) {
Expression right = nextExpression();
return operatorType
.getConstructor(Expression.class, Expression.class)
.newInstance(left, right);
} else if (UnaryOperatorExpression.class.isAssignableFrom(operatorType)) {
return operatorType
.getConstructor(Expression.class)
.newInstance(left);
}
return left;
}
|
Additionally, we can provide an opportunity to create a long-expression with multiple operators or without operators at all with only one literal or variable. Let’s enclose the operation read into the while loop with the condition that we have an Operator as the next lexeme. Each time we create an OperatorExpression, we assign it to the left expression thus creating a tree of subsequent operators inside one Expression until we read the whole expression. In the end we return the left expression:
 1
 2
 3
 4
 5
 6
 7
 8
 9
10
11
12
13
14
15
16
17
18
19
20
21
22
23
24
25
26
27
28
29
30
| @SneakyThrows
private Expression readExpression() {
Expression left = nextExpression();
//recursively read an expression
while (peek(TokenType.Operator)) {
Token operation = next(TokenType.Operator);
Class<? extends OperatorExpression> operatorType = Operator.getType(operation.getValue());
if (BinaryOperatorExpression.class.isAssignableFrom(operatorType)) {
Expression right = nextExpression();
left = operatorType
.getConstructor(Expression.class, Expression.class)
.newInstance(left, right);
} else if (UnaryOperatorExpression.class.isAssignableFrom(operatorType)) {
left = operatorType
.getConstructor(Expression.class)
.newInstance(left);
}
}
return left;
}
private boolean peek(TokenType type) {
if (position < tokens.size()) {
Token token = tokens.get(position);
return token.getType() == type;
}
return false;
}
|
Structure instance
After we completed the readExpression() implementation we can go back to the parseExpression() and finish the readInstance() implementation to instantiate a structure instance:

According to our language’s semantics we know that our structure instantiation starts with the new keyword, we can skip the next token by calling the next() method. The next lexeme will signify the structure name, we read it as the Variable token type. After the structure name we expect to receive arguments inside square brackets as group dividers. In some cases our structure can be created without any arguments at all. Therefore, we use peek() first. Each passing argument to the structure can mean an expression, thus we call readExpression() and pass the result to the arguments list. After building structure arguments we can build our StructureExpression preliminarily retrieving appropriate StructureDefinition:
 1
 2
 3
 4
 5
 6
 7
 8
 9
10
11
12
13
14
15
16
17
18
19
20
21
22
23
24
25
| private Expression readInstance() {
next(TokenType.Keyword, "new"); //skip new
Token type = next(TokenType.Variable);
List<Expression> arguments = new ArrayList<>();
if (peek(TokenType.GroupDivider, "[")) {
next(TokenType.GroupDivider, "["); //skip open square bracket
while (!peek(TokenType.GroupDivider, "]")) {
Expression value = readExpression();
arguments.add(value);
}
next(TokenType.GroupDivider, "]"); //skip close square bracket
}
StructureDefinition definition = structures.get(type.getValue());
if (definition == null) {
throw new SyntaxException(String.format("Structure is not defined: %s", type.getValue()));
}
return new StructureExpression(definition, arguments, variables::get);
}
|
To retrieve the StructureDefinition by name we must declare the structures map as StatementParser’s field, we will fill it later during struct keyword analysis:
 1
 2
 3
 4
 5
 6
 7
 8
 9
10
| public class StatementParser {
...
private final Map<String, StructureDefinition> structures;
public StatementParser(List<Token> tokens) {
...
this.structures = new HashMap<>();
}
...
}
|
3.7.2 Keyword
Now we can continue working on the parseExpression() method when we receive the Keyword lexeme:
 1
 2
 3
 4
 5
 6
 7
 8
 9
10
11
12
13
14
15
| public Statement parseExpression() {
...
switch (token.getType()) {
case Variable:
...
case Keyword:
switch (token.getValue()) {
case "print":
case "input":
case "if":
case "struct":
}
...
}
}
|
Our language expression can start with print, input, if and struct keywords.
Print
To read the printing value we call the already created readExpression() method. It will read a literal, variable or more complex Expression implementation as we did for the variable assignment. Then we create and return an instance of the PrintStatement:
1
2
3
4
5
| ...
case "print":
Expression expression = readExpression();
return new PrintStatement(expression);
...
|
For the input statement, we need to know the variable name we assign value to. Therefore, we ask the next() method to catch the next Variable token for us:
1
2
3
4
5
| ...
case "input":
Token variable = next(TokenType.Variable);
return new InputStatement(variable.getValue(), scanner::nextLine, variables::put);
...
|
To create an InputStatement instance we introduce a Scanner object in the StatementParser fields declaration which will help us to read a line from the console:
1
2
3
4
5
6
7
8
9
10
| public class StatementParser {
...
private final Scanner scanner;
public StatementParser(List<Token> tokens) {
...
this.scanner = new Scanner(System.in);
}
...
}
|
If
The next statement we will touch is if/then condition:
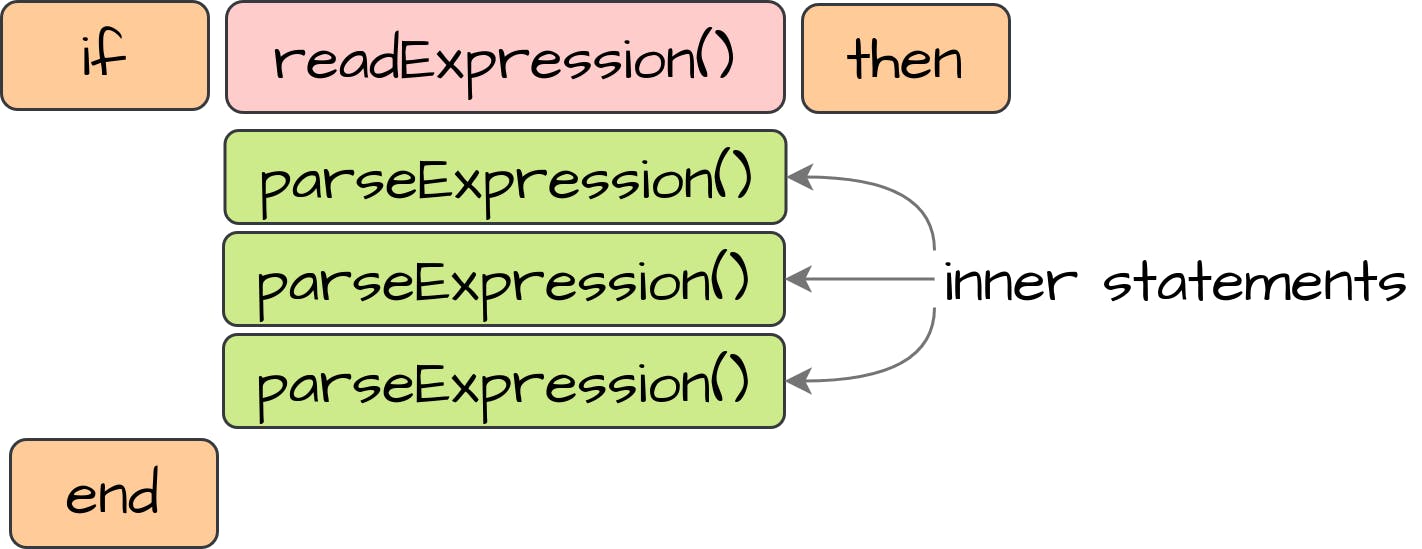
Firstly, when we receive the if keyword, we read the condition expression by calling readExpression(). Then according to our language semantics, we need to catch the then keyword. Inside our condition we can declare other statements including other condition statements. Therefore, we recursively add parseExpression() to the condition’s inner statements until we will read the finalizing end keyword:
1
2
3
4
5
6
7
8
9
10
11
12
13
14
| ...
case "if":
Expression condition = readExpression();
next(TokenType.Keyword, "then"); //skip then
ConditionStatement conditionStatement = new ConditionStatement(condition);
while (!peek(TokenType.Keyword, "end")) {
Statement statement = parseExpression();
conditionStatement.addStatement(statement);
}
next(TokenType.Keyword, "end"); //skip end
return conditionStatement;
...
|
Struct
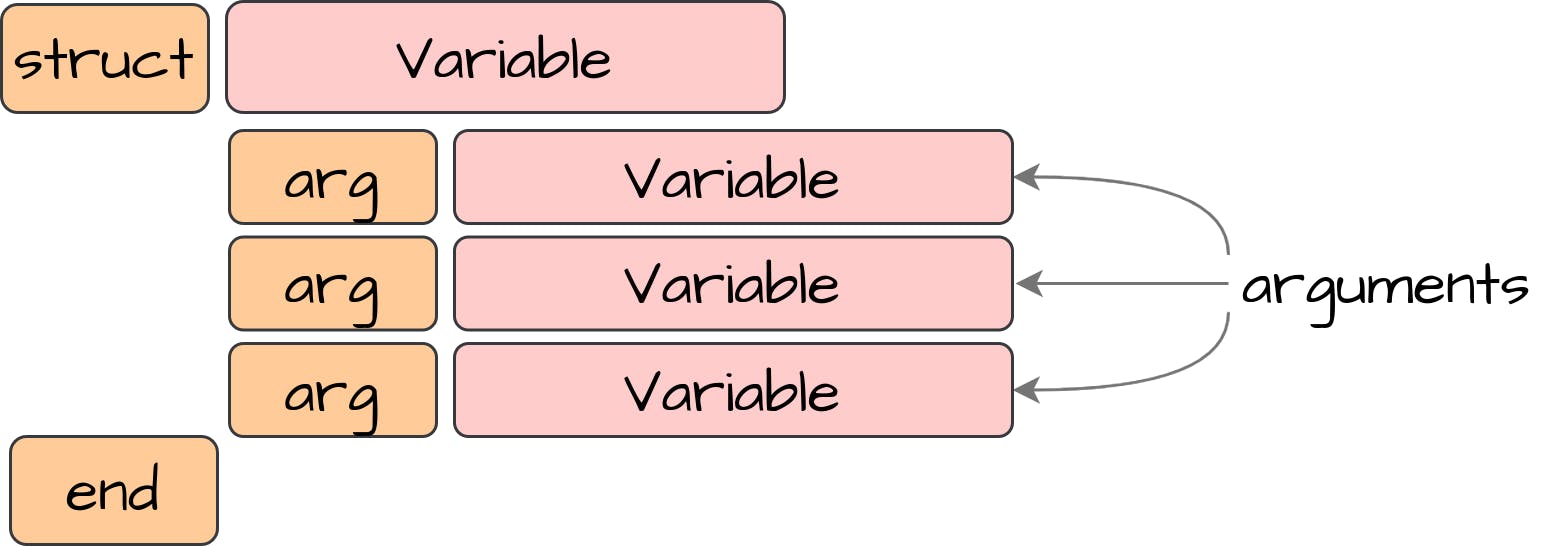
Structure declaration is quite simple because it consists only of Variable and Keyword token types. After reading the struct keyword we expect to read the Structure name as Variable token type. Then we read arguments until we end up with the end keyword. In the end we build our StructureDefinition and put it in the structures map to be accessed in the future when we’ll create a structure instance:
1
2
3
4
5
6
7
8
9
10
11
12
13
14
15
16
17
| ...
case "struct":
Token type = next(TokenType.Variable);
Set<String> args = new HashSet<>();
while (!peek(TokenType.Keyword, "end")) {
next(TokenType.Keyword, "arg");
Token arg = next(TokenType.Variable);
args.add(arg.getValue());
}
next(TokenType.Keyword, "end"); //skip end
structures.put(type.getValue(), new StructureDefinition(type.getValue(), new ArrayList<>(args)));
return null;
...
|
The complete parseExpression() method:
1
2
3
4
5
6
7
8
9
10
11
12
13
14
15
16
17
18
19
20
21
22
23
24
25
26
27
28
29
30
31
32
33
34
35
36
37
38
39
40
41
42
43
44
45
46
47
48
49
50
51
52
53
54
55
56
| ...
public Statement parseExpression() {
Token token = next(TokenType.Keyword, TokenType.Variable);
switch (token.getType()) {
case Variable:
next(TokenType.Operator, "="); //skip equals
Expression value;
if (peek(TokenType.Keyword, "new")) {
value = readInstance();
} else {
value = readExpression();
}
return new AssignStatement(token.getValue(), value, variables::put);
case Keyword:
switch (token.getValue()) {
case "print":
Expression expression = readExpression();
return new PrintStatement(expression);
case "input":
Token variable = next(TokenType.Variable);
return new InputStatement(variable.getValue(), scanner::nextLine, variables::put);
case "if":
Expression condition = readExpression();
next(TokenType.Keyword, "then"); //skip then
ConditionStatement conditionStatement = new ConditionStatement(condition);
while (!peek(TokenType.Keyword, "end")) {
Statement statement = parseExpression();
conditionStatement.addStatement(statement);
}
next(TokenType.Keyword, "end"); //skip end
return conditionStatement;
case "struct":
Token type = next(TokenType.Variable);
Set<String> args = new HashSet<>();
while (!peek(TokenType.Keyword, "end")) {
next(TokenType.Keyword, "arg");
Token arg = next(TokenType.Variable);
args.add(arg.getValue());
}
next(TokenType.Keyword, "end"); //skip end
structures.put(type.getValue(), new StructureDefinition(type.getValue(), new ArrayList<>(args)));
return null;
}
default:
throw new SyntaxException(String.format("Statement can't start with the following lexeme `%s`", token));
}
}
...
|
To find and accumulate all statements we create parse() method that will parse all expressions from the given tokens and return CompositeStatement instance:
1
2
3
4
5
6
7
8
9
10
| ...
public Statement parse() {
CompositeStatement root = new CompositeStatement();
while (position < tokens.size()) {
Statement statement = parseExpression();
root.addStatement(statement);
}
return root;
}
...
|
4 ToyLanguage
We finished with the lexical and syntax analyzer. Now we can gather both implementations into the ToyLanguage class and finally run our language:
1
2
3
4
5
6
7
8
9
10
11
| public class ToyLanguage {
@SneakyThrows
public void execute(Path path) {
String source = Files.readString(path);
LexicalParser lexicalParser = new LexicalParser(source);
List<Token> tokens = lexicalParser.parse();
StatementParser statementParser = new StatementParser(tokens);
Statement statement = statementParser.parse();
statement.execute();
}
}
|
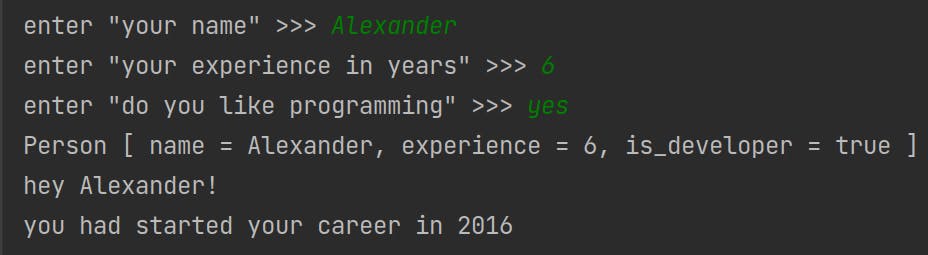
5 Wrapping Up
In this tutorial, we built our own language with lexical and syntax analysis. I hope this article will be useful to someone. I highly recommend you to try writing your own language, despite the fact that you have to understand a lot of implementation details. This is a learning, self-improving, and interesting experiment!
Building Your Own Programming Language From Scratch: Part II - Dijkstra’s Two-Stack Algorithm
1 Introduction
In this article we will improve mathematical expressions evaluation for our programming language (please see Part I) using Dijkstra’s Two-Stack algorithm. The essence of this algorithm is that any complex expression ultimately comes down to the simple expression. In the end, It will be a unary or binary operation on one/two operands.
How Dijkstra’s Two-Stack algorithm works:
- We iterate tokens expression
- If our token is an operand (e.g. number), we push it into the operands stack
- If we find an operator, we push into the operators stack
- We pop operators with the higher priority than the current one and apply it on the top operand(s)
- If an opening parenthesis is found, we push it into the operands stack.
- If a closing parenthesis is found, pop all operators and apply it on the top operand(s) until the opening parenthesis will be reached, and finally pop the opening parenthesis.
Example
Let’s suppose we have the following expression: 2 * (3 + 4) - 5. When we calculate this expression first we summarize 3 and 4 in the parentheses. After that, we multiply the result by 2. And in the end we subtract 5 from the result. Down below is the expression evaluation using Dijkstra’s Two-Stack algorithm:
- Push
2 to the operands stack:

- Push
* to operators:
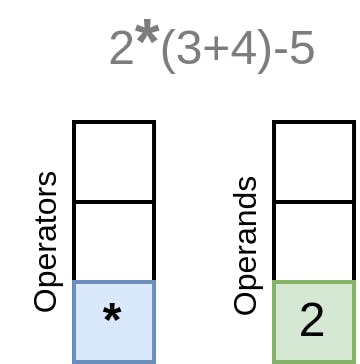
- Push
( to operands:
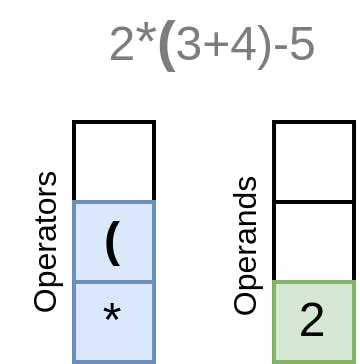
- Push
3 to operands:
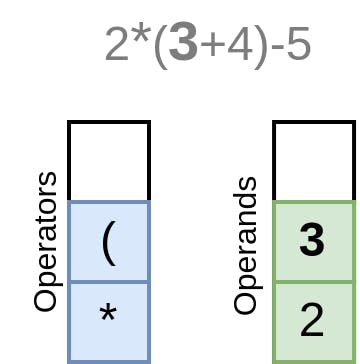
- Push
+ to operators:
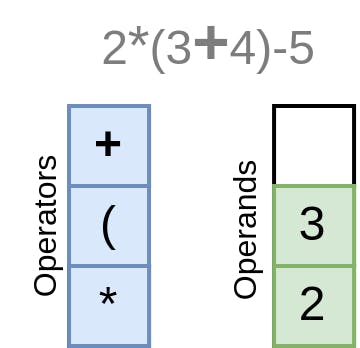
- Push
4 to operands:
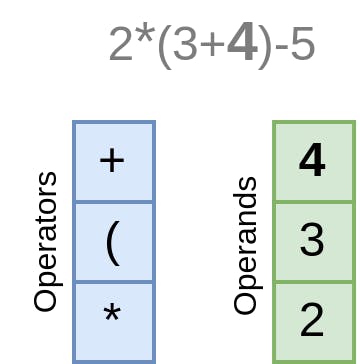
- Push
) to operators. Closing parenthesis pops an operation until a nearest opening parenthesis (. Therefore, we pop top operator and apply it on the two top operands:
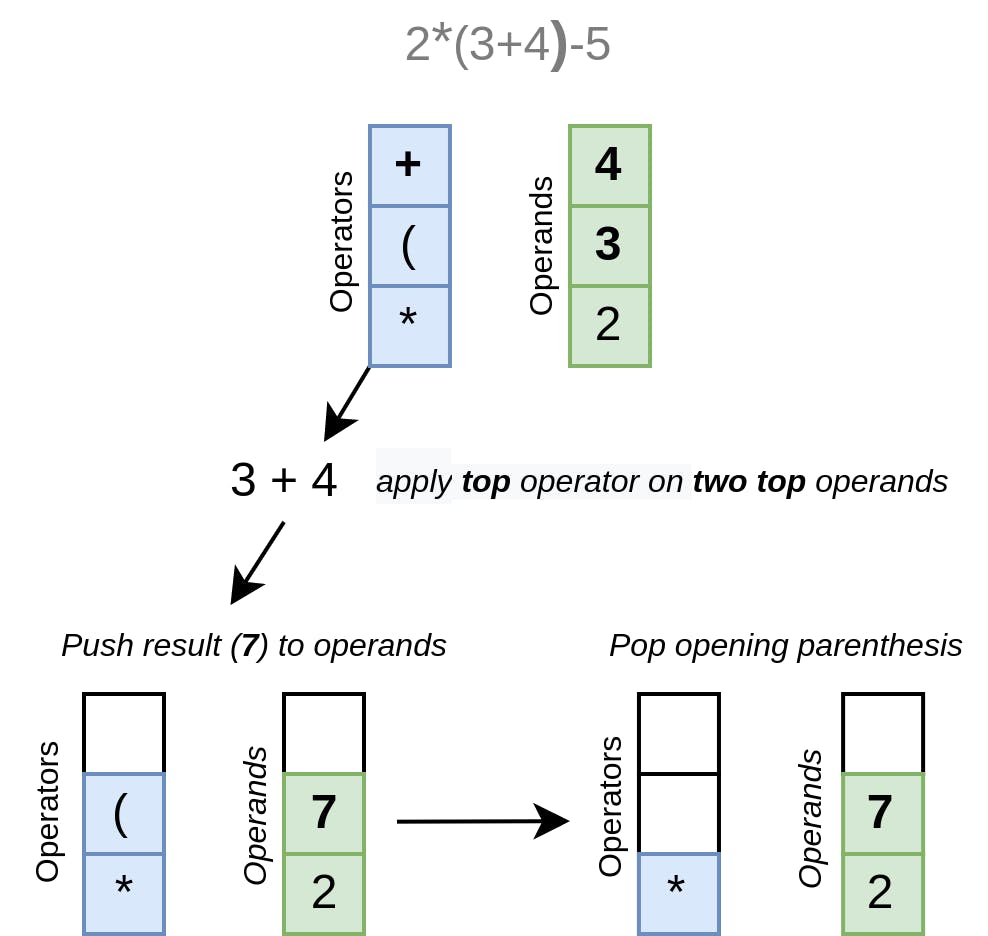
- Push
- to operators. The operators stack’s top element * has greater precedence than the current operator -. Therefore, first we apply top operator on two top operands:
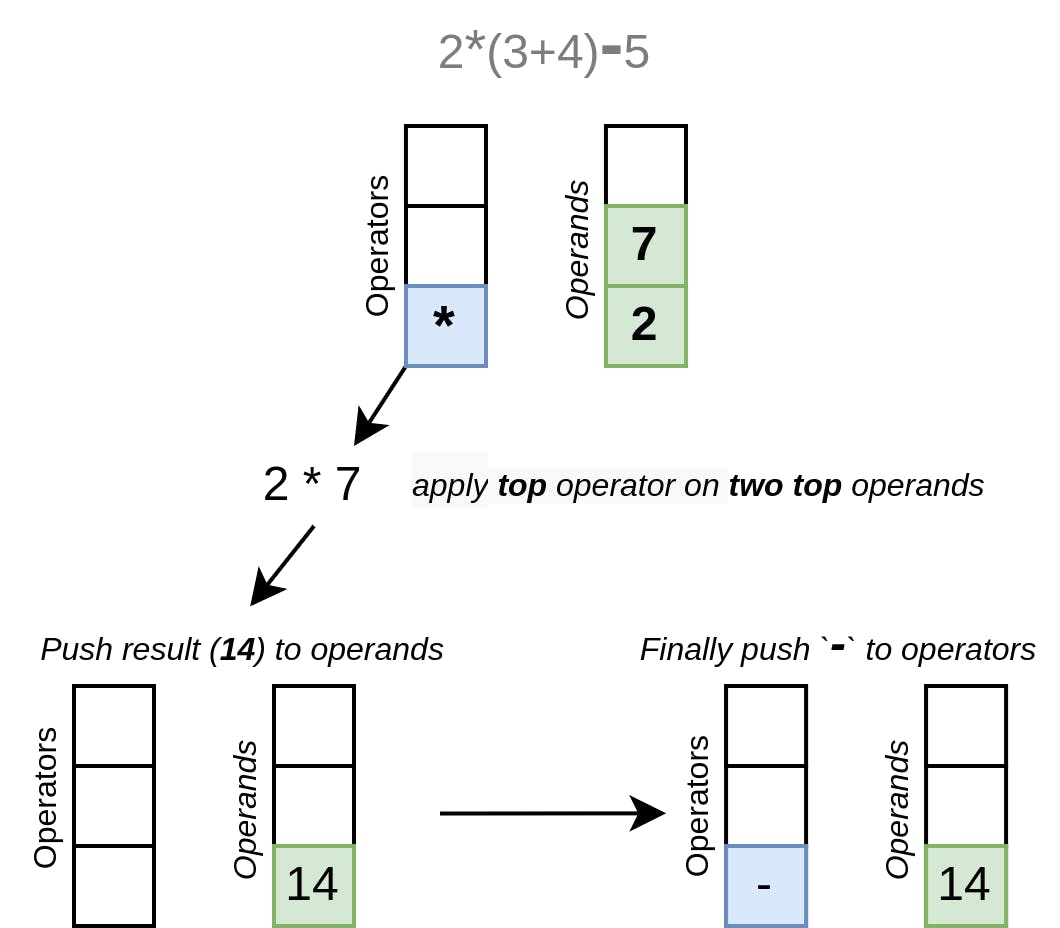
- Push
5 to operands:
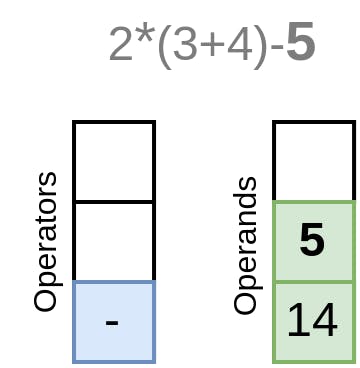
- Pop left
- operator:
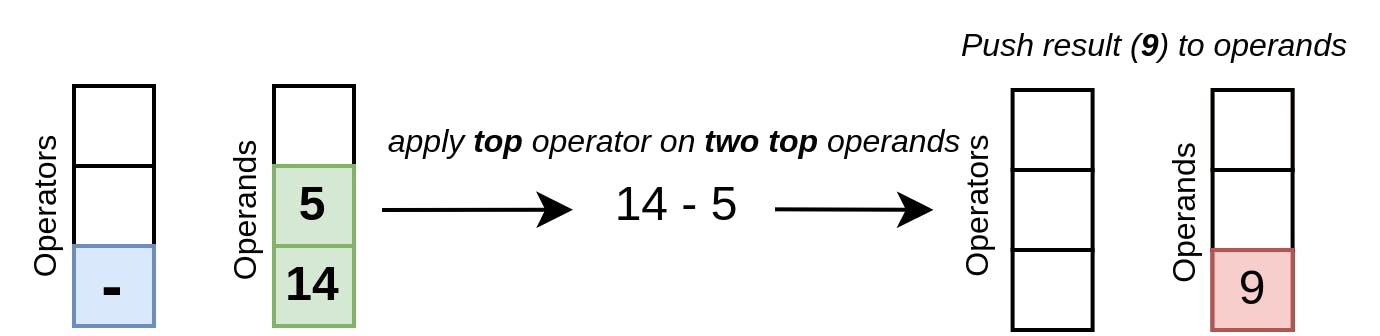
2 Operators
Let’s dive into the code. First, we will update our Operator enum including operators precedence and introduce a few new operators:
1
2
3
4
5
6
7
8
9
10
11
12
13
14
15
16
17
18
19
20
21
22
23
24
25
26
27
28
29
30
| @RequiredArgsConstructor
@Getter
public enum Operator {
Not("!", NotOperator.class, 5),
StructureValue("::", StructureValueOperator.class, 5),
Addition("+", AdditionOperator.class, 3),
Subtraction("-", SubtractionOperator.class, 3),
LessThan("<", LessThanOperator.class, 2),
GreaterThan(">", GreaterThanOperator.class, 2);
private final String character;
private final Class<? extends OperatorExpression> type;
private final Integer precedence;
Operator(String character, Integer precedence) {
this(character, null, precedence);
}
public static Operator getType(String character) {
return Arrays.stream(values())
.filter(t -> Objects.equals(t.getCharacter(), character))
.findAny().orElse(null);
}
public boolean greaterThan(Operator o) {
return getPrecedence().compareTo(o.getPrecedence()) > 0;
}
}
|
1
2
3
4
5
6
7
8
9
10
11
12
13
14
15
| public class StatementParser {
...
private Expression readExpression() {
...
while (peek(TokenType.Operator)) {
Token operation = next(TokenType.Operator);
Operator operator = Operator.getType(operation.getValue());
Class<? extends OperatorExpression> operatorType = operator.getType();
...
}
...
}
...
}
|
2.1 StructureInstance
We will no longer mark new as the keyword lexeme, it will be the operator which will help us to instantiate a structure object inside a more complex expression:
1
2
3
4
5
6
| public enum TokenType {
...
Keyword("(if|then|end|print|input|struct|arg)"),
Operator("(\\+|\\-|\\>|\\<|\\={1,2}|\\!|\\:{2}|new)");
...
}
|
We set it the highest priority:
1
2
3
4
5
| public enum Operator {
...
StructureInstance("new", StructureInstanceOperator.class, 5),
...
}
|
1
2
3
4
5
6
7
8
9
10
| public class StructureInstanceOperator extends UnaryOperatorExpression {
public StructureInstanceOperator(Expression value) {
super(value);
}
@Override
public Value<?> calc(Value<?> value) {
return value; //will return toString() value
}
}
|
2.2 Multiplication & Division
We will also include two more operators with higher priority than addition and subtraction. Don’t forget to add regex expression for each operator to be counted when we’re doing lexical analysis:
1
2
3
4
5
| public enum TokenType {
...
Operator("(\\+|\\-|\\>|\\<|\\={1,2}|\\!|\\:{2}|new|\\*|\\/)");
...
}
|
1
2
3
4
5
6
| public enum Operator {
...
Multiplication("*", MultiplicationOperator.class, 4),
Division("/", DivisionOperator.class, 4),
...
}
|
2.3 LeftParen & RightParen
These operators will be used to change operator’s precedence by surrounding expression in the parentheses. We will not create OperatorExpression implementations as we make an expression calculation using parentheses:
1
2
3
4
5
| public enum TokenType {
...
Operator("(\\+|\\-|\\>|\\<|\\={1,2}|\\!|\\:{2}|new|\\*|\\/|\\(|\\))");
...
}
|
1
2
3
4
5
6
| public enum Operator {
...
LeftParen("(", 1),
RightParen(")", 1),
...
}
|
2.4 Assignment
We also need to introduce a new assignment operator with a single equal = sign. The variable value will be assigned to the variable only when we complete evaluation of the right expression. Therefore, this operator should have the lowest priority:
1
2
3
4
5
| public enum Operator {
...
Assignment("=", AssignmentOperator.class, 6),
...
}
|
1
2
3
4
5
6
7
8
9
10
11
12
13
| public class AssignOperator extends BinaryOperatorExpression {
public AssignOperator(Expression left, Expression right) {
super(left, right);
}
@Override
public Value<?> calc(Value<?> left, Value<?> right) {
if (getLeft() instanceof VariableExpression) {
((VariableExpression) getLeft()).setValue(right);
}
return left;
}
}
|
During the execution we expect to retrieve the left expression as a VariableExpression - the variable we’re assigning value to. Thus, we introduce a new method in our VariableExpression to set the variable value. As you may remember our variables Map is being stored in the StatementParser. To set access it and set a new value we introduce a BiConsumer instance, passing variable name as a key and variable value as a new value:
1
2
3
4
5
6
7
8
9
| public class VariableExpression implements Expression {
...
private final BiConsumer<String, Value<?>> setter;
...
public void setValue(Value<?> value) {
setter.accept(name, value);
}
}
|
1
2
3
4
5
6
7
8
| public class StatementParser {
...
private Expression nextExpression() {
...
return new VariableExpression(value, variables::get, variables::put);
}
...
}
|
2.5 Expression dividers
2.5.1 End of the row
Previously, to build a mathematical expression we expected to obtain an operator after each operand:
1
2
3
4
5
6
7
8
9
10
11
12
13
14
15
16
17
18
| Expression left = nextExpression();
//recursively read an expression
while (peek(TokenType.Operator)) {
Token operation = next(TokenType.Operator);
Operator operator = Operator.getType(operation.getValue());
Class<? extends OperatorExpression> operatorType = operator.getType();
if (BinaryOperatorExpression.class.isAssignableFrom(operatorType)) {
Expression right = nextExpression();
left = operatorType
.getConstructor(Expression.class, Expression.class)
.newInstance(left, right);
} else if (UnaryOperatorExpression.class.isAssignableFrom(operatorType)) {
left = operatorType
.getConstructor(Expression.class)
.newInstance(left);
}
}
|
With the current behavior we can expect two subsequent operators in the row, e.g. addition of structure instantiation as an right operand or two following opening parentheses:
1
2
3
4
5
| value + new Car [“E30” “325i”] :: model
or
( ( 1 + 2) * 3) - 4
|
To read an entire expression with any sequence of operands and operators we will introduce the LineBreak lexeme which will help us to catch all expression tokens until we reach end of the row:
1
2
3
4
5
| public class StatementParser {
LineBreak("[\\n\\r]"),
Whitespace("[\\s\\t]"),
...
}
|
2.5.2 Structure arguments
The second divider we need to count is when we instantiate a structure object:
1
| new Car [ “E30” “325i” new Engine [“M20B25”] :: model ]
|
This structure instantiation is quite complex for the StatementParser to divide each passing argument into separate expression. To deal with it we can introduce new comma GroupDivider:
1
2
3
4
5
| public enum TokenType {
...
GroupDivider("(\\[|\\]|\\,)"),
...
}
|
1
| new Car [ “E30”, “325i”, new Engine [“M20B25”] :: model ]
|
3 Expression evaluation
Now we can start refactoring our expression evaluation in the StatementParser using Dijkstra’s Two-Stack algorithm.
3.1 Next token
Firstly, we will introduce skipLineBreaks() method, that will increment tokens position while we reach LineBreak token:
1
2
3
4
| private void skipLineBreaks() {
while (tokens.get(position).getType() == TokenType.LineBreak
&& ++position != tokens.size()) ;
}
|
It will be used on the top of each next() and peek() methods to escape catching LineBreak token:
1
2
3
4
5
6
7
8
9
10
11
12
13
14
15
16
17
18
19
| private Token next(TokenType type, TokenType... types) {
skipLineBreaks();
...
}
private Token next(TokenType type, String value) {
skipLineBreaks();
...
}
private boolean peek(TokenType type, String content) {
skipLineBreaks();
...
}
private boolean peek(TokenType type) {
skipLineBreaks();
...
}
|
We will also override the next() method without any arguments just returning the next token:
1
2
3
4
| private Token next() {
skipLineBreaks();
return tokens.get(position++);
}
|
3.2 ExpressionReader
To read and calculate an entire expression using Dijkstra’s Two-Stack algorithm we will need two stacks, the operators stack, and the operands stack. The first stack of operators will contain the Operator enum types. The second stack of operands will have Expression type, it will help us to store every type of expression including values, variables and composite operators. It will be clearer if we perform expression reading in a separate inner class ExpressionReader:
1
2
3
4
5
6
7
8
9
| private class ExpressionReader {
private final Stack<Expression> operands;
private final Stack<Operator> operators;
private ExpressionReader() {
this.operands = new Stack<>();
this.operators = new Stack<>();
}
}
|
Then we create a readExpression() method with a while loop to read an entire expression. Our mathematical expression can begin with Operator, Variable, Numeric , Logical or Text token types. In this case we can’t exclude the LineBreak token during token retrieval because this token means the end of the expression. Therefore, we introduce an additional peek() method inside our inner class that will read an expression until we reach the end of the row:
1
2
3
4
5
6
7
8
9
10
11
12
13
14
15
16
17
18
19
20
21
22
23
24
| private class ExpressionReader {
...
private Expression readExpression() {
while (peek(TokenType.Operator, TokenType.Variable, TokenType.Numeric, TokenType.Logical, TokenType.Text)) {
Token token = next();
switch (token.getType()) {
case Operator:
...
default:
...
}
}
...
}
private boolean peek(TokenType type, TokenType... types) {
TokenType[] tokenTypes = ArrayUtils.add(types, type);
if (position < tokens.size()) {
Token token = tokens.get(position);
return Stream.of(tokenTypes).anyMatch(t -> t == token.getType());
}
return false;
}
}
|
3.2.1 Operator
The first lexeme type we will process is Operator. We retrieve the Operator enum by token’s value and use it in the switch block. There are 3 cases we will deal with:
LeftParen - just put an operator into the operators stackRightParen - calculate previously pushed expressions until we reach the left parenthesis LeftParen.- Before inserting other operators we need to be sure that the current operator has greater precedence than the top operator, in the negative case we pop the top operator and apply it on the top operand(s). In the end we push the less prioritized operator into the operators stack.
1
2
3
4
5
6
7
8
9
10
11
12
13
14
15
16
17
18
19
20
21
| ...
case Operator:
Operator operator = Operator.getType(token.getValue());
switch (operator) {
case LeftParen:
operators.push(operator);
break;
case RightParen:
//until left parenthesis is not reached
while (!operators.empty() && operators.peek() != Operator.LeftParen)
applyTopOperator();
operators.pop(); //pop left parenthesis
break;
default:
//until top operator has greater precedence
while (!operators.isEmpty() && operators.peek().greaterThan(operator))
applyTopOperator();
operators.push(operator); // finally, add less prioritized operator
}
break;
...
|
To apply the top operator on the top operand(s) we create an additional applyTopOperator() method. First we pop an operator and the first operand. Then if our operator is binary we pop the second operand. To create an OperatorExpression object we retrieve a suitable constructor for unary or binary operator implementation and make an instance with earlier popped operands. In the end we push the OperatorExpression instance to the operands stack. Thus, this pushed operand Expression can be used later by other operators inside a more composite expression:
1
2
3
4
5
6
7
8
9
10
11
12
13
14
15
16
17
18
19
20
| @SneakyThrows
private void applyTopOperator() {
// e.g. a + b
Operator operator = operators.pop();
Class<? extends OperatorExpression> operatorType = operator.getType();
Expression left = operands.pop();
if (BinaryOperatorExpression.class.isAssignableFrom(operatorType)) {
Expression right = operands.pop();
operands.push(operatorType
.getConstructor(Expression.class, Expression.class)
.newInstance(right, left));
} else if (UnaryOperatorExpression.class.isAssignableFrom(operatorType)) {
// e.g. new Instance []
operands.push(operatorType
.getConstructor(Expression.class)
.newInstance(left));
} else {
throw new SyntaxException(String.format("Operator `%s` is not supported", operatorType));
}
}
|
3.2.2 Value & VariableExpression
If our token is a variable or a literal, we transform it to the appropriate Expression object inside the following switch block and then push the result to the operands stack:
1
2
3
4
5
6
7
8
9
10
11
12
13
14
15
16
17
18
19
20
21
22
23
24
| ...
default:
String value = token.getValue();
Expression operand;
switch (token.getType()) {
case Numeric:
operand = new NumericValue(Integer.parseInt(value));
break;
case Logical:
operand = new LogicalValue(Boolean.valueOf(value));
break;
case Text:
operand = new TextValue(value);
break;
case Variable:
default:
if (!operators.isEmpty() && operators.peek() == Operator.StructureInstance) {
operand = readInstance(token);
} else {
operand = new VariableExpression(value, variables::get, variables::put);
}
}
operands.push(operand);
...
|
A variable token can also indicate the start of the structure instantiation. In this case we read an entire structure expression with arguments inside square brackets and only then assign it to the StructureExpression value. We will move existent readInstance() method from StatementParser class into the inner ExpressionReader class with following changes:
1
2
3
4
5
6
7
8
9
10
11
12
13
14
15
16
17
18
19
20
21
22
23
24
25
26
| ...
private Expression readInstance(Token token) {
StructureDefinition definition = structures.get(token.getValue());
List<Expression> arguments = new ArrayList<>();
if (StatementParser.this.peek(TokenType.GroupDivider, "[")) {
next(TokenType.GroupDivider, "["); //skip open square bracket
while (!StatementParser.this.peek(TokenType.GroupDivider, "]")) {
Expression value = new ExpressionReader().readExpression();
arguments.add(value);
if (StatementParser.this.peek(TokenType.GroupDivider, ","))
next();
}
next(TokenType.GroupDivider, "]"); //skip close square bracket
}
if (definition == null) {
throw new SyntaxException(String.format("Structure is not defined: %s", token.getValue()));
}
return new StructureExpression(definition, arguments, variables::get);
}
...
|
3.2.3 Evaluation
After we finished processing expression tokens and reached the end of the expression we will need an extra while loop to pop remaining operators and apply it on the top operand(s). In the end we should have the only one resulting composite operand in the operands stack, we return it as a final expression result:
1
2
3
4
5
6
7
8
9
| private Expression readExpression() {
...
while (!operators.isEmpty()) {
applyTopOperator();
}
return operands.pop();
}
|
3.3 AssignStatement
Now we can now build AssignmentStatement in the parseExpression() method. The AssignStatement can start with a Variable or an Operator token type (in case we have a new operator for the structure instantiation). When we read an expression we expect to read an entire Assignment expression accumulating left value as a variable name and right expression as a variable value. Therefore, we go to one tokens position back and start reading the expression using ExpressionReader starting from variable’s name declaration:
1
2
3
4
5
6
7
8
9
10
11
12
13
| private Statement parseExpression() {
Token token = next(TokenType.Keyword, TokenType.Variable, TokenType.Operator);
switch (token.getType()) {
case Variable:
case Operator:
position--;
Expression value = new ExpressionReader().readExpression();
...
case Keyword:
default:
...
}
}
|
In the end we expect to obtain the complete AssignmentOperator and we can create an AssignmentStatement instance:
1
2
3
4
5
6
7
8
9
10
11
12
13
| ...
case Variable:
case Operator:
position--;
Expression value = new ExpressionReader().readExpression();
if (value instanceof AssignmentOperator) {
VariableExpression variable = (VariableExpression) ((AssignmentOperator) value).getLeft();
return new AssignmentStatement(variable.getName(), ((AssignmentOperator) value).getRight(), variables::put);
} else {
throw new SyntaxException(String.format("Unsupported statement: `%s`", value));
}
...
|
The last thing we need to do is to update expressions reading for the input and if statements using our new inner ExpressionReader class. It will allow us to read complex expression inside print and if statements:
1
2
3
4
5
6
7
8
9
10
11
12
| ...
case Keyword:
default:
switch (token.getValue()) {
case "print":
Expression expression = new ExpressionReader().readExpression();
...
case "if":
Expression condition = new ExpressionReader().readExpression();
...
}
...
|
4 Wrapping up
In this article, we improved our own programming language with mathematical expressions evaluation using Dijkstra’s Two-Stack algorithm. We injected operators priority with an ability to change it using parentheses, including complex structure instantiations. The full source code is available over on GitHub.
Build Your Own Programming Language Part III: Improving Lexical Analysis with Regex Lookaheads
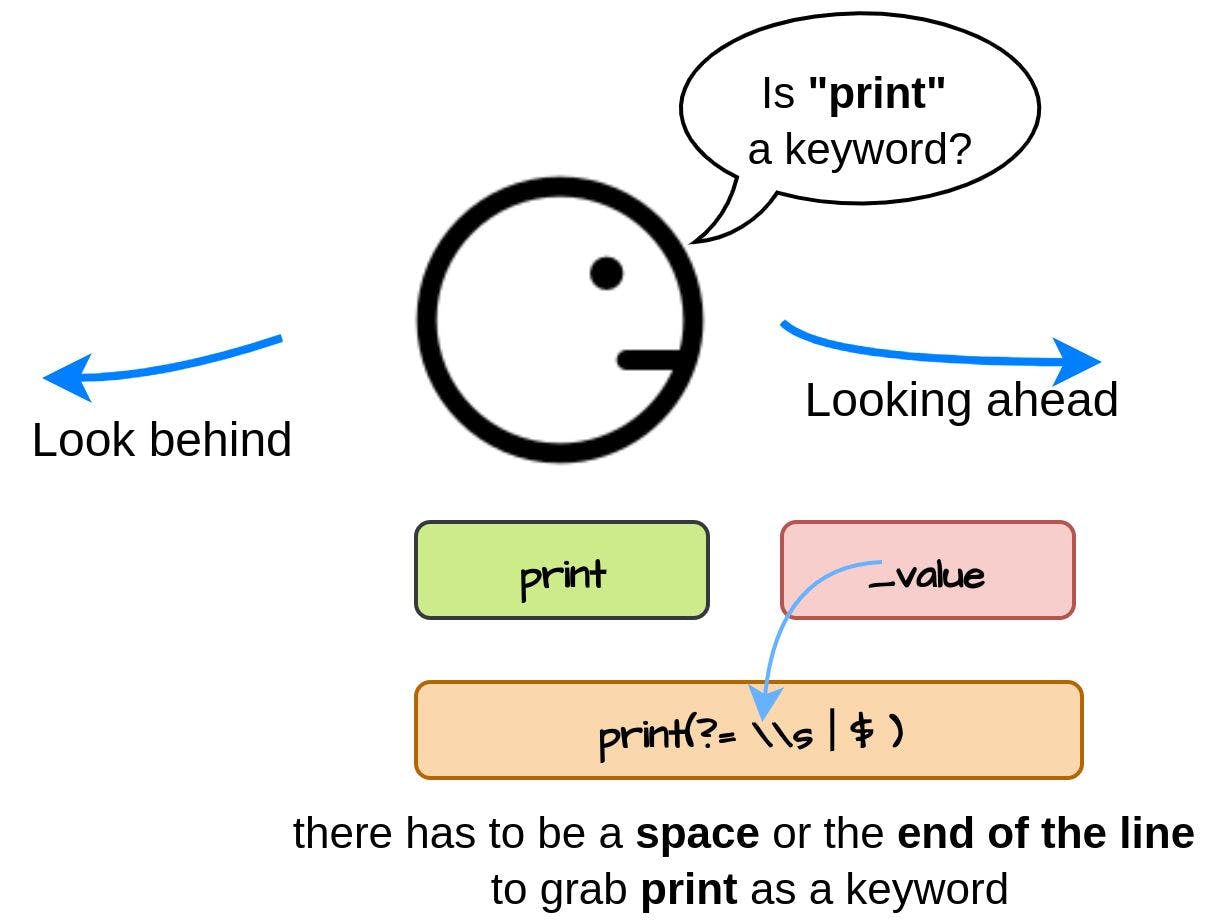
In this part of creating your own programming language, we will improve our lexical analysis with Regex lookaheads and lookbehinds (please check out Part I and Part II).
Basically, lookaheads and lookbehinds allow you to create your own ^ and $ sub-expressions (anchors). With their help, you can set up a condition that will be met at the beginning and at the end of the line or won’t, and this condition will not be a part of the “matched” expression.
Lookbehind can “look” back and should be placed at the beginning of the regular expression. Lookahead “looks” forward and accordingly should be placed at the end.
There are four types of lookaheads and lookbehinds with corresponding regex syntax:
- Positive lookahead:
(?=pattern) - Negative lookahead
(?!pattern) - Positive lookbehind
(?<=pattern) - Negative lookbehind
(?<!pattern)
Let’s dive into code and see how we can improve lexical analysis for our programming language. We will go through the declared Token types with the corresponding regex value to define an appropriate lexeme:
Keyword lexeme if|then|end|print|input|struct|arg
Let’s suppose we defined a variable starting with a Keyword:
1
2
| print_value = 5
print print_value
|
During the lexical analysis we will capture this print_value variable by the Keyword lexeme instead of being parsed as a variable. To read it properly, we need to be sure that after the keyword is placed either a space or the end of the line. It could be done with the help of a positive lookahead in the end of the Keyword expression:
1
| (if|then|end|print|input|struct|arg)(?=\\s|$)
|
- Logical lexeme
true|false
The same rule is applied to the Logical lexeme:
To read the Logical lexeme properly, it should be separated either by space or by the end of the line:
- Numeric lexeme
[0-9]+
For the Numeric values, we will introduce the ability to read floating-point numbers with a decimal point and numbers with a negative/positive sign in front of the number:
1
2
3
4
| negative_value = -123
float_value = 123.456
leading_dot_float_value = .123
ending_dot_float_value = 123.
|
First, to match optional + or - we add a character class:
Then to read a float number, we introduce a dot character with arbitrary numbers set after it:
There could be a special case when our number starts with a leading dot, so we add an extra alternation:
1
| [+-]?([0-9]+[.]?[0-9]*|[.][0-9]+)
|
We can also replace an alternation by applying a positive lookahead with a requirement to contain maximum 1 dot and at least 1 number after an arbitrary sign declaration. In this case, our main expression for the float number will have a greedy * quantifier:
1
| [+-]?((?=[.]?[0-9])[0-9]*[.]?[0-9]*)
|
Lastly, to map floating-point numbers, we modify NumericValue to accept Double type as a generic Value type:
1
2
3
4
5
6
7
8
9
10
11
12
| public class NumericValue extends Value<Double> {
public NumericValue(Double value) {
super(value);
}
@Override
public String toString() {
if ((getValue() % 1) == 0) //print integer without fractions
return String.valueOf(getValue().intValue());
return super.toString();
}
}
|
- Operator
([+]|[-]|[*]|[/]|[>]|[<]|[=]{1,2}|[!]|[:]{2}|[(]|[)]|new)
1
2
3
4
5
| struct Object
arg number
end
new_value = new Object [ 5 ]
|
For the new operator, we as well need to introduce a positive lookahead separating value with a space or with the end of the line:
1
| ([+]|[-]|[*]|[/]|[>]|[<]|[=]{1,2}|[!]|[:]{2}|[(]|[)]|new(?=\s|$))
|
In this part we slightly improved our lexical analyzer with positive lookaheads. Now our toy language is a little bit smarter and able to parse more complex variable expressions.
Building Your Own Programming Language From Scratch Part IV: Implementing Functions
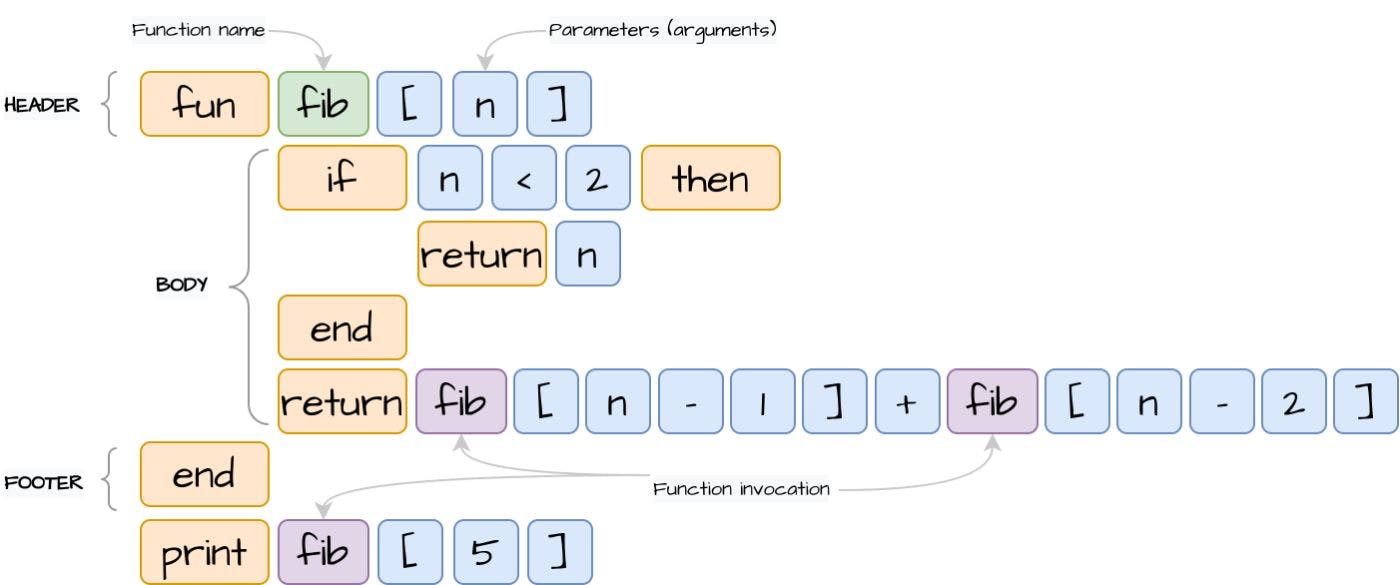
In this part of creating your own programming language, we will introduce new function constructions. Please checkout the previous parts:
- Building Your Own Programming Language From Scratch
- Building Your Own Programming Language From Scratch: Part II - Dijkstra’s Two-Stack Algorithm
- Build Your Own Programming Language Part III: Improving Lexical Analysis with Regex Lookaheads
The full source code is available over on GitHub.
1. Function Design
We will begin embedding function constructions with the lexical analyzer. As you may remember from the previous parts, we store language lexeme types in the TokenType enum with corresponding regular expressions.
With the new function statement, we’re missing the fun and return keywords. The first fun will stand for the beginning of the function declaration, the second return will be used to exit the function and pass the resulting value. Therefore, we add these missing keywords as “or” expressions:
1
2
3
4
5
6
7
8
| package org.example.toylanguage.token;
...
public enum TokenType {
...
Keyword("(if|then|end|print|input|struct|fun|return)(?=\\s|$)"),
...
}
|
Then we will map the fun and return keywords inside the syntax analyzer. The purpose of the syntax analyzer is to build statements from tokens generated by the lexical analyzer in the first step. But before diving into parsing function expressions, we will add a couple of auxiliary classes, which are required to store and manage function expressions.
1.1 Function Statement
First, we need a class for the function statement. It should extend the existing CompositeStatement, which will allow to store inner statements as the early created ConditionStatement (if/then):
1
2
3
4
| package org.example.toylanguage.statement;
public class FunctionStatement extends CompositeStatement {
}
|
1.2 Function Definition
In order to store function declarations with all metadata information, we need a function definition class. We already have StructureDefinition for structures.
Let’s initialize a new one for the functions. It will contain the following fields: function name, function arguments and the FunctionStatement itself, which will be used later when we meet the actual function invocation to access inner function statements:
1
2
3
4
5
6
7
8
9
10
11
| package org.example.toylanguage.definition;
@RequiredArgsConstructor
@Getter
@EqualsAndHashCode(onlyExplicitlyIncluded = true)
public class FunctionDefinition implements Definition {
@EqualsAndHashCode.Include
private final String name;
private final List<String> arguments;
private final FunctionStatement statement;
}
|
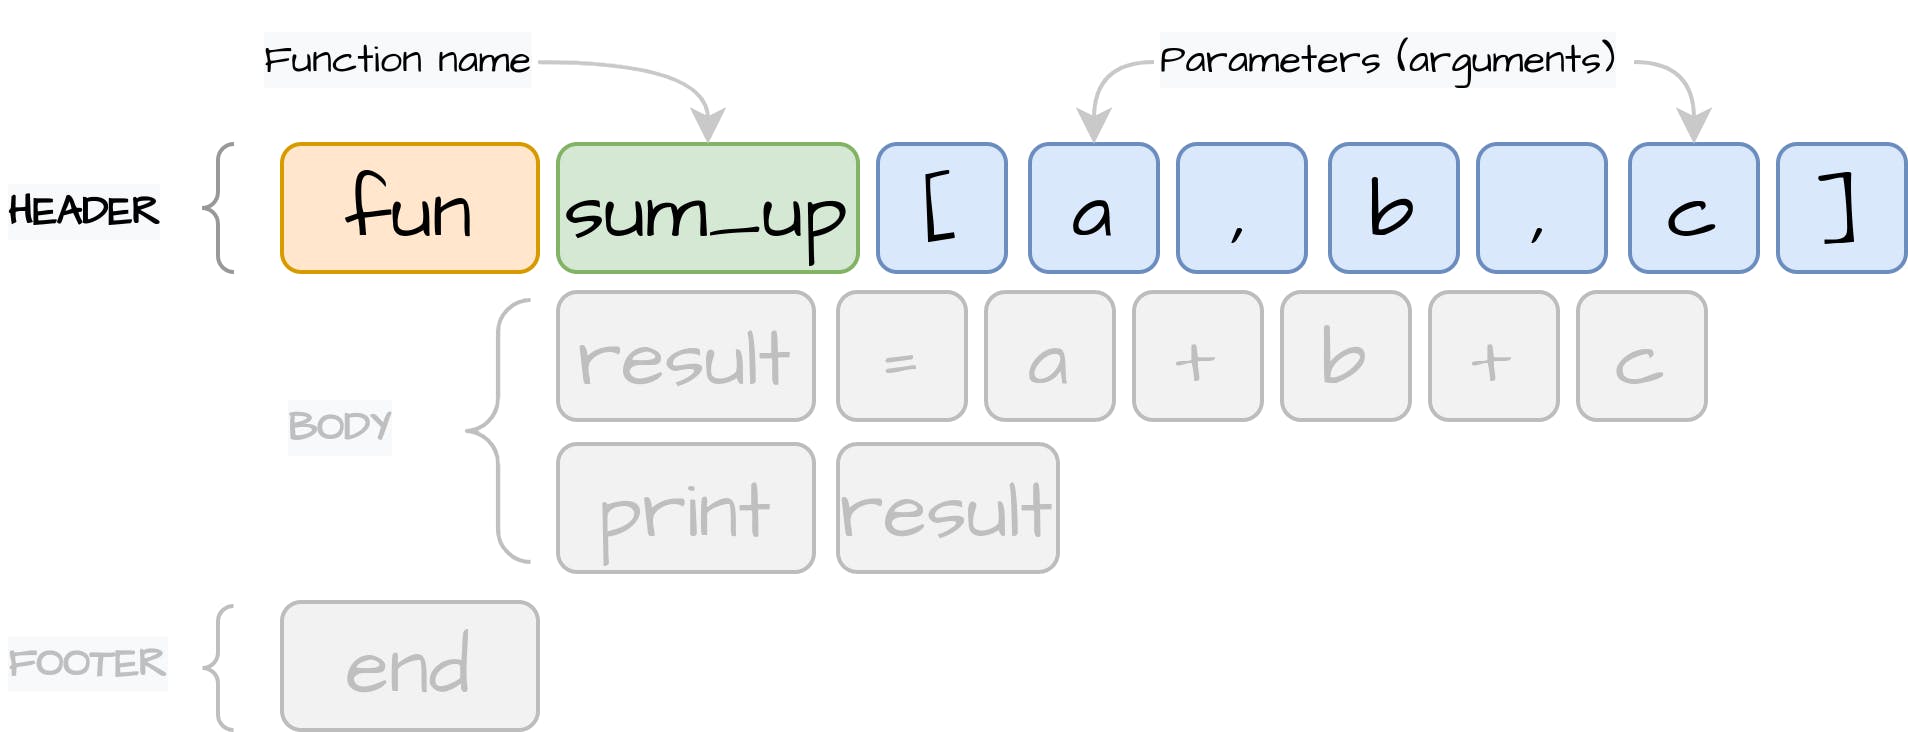
Now we have classes to read a function definition and function inner statements, we can start reading the function header. We will extend the existent StatementParser#parseExpression() method to read the new fun Keyword:
1
2
3
4
5
6
7
8
9
10
11
12
13
14
15
16
17
18
19
20
| package org.example.toylanguage;
public class StatementParser {
...
private Statement parseExpression() {
Token token = next(TokenType.Keyword, TokenType.Variable, TokenType.Operator);
switch (token.getType()) {
...
case Keyword:
switch (token.getValue()) {
...
case "fun":
...
}
default:
...
}
}
}
|
After we successfully caught fun Keyword, we will read the function name:
1
2
3
4
| ...
case "fun":
Token type = tokens.next(TokenType.Variable);
...
|
After the function name, we expect to receive the function arguments surrounded by square brackets and divided by comma:
1
2
3
4
5
6
7
8
9
10
11
12
13
14
15
16
17
18
19
20
21
22
| ...
case "fun":
Token type = tokens.next(TokenType.Variable);
List<String> args = new ArrayList<>();
if (tokens.peek(TokenType.GroupDivider, "[")) {
tokens.next(TokenType.GroupDivider, "["); //skip open square bracket
while (!tokens.peek(TokenType.GroupDivider, "]")) {
Token arg = tokens.next(TokenType.Variable);
args.add(arg.getValue());
if (tokens.peek(TokenType.GroupDivider, ","))
tokens.next();
}
tokens.next(TokenType.GroupDivider, "]"); //skip close square bracket
}
...
|
In the next step, we initialize the FunctionDefinition instance and add it to the functions HashMap, which will be used later by inner ExpressionReader to construct function invocations:
1
2
3
4
5
6
7
8
9
10
11
12
13
14
15
16
17
18
19
| public class StatementParser {
...
private final Map<String, FunctionDefinition> functions;
...
public StatementParser(List<Token> tokens) {
...
this.functions = new HashMap<>();
}
...
case "fun":
...
FunctionStatement functionStatement = new FunctionStatement();
FunctionDefinition functionDefinition = new FunctionDefinition(type.getValue(), args, functionStatement);
functions.put(type.getValue(), functionDefinition);
...
}
|
1.4 Function Body
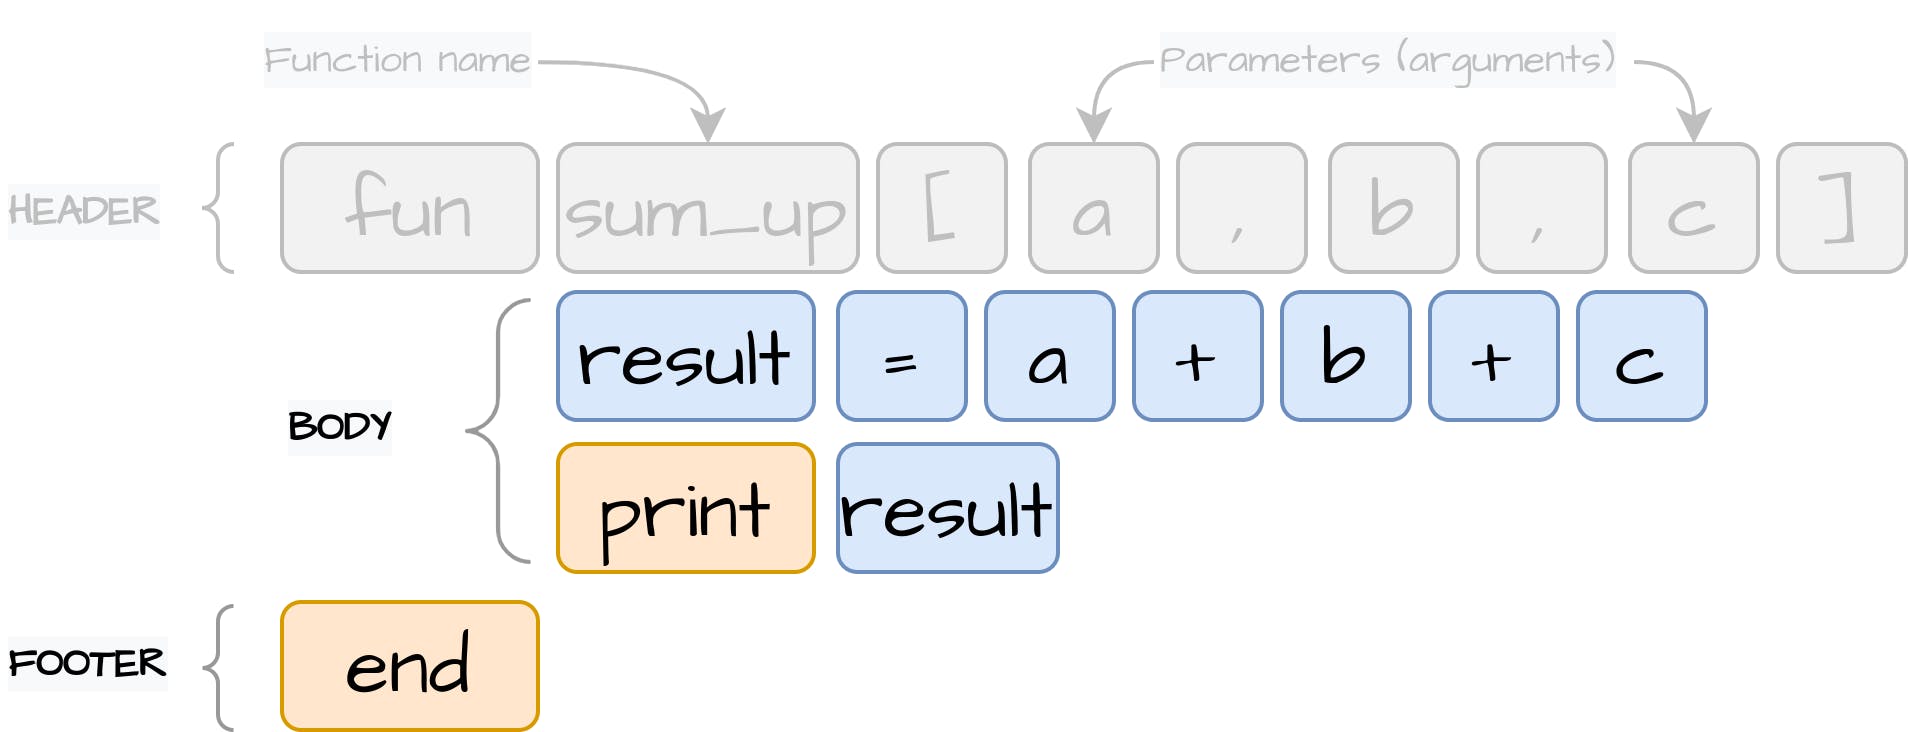
After completing the statement header, we will read the inner statements until we reach the finalizing end Keyword the same way we did to read the ConditionStatement (if/then).
To parse an inner statement, we invoke the StatementParser#parseExpression(), which will read nested functions as well.
1
2
3
4
5
6
7
8
9
10
11
| ...
case "fun":
...
while (!tokens.peek(TokenType.Keyword, "end")) {
Statement statement = parseExpression();
functionStatement.addStatement(statement);
}
tokens.next(TokenType.Keyword, "end");
return null;
...
|
In the end, we return null as we don’t want this function statement to be executed in the main program without a direct invocation call. This code definitely needs to be refactored, but for now it’s the easiest way to manage inner parseExpression() invocations.
2. Return Statement
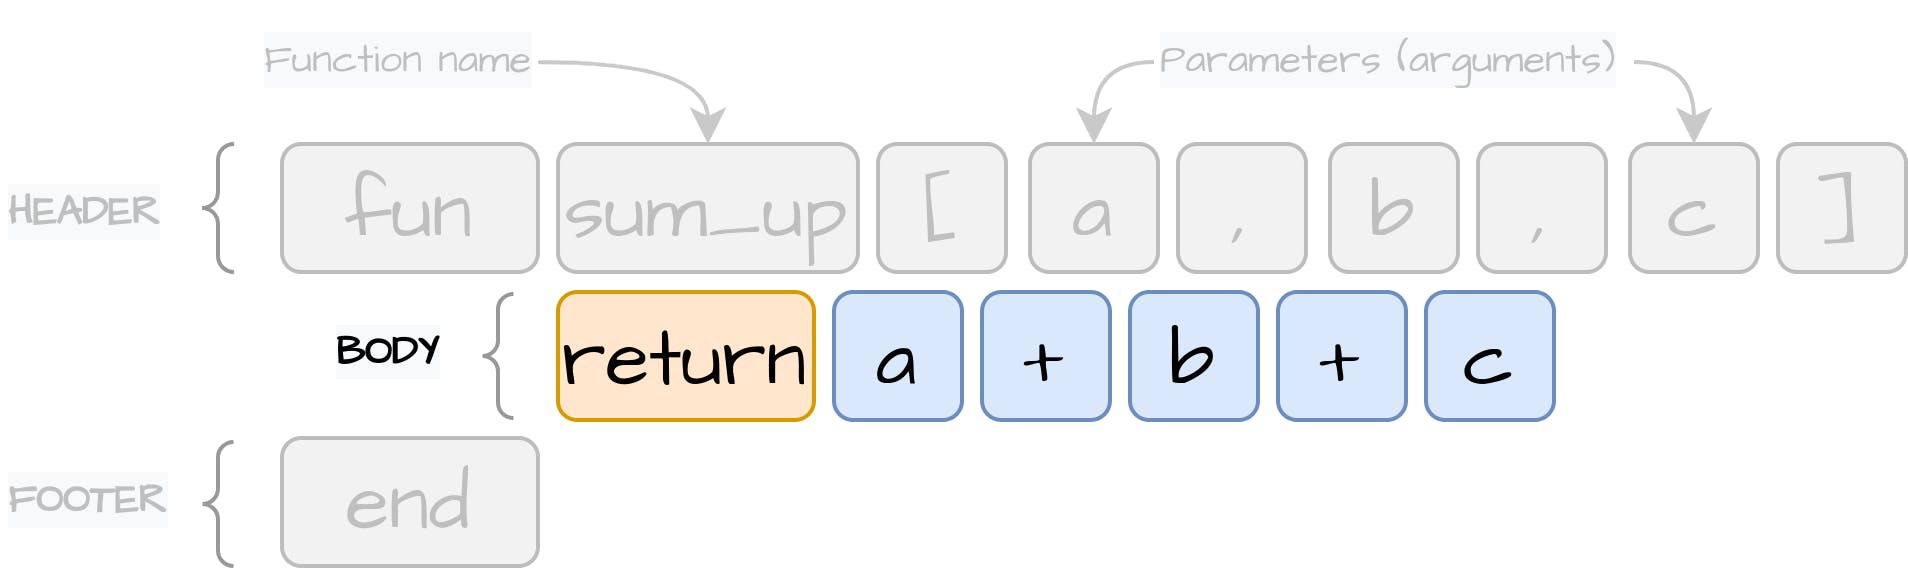
In the previous section, we added the return as the TokenType.Keyword to be captured by the lexical analyzer. In this step, we will handle this keyword using the syntax analyzer.
First, we start with a statement implementation, which should contain only an expression to execute and pass as the result of the function invocation:
1
2
3
4
5
6
7
8
9
10
11
12
| package org.example.toylanguage.statement;
@RequiredArgsConstructor
@Getter
public class ReturnStatement implements Statement {
private final Expression expression;
@Override
public void execute() {
Value<?> result = expression.evaluate();
}
}
|
To pass the resulting expression of the invoked function, we introduce an auxiliary ReturnScope class with the invoke() method, indicating that we have triggered the end of the function:
1
2
3
4
5
6
7
8
9
10
11
12
13
14
15
16
17
18
19
20
| package org.example.toylanguage.context;
@Getter
public class ReturnScope {
private boolean invoked;
private Value<?> result;
public void invoke(Value<?> result) {
setInvoked(true);
setResult(result);
}
private void setInvoked(boolean invoked) {
this.invoked = invoked;
}
private void setResult(Value<?> result) {
this.result = result;
}
}
|
There is one important note: we can have several nested function invocations with multiple function exits, but one ReturnScope cannot manage all function calls. Therefore, we create an extra class to manage the return context for each of the function invocation:
1
2
3
4
5
6
7
8
9
10
11
12
13
| package org.example.toylanguage.context;
public class ReturnContext {
private static ReturnScope scope = new ReturnScope();
public static ReturnScope getScope() {
return scope;
}
public static void reset() {
ReturnContext.scope = new ReturnScope();
}
}
|
Now we can go back to the ReturnStatement declaration and call ReturnScope#invoke() method using ReturnContext:
1
2
3
4
5
6
7
8
9
10
11
12
| package org.example.toylanguage.statement;
...
public class ReturnStatement implements Statement {
...
@Override
public void execute() {
Value<?> result = expression.evaluate();
ReturnContext.getScope().invoke(result);
}
}
|
The ReturnStatement is ready and will notify the current ReturnScope about function exit, therefore we can implement logic for the syntax analyzer to map return lexeme into ReturnStatement:
1
2
3
4
5
6
7
8
9
10
11
12
13
14
15
16
17
18
19
20
| package org.example.toylanguage;
public class StatementParser {
private Statement parseExpression() {
Token token = next(TokenType.Keyword, TokenType.Variable, TokenType.Operator);
switch (token.getType()) {
...
case Keyword:
switch (token.getValue()) {
...
case "return":
Expression expression = new ExpressionReader().readExpression();
return new ReturnStatement(expression);
}
default:
...
}
}
}
|
The next step would be to subscribe function execution to the ReturnContext. The function needs to know at which moment we performed the return statement to stop the subsequent execution. We will extend ConditionStatement#execute() implementation, which will work both for the FunctionStatement and for the ConditionStatement (if/then), by stopping the execution at the moment we catch the return invocation:
1
2
3
4
5
6
7
8
9
10
11
12
13
14
15
16
17
| package org.example.toylanguage.statement;
...
public class CompositeStatement implements Statement {
...
@Override
public void execute() {
for (Statement statement : statements2Execute) {
statement.execute();
//stop the execution in case ReturnStatement has been invoked
if (ReturnContext.getScope().isInvoked())
return;
}
}
}
|
3. Empty Return
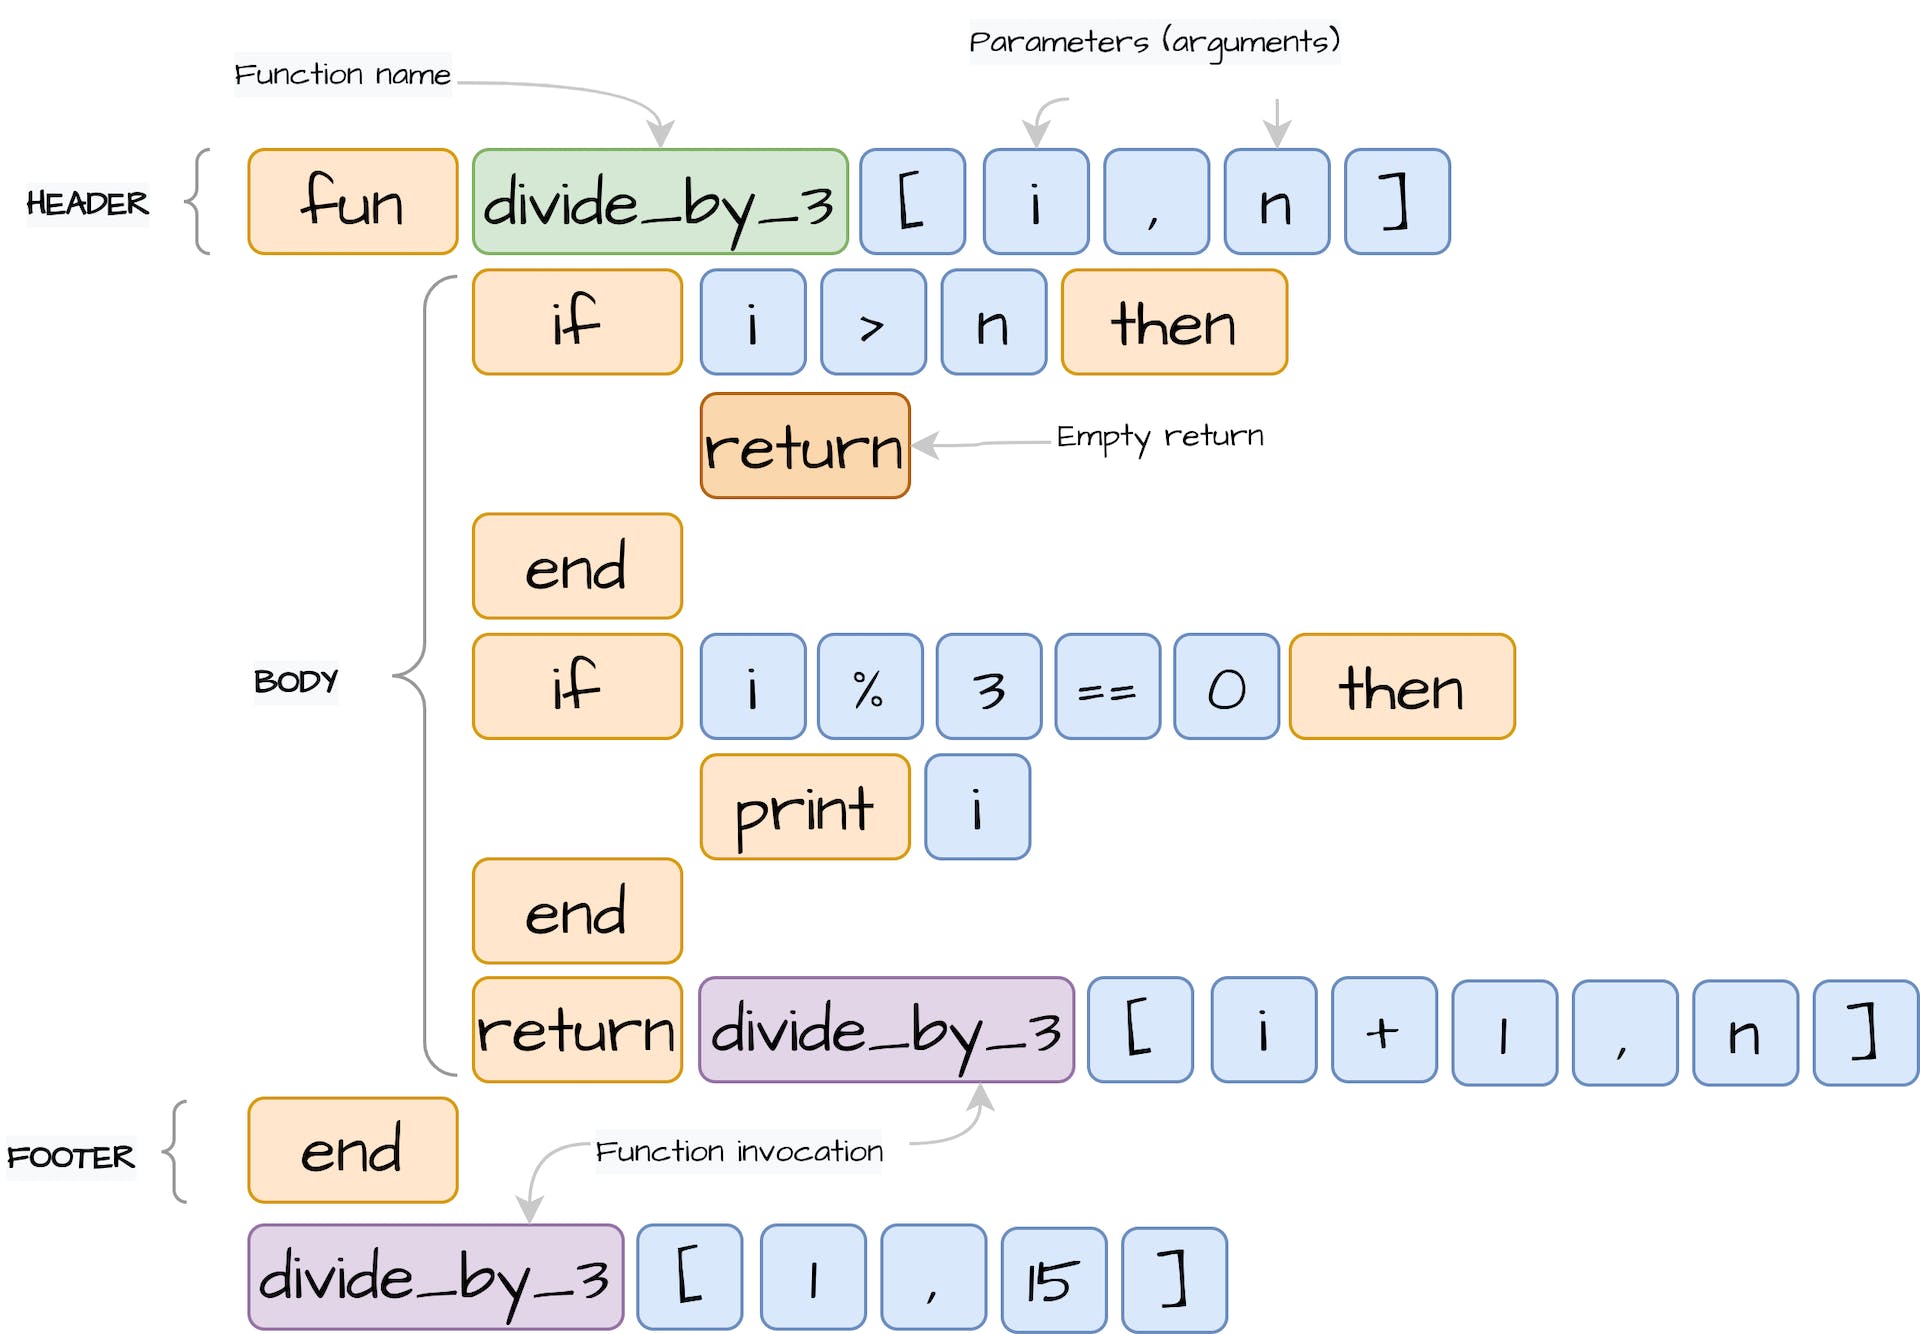
Our return statement can contain no resulting value, indicating just the end of the function without the provided result. Let’s introduce the new Value implementation containing “null” value.
First, we add new Null lexeme to parse “null” as different lexeme instead of Variable:
1
2
3
4
5
6
7
8
| ...
public enum TokenType {
...
Numeric("[+-]?((?=[.]?[0-9])[0-9]*[.]?[0-9]*)"),
Null("(null)(?=,|\\s|$)"),
Text("\"([^\"]*)\""),
...
}
|
In the next step, we create the Value implementation for this Null lexeme. We can initialize a static instance as we will use the same object to refer:
1
2
3
4
5
6
7
8
9
10
11
12
13
14
15
16
17
18
19
20
21
| package org.example.toylanguage.expression.value;
public class NullValue<T extends Comparable<T>> extends Value<T> {
public static final NullValue<?> NULL_INSTANCE = new NullValue<>(null);
private NullValue(T value) {
super(value);
}
@Override
public T getValue() {
//noinspection unchecked
return (T) this;
}
@Override
public String toString() {
return "null";
}
}
|
The last thing would be to map Null lexeme as NullValue by the ExpressionReader. If our return statement will contain only return statement without “null” value, we will not have any operands for the returned expression.
Therefore, we should add extra validation at the end of the readExpression() method by returning NULL_INSTANCE in the case operands stack is empty:
1
2
3
4
5
6
7
8
9
10
11
12
13
14
15
16
17
18
19
20
21
22
23
24
25
26
27
28
29
30
31
32
33
34
35
36
37
38
39
40
| private class ExpressionReader {
...
private Expression readExpression() {
while (tokens.peekSameLine(TokenType.Operator, TokenType.Variable, TokenType.Numeric, TokenType.Logical, TokenType.Null, TokenType.Text)) {
Token token = tokens.next();
switch (token.getType()) {
case Operator:
...
default:
String value = token.getValue();
Expression operand;
switch (token.getType()) {
case Numeric:
...
case Logical:
...
case Text:
...
case Null:
operand = NULL_INSTANCE;
break;
case Variable:
default:
...
}
...
}
}
...
if (operands.isEmpty()) {
return NULL_INSTANCE;
} else {
return operands.pop();
}
}
...
}
|
4. Memory Scope
Before diving into function expressions, first we will need to get familiar with the function scope. Basically, scope is the current context in the code.
Scope can be defined locally or globally. Currently, if we define any variable, it will be stored as a global variable in the StatementParser#variables Map and will be accessible in the global context.
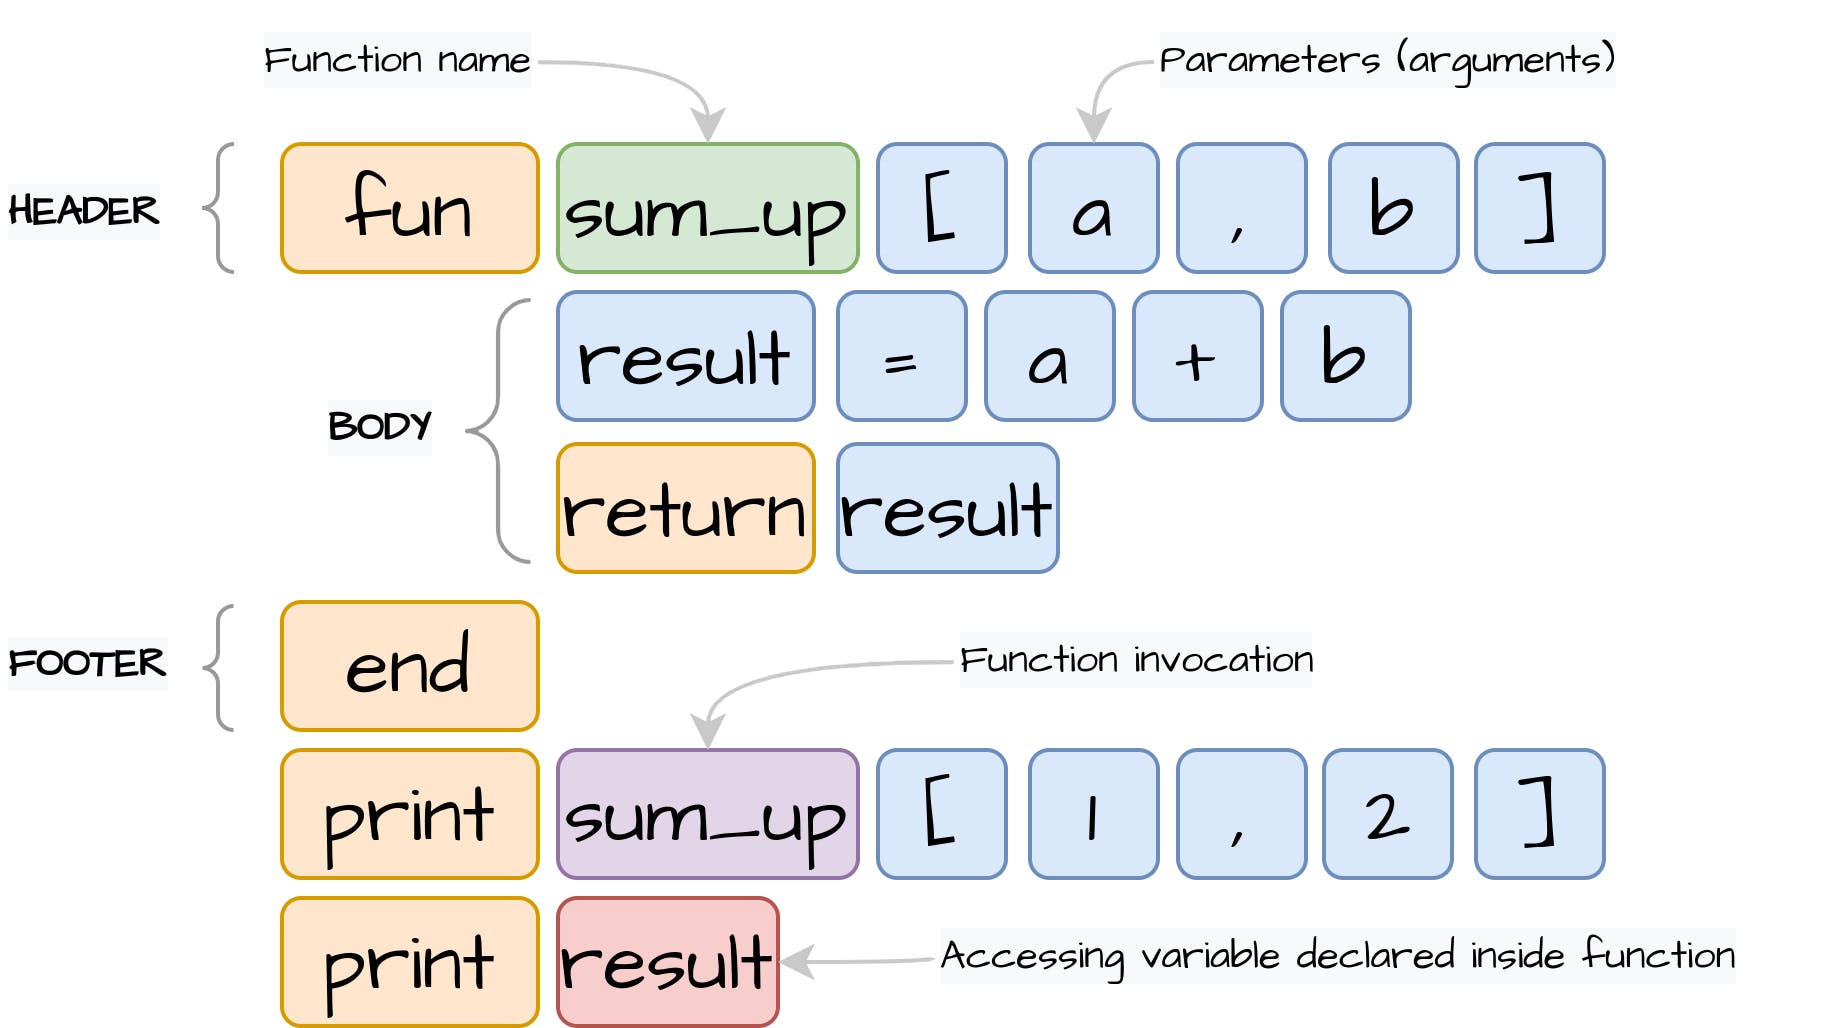
Inside a function, we can also declare variables, and these variables should be accessible only in the scope of this declared function and should be isolated from each function call. To isolate the memory, we will introduce a new class MemoryScope, which will hold the Map of variables:
1
2
3
4
5
6
7
8
9
10
11
12
13
14
15
16
17
| package org.example.toylanguage.context;
public class MemoryScope {
private final Map<String, Value<?>> variables;
public MemoryScope(MemoryScope parent) {
this.variables = new HashMap<>();
}
public Value<?> get(String name) {
return variables.get(name);
}
public void set(String name, Value<?> value) {
variables.put(name, value);
}
}
|
Unlike ReturnScope, we shouldn’t reset the memory (variables Map) after we enter a function or any other inner block of code. We still need a way to access global variables. Therefore, we can add a parent instance of the MemoryScope, which will be used to read the global variables declared outside of the function:
1
2
3
4
5
6
7
8
9
10
11
12
13
14
15
16
17
18
19
| public class MemoryScope {
private final Map<String, Value<?>> variables;
private final MemoryScope parent;
public MemoryScope(MemoryScope parent) {
this.variables = new HashMap<>();
this.parent = parent;
}
public Value<?> get(String name) {
Value<?> value = variables.get(name);
if (value == null && parent != null) {
return parent.get(name);
}
return value;
}
...
}
|
To switch between memory contexts easily, we will introduce the MemoryContext class as we did for the ReturnScope. The newScope() will be called when we enter an inner block of code and the endScope() will be triggered at the end of this block:
1
2
3
4
5
6
7
8
9
10
11
12
13
14
15
16
17
| package org.example.toylanguage.context;
public class MemoryContext {
private static MemoryScope memory = new MemoryScope(null);
public static MemoryScope getMemory() {
return memory;
}
public static void newScope() {
MemoryContext.memory = new MemoryScope(memory);
}
public static void endScope() {
MemoryContext.memory = memory.getParent();
}
}
|
Now we can refactor variables access for the AssignStatement, InputStatement and VariableExpression with the new MemoryContext interface:
1
2
3
4
5
6
7
8
9
10
11
12
| package org.example.toylanguage.statement;
...
public class AssignStatement implements Statement {
private final String name;
private final Expression expression;
@Override
public void execute() {
MemoryContext.getMemory().set(name, expression.evaluate());
}
}
|
1
2
3
4
5
6
7
8
9
10
11
12
13
14
| package org.example.toylanguage.statement;
...
public class InputStatement implements Statement {
private final String name;
private final Supplier<String> consoleSupplier;
@Override
public void execute() {
...
MemoryContext.getMemory().set(name, value);
}
}
|
1
2
3
4
5
6
7
8
9
10
11
12
13
14
15
16
| package org.example.toylanguage.expression;
...
public class VariableExpression implements Expression {
private final String name;
@Override
public Value<?> evaluate() {
Value<?> value = MemoryContext.getMemory().get(name);
...
}
public void setValue(Value<?> value) {
MemoryContext.getMemory().set(name, value);
}
}
|
5. Function Invocation
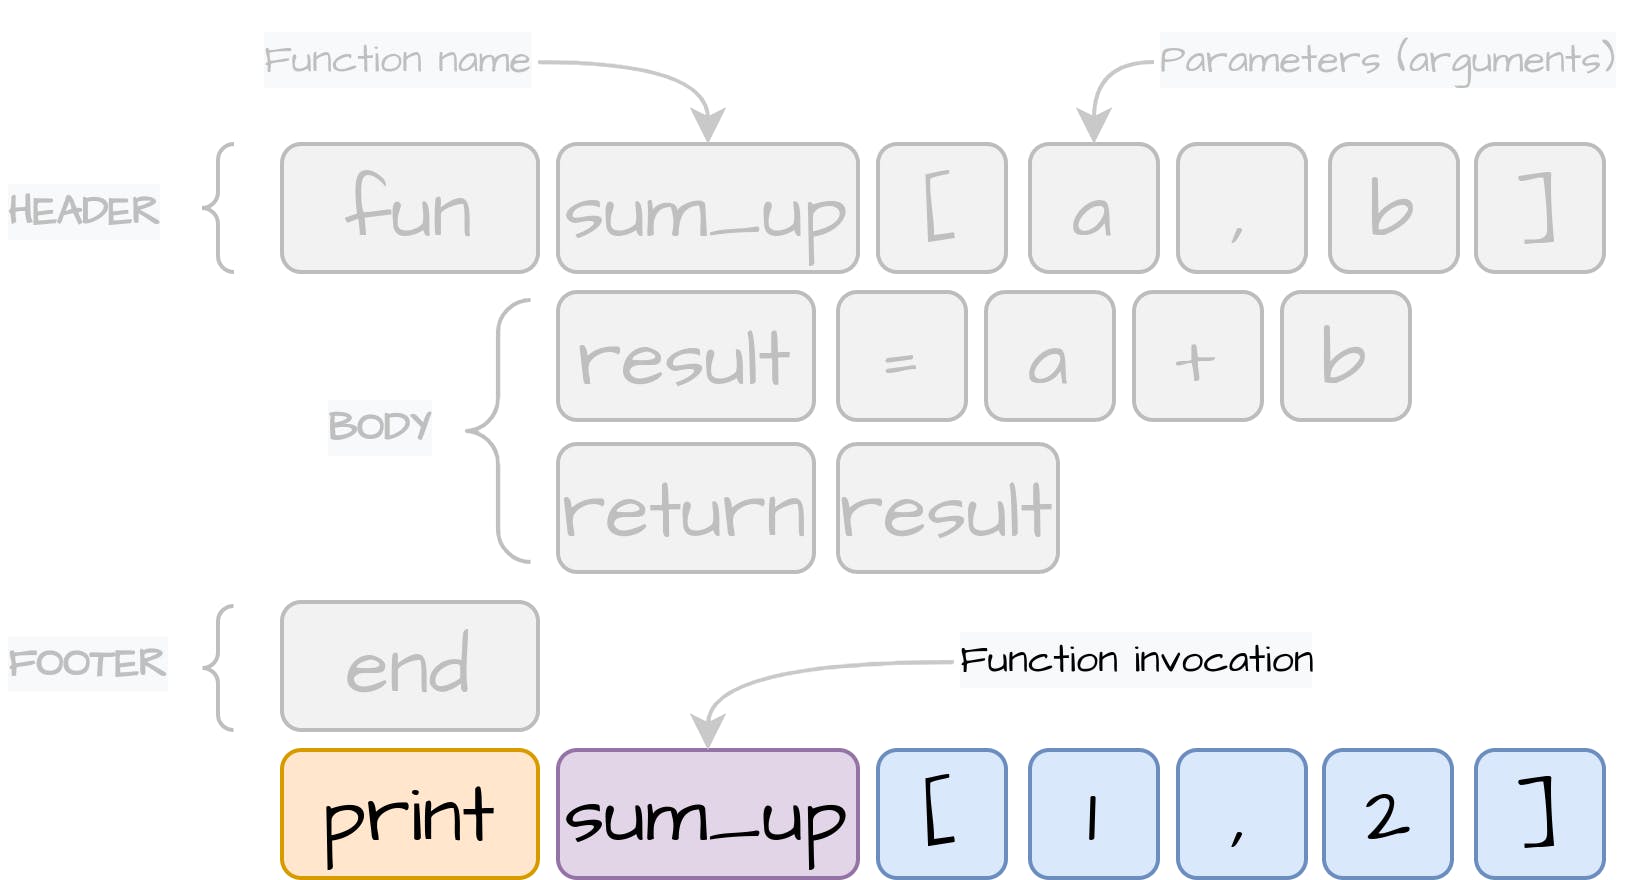
In this section, we will make our syntax analyzer able to read and parse function invocations. First, we will start with the FunctionExpression declaration.
This class will contain the FunctionDefinition field to access the function details and the Map of Expression values, passed as arguments during function invocation:
1
2
3
4
5
6
7
8
9
10
11
12
13
| package org.example.toylanguage.expression;
@RequiredArgsConstructor
@Getter
public class FunctionExpression implements Expression {
private final FunctionDefinition definition;
private final List<Expression> values;
@Override
public Value<?> evaluate() {
return null;
}
}
|
To evaluate() the function expression, we need to execute function inner statements. To retrieve them, we use the FunctionStatement instance from the declared FunctionDefinition field:
1
2
3
4
5
6
7
8
| ...
@Override
public Value<?> evaluate() {
FunctionStatement statement = definition.getStatement();
statement.execute();
return null;
}
...
|
But before executing function statements, it’s important to initialize the new MemoryScope. It will allow inner statements to use its own memory. The inner memory shouldn’t be accessible outside this function call, therefore at the end of the execution, we set the memory scope back:
1
2
3
4
5
6
7
8
9
10
11
12
13
14
15
16
| ...
@Override
public Value<?> evaluate() {
FunctionStatement statement = definition.getStatement();
MemoryContext.newScope(); //set new memory scope
//execute function body
try {
statement.execute();
} finally {
MemoryContext.endScope(); //end function memory scope
}
return null;
}
...
|
We should also initialize function arguments, which can be passed as value lexemes and not be available in the global memory scope. We can save them in the new function’s memory scope by creating and executing the AssignStatement for each of the function values:
1
2
3
4
5
6
7
8
9
10
11
12
13
14
15
16
17
18
19
20
21
22
| ...
@Override
public Value<?> evaluate() {
FunctionStatement statement = definition.getStatement();
MemoryContext.newScope(); //set new memory scope
//initialize function arguments
IntStream.range(0, values.size())
.boxed()
.map(i -> new AssignStatement(definition.getArguments().get(i), values.get(i)))
.forEach(Statement::execute);
//execute function body
try {
statement.execute();
} finally {
MemoryContext.endScope(); //end function memory scope
}
return null;
}
...
|
The last thing left to do is to return the result. We can grab it from the ReturnContext. The result will be captured in the ReturnScope when we invoke the ReturnStatement.
Don’t forget to reset the ReturnScope at the end of the function block to make the next function invocation use its own ReturnScope instance:
1
2
3
4
5
6
7
8
9
10
11
12
13
14
15
16
17
18
19
20
21
22
| ...
@Override
public Value<?> evaluate() {
FunctionStatement statement = definition.getStatement();
MemoryContext.newScope(); //set new memory scope
//initialize function arguments
IntStream.range(0, values.size())
.boxed()
.map(i -> new AssignStatement(definition.getArguments().get(i), values.get(i)))
.forEach(Statement::execute);
//execute function body
try {
statement.execute();
return ReturnContext.getScope().getResult();
} finally {
MemoryContext.endScope(); //end function memory scope
ReturnContext.reset(); //reset return context
}
}
...
|
Now we can switch to the ExpressionReader class and read an actual function invocation. The pattern of function call looks almost the same as the structure instantiation, except for the fact, we don’t have the New keyword in the front of the expression.
Before creating the VariableExpression, we check that the next lexeme is the opening square bracket, which will indicate the function call:
1
2
3
4
5
6
7
8
9
10
11
12
13
14
15
16
17
18
19
20
21
22
23
24
25
26
27
28
29
30
31
32
33
34
35
36
37
38
39
| private class ExpressionReader {
...
private Expression readExpression() {
while (tokens.peekSameLine(TokenType.Operator, TokenType.Variable, TokenType.Numeric, TokenType.Logical, TokenType.Null, TokenType.Text)) {
Token token = tokens.next();
switch (token.getType()) {
case Operator:
...
default:
String value = token.getValue();
Expression operand;
switch (token.getType()) {
case Numeric:
...
case Logical:
...
case Text:
...
case Null:
...
case Variable:
default:
if (!operators.isEmpty() && operators.peek() == Operator.StructureInstance) {
operand = readStructureInstance(token);
} else if (tokens.peekSameLine(TokenType.GroupDivider, "[")) {
operand = readFunctionInvocation(token);
} else {
operand = new VariableExpression(value);
}
}
...
}
}
...
}
}
|
Reading the function invocation will look almost the same as structure instantiation. First, we obtain the function definition by function name. Then, we read function arguments. In the end, we return an instance of FunctionExpression:
1
2
3
4
5
6
7
8
9
10
11
12
13
14
15
16
17
18
19
20
21
| private FunctionExpression readFunctionInvocation(Token token) {
FunctionDefinition definition = functions.get(token.getValue());
List<Expression> arguments = new ArrayList<>();
if (tokens.peekSameLine(TokenType.GroupDivider, "[")) {
tokens.next(TokenType.GroupDivider, "["); //skip open square bracket
while (!tokens.peekSameLine(TokenType.GroupDivider, "]")) {
Expression value = new ExpressionReader().readExpression();
arguments.add(value);
if (tokens.peekSameLine(TokenType.GroupDivider, ","))
tokens.next();
}
tokens.next(TokenType.GroupDivider, "]"); //skip close square bracket
}
return new FunctionExpression(definition, arguments);
}
|
6. Testing Time
We have finished embedding functions in both lexical and syntax analyzers. Now we should be able to parse function definitions and to read function invocations. Note that function invocation is just like any other expression, including structure instantiation.
Therefore, you can build any logical complex nested expressions. Let’s create a more difficult task for the syntax analysis to determine if two binary trees are the same:
1
2
3
4
5
6
7
8
9
10
11
12
13
14
15
16
17
18
19
20
21
22
23
24
25
26
27
28
29
30
31
32
33
34
35
36
37
38
39
40
41
42
43
44
45
46
47
| #
# Determine if two binary trees are identical following these rules:
# - root nodes have the same value
# - left sub trees are identical
# - right sub trees are identical
#
struct TreeNode [ value, left, right ]
fun is_same_tree [ node1, node2 ]
if node1 == null and node2 == null then
return true
end
if node1 != null and node2 != null then
return node1 :: value == node2 :: value and is_same_tree [ node1 :: left, node2 :: left ] and is_same_tree [ node1 :: right, node2 :: right ]
end
return false
end
# tree-s example
#
# tree1 tree2 tree3 tree4
# 3 3 3 3
# / \ / \ / \ / \
# 4 5 4 5 4 5 4 5
# / \ / \ / \ / \ / \ / \ / \ \
# 6 7 8 9 6 7 8 9 6 7 9 8 6 7 9
# tree1 nodes
tree1_node9 = new TreeNode [ 9, null, null ]
tree1_node8 = new TreeNode [ 8, null ]
tree1_node7 = new TreeNode [ 7 ]
tree1_node6 = new TreeNode [ 6 ]
tree1_node5 = new TreeNode [ 5, tree1_node8, tree1_node9 ]
tree1_node4 = new TreeNode [ 4, tree1_node6, tree1_node7 ]
tree1 = new TreeNode [ 3, tree1_node4, tree1_node5 ]
tree2 = new TreeNode [ 3, new TreeNode [ 4, new TreeNode [ 6 ], new TreeNode [ 7 ] ], new TreeNode [ 5, new TreeNode [ 8 ], new TreeNode [ 9 ] ] ]
tree3 = new TreeNode [ 3, new TreeNode [ 4, new TreeNode [ 6 ], new TreeNode [ 7 ] ], new TreeNode [ 5, new TreeNode [ 9 ], new TreeNode [ 8 ] ] ]
tree4 = new TreeNode [ 3, new TreeNode [ 4, new TreeNode [ 6 ], new TreeNode [ 7 ] ], new TreeNode [ 5, null, new TreeNode [ 9 ] ] ]
print is_same_tree [ tree1, tree2 ]
print is_same_tree [ tree1, tree3 ]
print is_same_tree [ tree2, tree3 ]
print is_same_tree [ tree1, tree4 ]
print is_same_tree [ tree2, tree4 ]
print is_same_tree [ tree3, tree4 ]
|
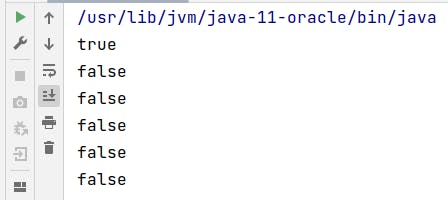
Building Your Own Programming Language From Scratch: Part V - Arrays
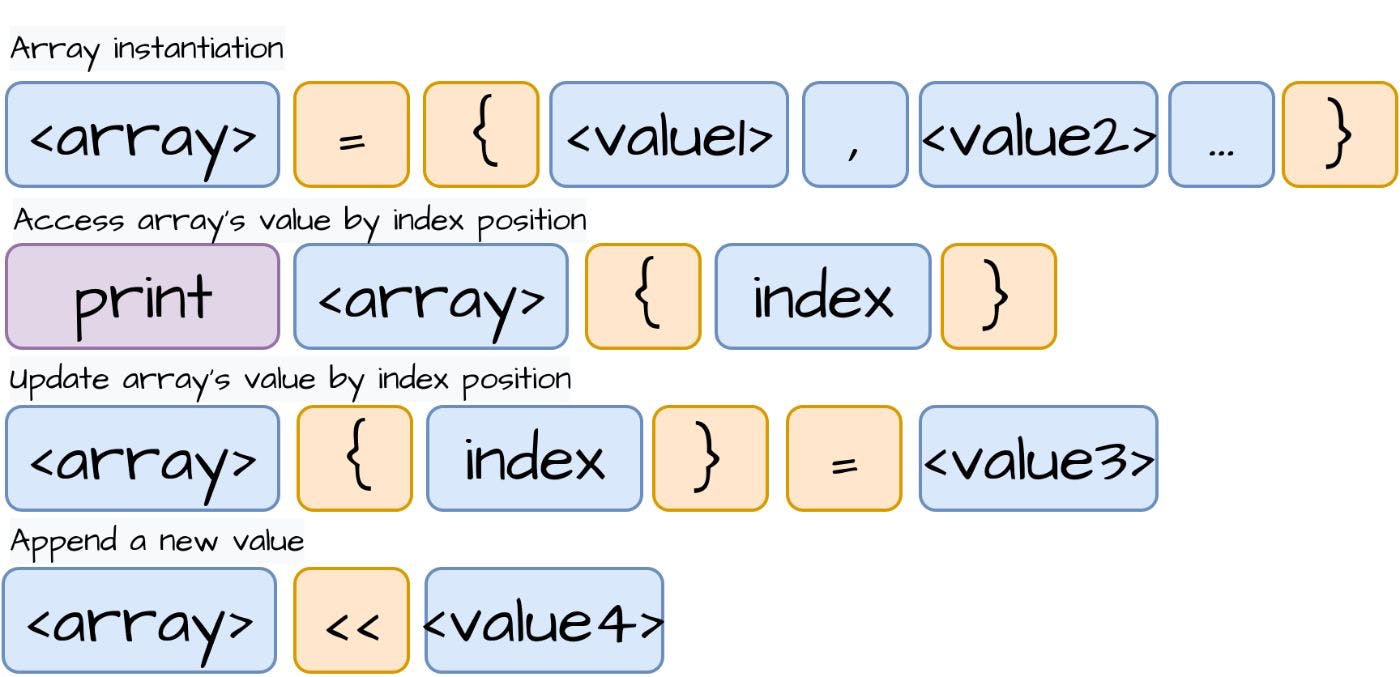
In this part of creating your programming language, we will implement arrays. Please see the previous parts:
- Building Your Own Programming Language From Scratch
- Building Your Own Programming Language From Scratch: Part II - Dijkstra’s Two-Stack Algorithm
- Build Your Own Programming Language Part III: Improving Lexical Analysis with Regex Lookaheads
- Building Your Own Programming Language From Scratch Part IV: Implementing Functions
The full source code is available over on GitHub.
Our language will provide the following abilities for the arrays:
- Contain arbitrary types of values: plain types, structure instantiations, function invocations, nested operators with other arrays, and any other composite expressions inheriting the
Expression interface
1
| arbitrary_array = { 1, "two", false, new Structure[4], get_value[5], { 6, 7 * 8 } }
|
- Append a value to the defined array with
<< operator
1
2
| array = { 1, 2 }
array << 3 # will contain { 1, 2, 3 }
|
- Access array’s value by index position
- Update array’s value by index position
1
2
| array{0} = 1
array{1} = array{array{0} + 1} + 1
|
1 Lexical analysis
We will begin with lexical analysis. Basically, it’s a process to divide the source code into tokens, such as keyword, identifier/variable, operator, etc.
First, to define the array, we add curly brackets { } as the GroupDivider lexeme. We can’t use the square brackets [ ] or round brackets ( ) as they are already taken by the functions/structures definitions and by expression operators accordingly.
1
2
3
4
5
6
7
8
| package org.example.toylanguage.token;
...
public enum TokenType {
...
GroupDivider("(\\[|\\]|\\,|\\{|})"),
...
}
|
Second, we need to introduce a new << Operator lexeme to define the “append a value to array” operation. We’ll extend the current less than operator < by adding an {1,2} quantifier after it, which will be able to catch either one or two < symbols:
1
2
3
4
5
6
| ...
public enum TokenType {
...
Operator("([+]|[-]|[*]|[/]|[%]|>=|>|<=|[<]{1,2}|[=]{1,2}|!=|[!]|[:]{2}|[(]|[)]|(new|and|or)(?=\\s|$))"),
...
}
|
With all this being set, we will catch all the needed lexemes properly with defined TokenType values.
2 Syntax analysis
In this section, within the syntax analysis, we will convert tokens obtained from the lexical analysis into final statements following our language’s array rules. Arrays are just like any other part of the expression without any additional statements. Therefore, we just need to extend the existing functionality for the ExpressionStatement.
2.1 ArrayExpression
First, to declare any values in our array, we define the ArrayExpression class and add the List of values, which will accept the Expression values to allow us to place non-final values such as variables, structure invocations, function invocations, operators, and any other Expression implementations. Next, we implement the Expression interface, which requires us to override the evaluate() method. It’s a deferred interface to transform array Expression expressions into final Value values, which will be invoked only during direct code execution:
1
2
3
4
5
6
7
8
9
10
11
12
| package org.example.toylanguage.expression;
@RequiredArgsConstructor
@Getter
public class ArrayExpression implements Expression {
private final List<Expression> values;
@Override
public Value<?> evaluate() {
return new ArrayValue(this);
}
}
|
2.2 ArrayValue
The next class we implement is ArrayValue, which will accept the ArrayExpression as a constructor argument to gather all the details about the array state. To change the array values, we include the corresponding getValue(), setValue(), appendValue() methods:
1
2
3
4
5
6
7
8
9
10
11
12
13
14
15
16
17
18
19
20
21
22
23
24
25
| package org.example.toylanguage.expression.value;
public class ArrayValue extends Value<List<Value<?>>> {
public ArrayValue(ArrayExpression expression) {
this(expression.getValues()
.stream()
.map(Expression::evaluate)
.collect(Collectors.toList()));
}
public Value<?> getValue(int index) {
if (getValue().size() > index)
return getValue().get(index);
return NULL_INSTANCE;
}
public void setValue(int index, Value<?> value) {
if (getValue().size() > index)
getValue().set(index, value);
}
public void appendValue(Value<?> value) {
getValue().add(value);
}
}
|
We can also override the equals() method, as it will be used by the EqualsOperator and NotEqualsOperator to compare:
1
2
3
4
5
6
7
8
9
10
11
12
13
14
| ...
public class ArrayValue extends Value<List<Value<?>>> {
...
@Override
public boolean equals(Object o) {
if (this == o) return true;
if (o == null) return false;
if (getClass() != o.getClass()) return false;
//noinspection unchecked
List<Value<?>> oValue = (List<Value<?>>) o;
return new HashSet<>(getValue()).containsAll(oValue);
}
}
|
2.3 Operator
2.3.1 ArrayValueOperator
With the ArrayExpression implementation, we can already instantiate arrays and fill them with values. The next goal is to access the array’s value by index position. For this purpose, we’ll create the BinaryOperatorExpression operator implementation, which contains two operands. The evaluate() method will use the first operand as the array itself and the second operand as an index. The assign() method is used to set the array’s value by index using the same operands:
1
2
3
4
5
6
7
8
9
10
11
12
13
14
15
16
17
18
19
20
21
22
23
24
25
26
| package org.example.toylanguage.expression.operator;
public class ArrayValueOperator extends BinaryOperatorExpression implements AssignExpression {
public ArrayValueOperator(Expression left, Expression right) {
super(left, right);
}
@Override
public Value<?> evaluate() {
Value<?> left = getLeft().evaluate();
if (left instanceof ArrayValue) {
Value<?> right = getRight().evaluate();
return ((ArrayValue) left).getValue(((Double) right.getValue()).intValue());
}
return left;
}
@Override
public void assign(Value<?> value, VariableScope variableScope) {
Value<?> left = getLeft().evaluate();
if (left instanceof ArrayValue) {
Value<?> right = getRight().evaluate();
((ArrayValue) left).setValue(((Double) right.getValue()).intValue(), value);
}
}
}
|
The new AssignExpression interface can be used to set the variable’s value only within the assignment = operator:
1
2
3
| public interface AssignExpression {
void assign(Value<?> value, VariableScope variableScope);
}
|
1
2
3
4
5
6
7
8
9
10
11
12
| public class AssignmentOperator extends BinaryOperatorExpression {
...
@Override
public Value<?> evaluate() {
if (getLeft() instanceof AssignExpression) {
Value<?> right = getRight().evaluate();
((AssignExpression) getLeft()).assign(right, variableScope);
}
...
}
}
|
2.3.2 ArrayAppendOperator
Next, to transform the “append a value to array” operator defined as << Operator lexeme, we create a new BinaryOperatorExpression implementation. The left operand is still the array itself, and the right operand is the value we want to append:
1
2
3
4
5
6
7
8
9
10
11
12
13
14
15
16
17
| package org.example.toylanguage.expression.operator;
public class ArrayAppendOperator extends BinaryOperatorExpression {
public ArrayAppendOperator(Expression left, Expression right) {
super(left, right);
}
@Override
public Value<?> evaluate() {
Value<?> left = getLeft().evaluate();
if (left instanceof ArrayValue) {
Value<?> right = getRight().evaluate();
((ArrayValue) left).appendValue(right);
}
return getLeft().evaluate();
}
}
|
Don’t forget to include this << operator in the Operator enum. It will have the same precedence as the Assignment operator:
1
2
3
4
5
6
7
8
9
| ...
public enum Operator {
...
ArrayAppend("<<", ArrayAppendOperator.class, 0),
Assignment("=", AssignmentOperator.class, 0);
...
}
|
2.4 ExpressionReader
In this section, we will complete syntax analysis for the array integration by reading an actual array instantiation and the array’s value. To make it work, we need to extend the ExpressionReader implementation to support array expressions within Dijkstra’s Two-Stack algorithm.
2.4.1 Array instantiation
First, we will read the array instantiation. We extend the readExpression() filter to support the curly brackets as the marker of array beginning:
1
2
3
4
5
6
7
8
9
10
11
12
13
14
15
16
17
18
19
20
21
22
23
24
25
26
| package org.example.toylanguage;
public class StatementParser {
...
private class ExpressionReader {
...
private Expression readExpression() {
while (hasNextToken()) {
...
}
}
private boolean hasNextToken() {
if (tokens.peekSameLine(TokenType.Operator, TokenType.Variable, TokenType.Numeric, TokenType.Logical, TokenType.Null, TokenType.Text))
return true;
//beginning of an array
if (tokens.peekSameLine(TokenType.GroupDivider, "{"))
return true;
return false;
}
}
}
|
Next, we implement the corresponding case for the GroupDivider { lexeme:
1
2
3
4
5
6
7
8
9
10
11
12
13
14
15
16
17
18
19
20
21
22
23
24
25
26
27
28
29
30
31
32
| private Expression readExpression() {
while (hasNextToken()) {
Token token = tokens.next();
switch (token.getType()) {
case Operator:
...
default:
String value = token.getValue();
Expression operand;
switch (token.getType()) {
case Numeric:
...
case Logical:
...
case Text:
...
case Null:
...
case GroupDivider:
if (Objects.equals(token.getValue(), "{")) {
operand = readArrayInstance();
break;
}
case Variable:
default:
...
}
operands.push(operand);
}
}
...
}
|
The pattern for the array expression is the same as for the function invocation except for using the curly brackets instead of square brackets: we read the array’s values as the Expression expressions divided by a comma within the curly brackets. In the end, we build the ArrayExpression with the obtained values:
1
2
3
4
5
6
7
8
9
10
11
12
13
14
15
16
| // read array instantiation: { 1, 2, 3 }
private ArrayExpression readArrayInstance() {
List<Expression> values = new ArrayList<>();
while (!tokens.peekSameLine(TokenType.GroupDivider, "}")) {
Expression value = new ExpressionReader().readExpression();
values.add(value);
if (tokens.peekSameLine(TokenType.GroupDivider, ","))
tokens.next();
}
tokens.next(TokenType.GroupDivider, "}"); //skip close curly bracket
return new ArrayExpression(values);
}
|
2.4.2 Access array’s value by index
Accessing the array’s value by index position is less straightforward than the array’s append operation because our Dijkstra’s Two-Stack algorithm inside the ExpressionReader cannot handle the array’s index defined within the curly brackets as an operator. To solve this limitation, we will read the operator with operands together as a composite operand the same way we did read the structure instantiation, except for the fact that we don’t have the “new” operator in front of the structure and the array’s index is defined inside curly brackets instead of square brackets:
1
2
3
4
5
6
7
8
9
| // read array's value: array{index}
private ArrayValueOperator readArrayValue(Token token) {
VariableExpression array = new VariableExpression(token.getValue());
tokens.next(TokenType.GroupDivider, "{");
Expression arrayIndex = new ExpressionReader().readExpression();
tokens.next(TokenType.GroupDivider, "}");
return new ArrayValueOperator(array, arrayIndex);
}
|
1
2
3
4
5
6
7
8
9
10
11
12
13
14
15
16
17
18
19
20
21
22
23
24
25
26
27
28
29
30
31
32
33
34
35
36
37
| private Expression readExpression() {
while (hasNextToken()) {
Token token = tokens.next();
switch (token.getType()) {
case Operator:
...
default:
String value = token.getValue();
Expression operand;
switch (token.getType()) {
case Numeric:
...
case Logical:
...
case Text:
...
case Null:
...
case GroupDivider:
...
case Variable:
default:
if (!operators.isEmpty() && operators.peek() == Operator.StructureInstance) {
...
} else if (tokens.peekSameLine(TokenType.GroupDivider, "[")) {
...
} else if (tokens.peekSameLine(TokenType.GroupDivider, "{")) {
operand = readArrayValue(token);
} else {
...
}
}
operands.push(operand);
}
}
...
}
|
3 Tests
We have finished embedding arrays in both lexical and syntax analyzers. Now we should be able to read array expressions, access and update array values. Let’s implement a more realistic task - the recursive binary search algorithm:
1
2
3
4
5
6
7
8
9
10
11
12
13
14
15
16
17
18
19
20
21
22
23
24
25
26
27
| fun binary_search [ arr, n, lo, hi, key ]
if hi >= lo then
mid = (hi + lo) // 2 # floor division
if arr{mid} < key then
return binary_search [ arr, n, mid + 1, hi, key ]
elif arr{mid} > key then
return binary_search [ arr, n, lo, mid - 1, key ]
else then
return mid
end
else then
return -1
end
return
end
arr = {10, 20, 30, 50, 60, 80, 110, 130}
arr << 140
arr << 170
n = 10
print binary_search [ arr, n, 0, n - 1, 10 ] # 0
print binary_search [ arr, n, 0, n - 1, 80 ] # 5
print binary_search [ arr, n, 0, n - 1, 170 ] # 9
print binary_search [ arr, n, 0, n - 1, 5 ] # -1
print binary_search [ arr, n, 0, n - 1, 85 ] # -1
print binary_search [ arr, n, 0, n - 1, 175 ] # -1
|
Building Your Own Programming Language From Scratch: Part VI - Loops

In this part of creating your programming language, we will implement loops.
Please see the previous parts:
- Building Your Own Programming Language From Scratch
- Building Your Own Programming Language From Scratch: Part II - Dijkstra’s Two-Stack Algorithm
- Build Your Own Programming Language Part III: Improving Lexical Analysis with Regex Lookaheads
- Building Your Own Programming Language From Scratch Part IV: Implementing Functions
- Building Your Own Programming Language From Scratch: Part V - Arrays
The full source code is available over on GitHub.
Our language will provide the following types of loops:
- For loop - to iterate through a range:
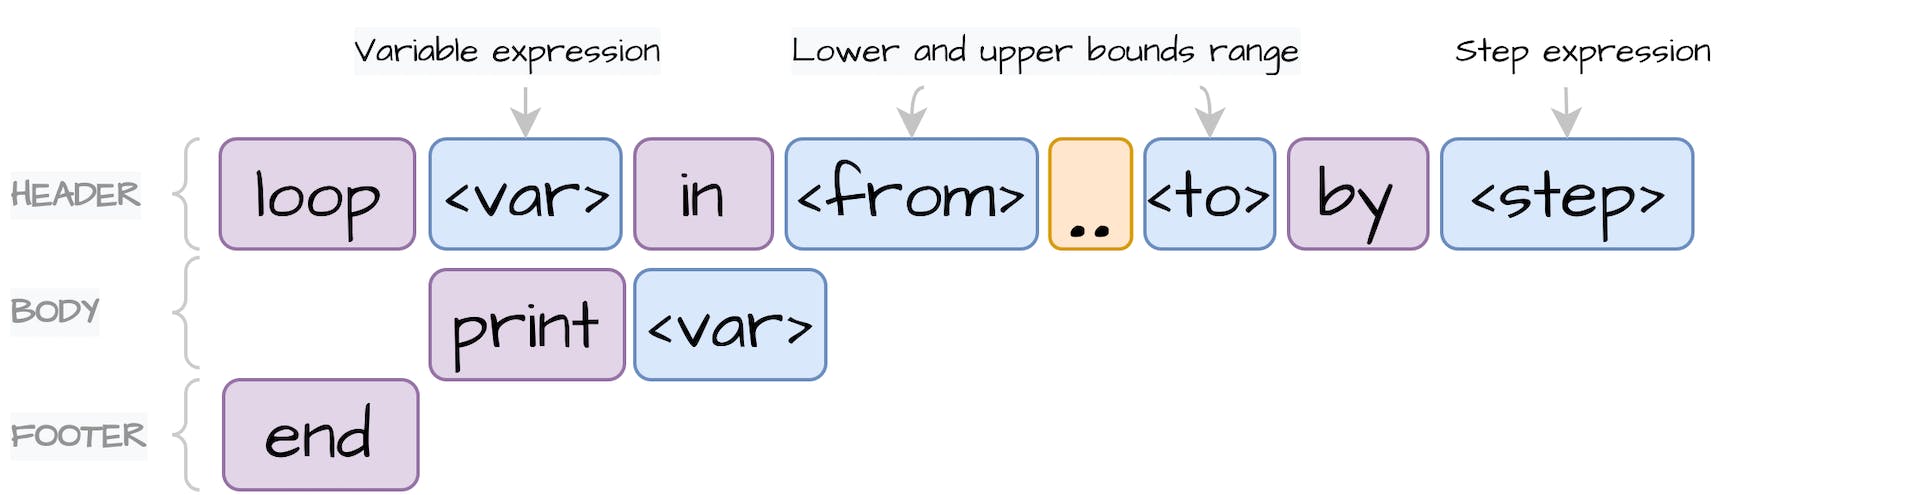
- While loop - to iterate as long as a specified condition is true:
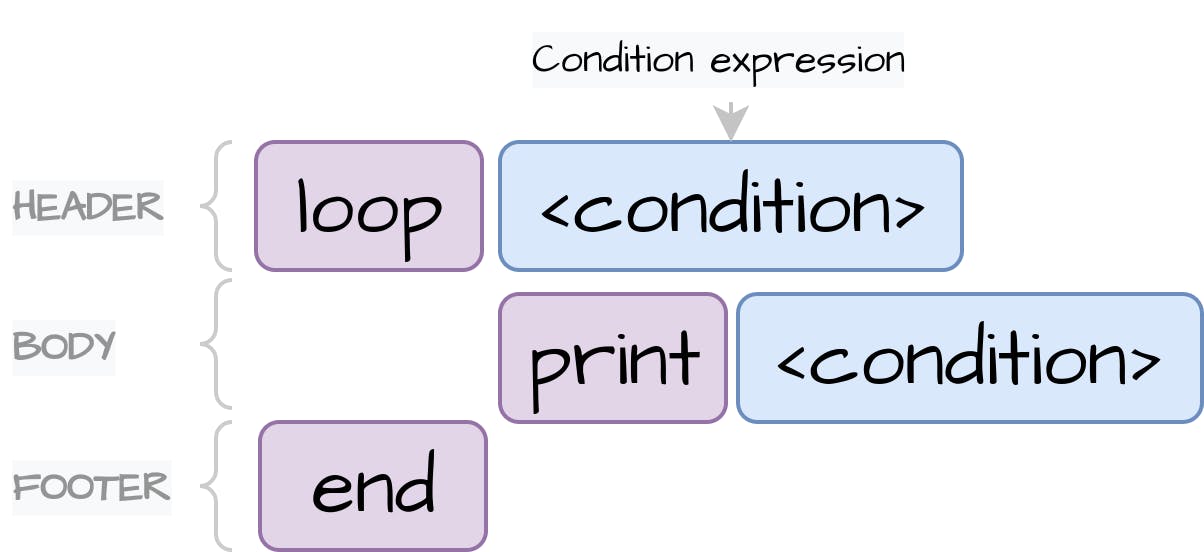
- For-each (Iterable) loop - to iterate through elements of arrays and structures:
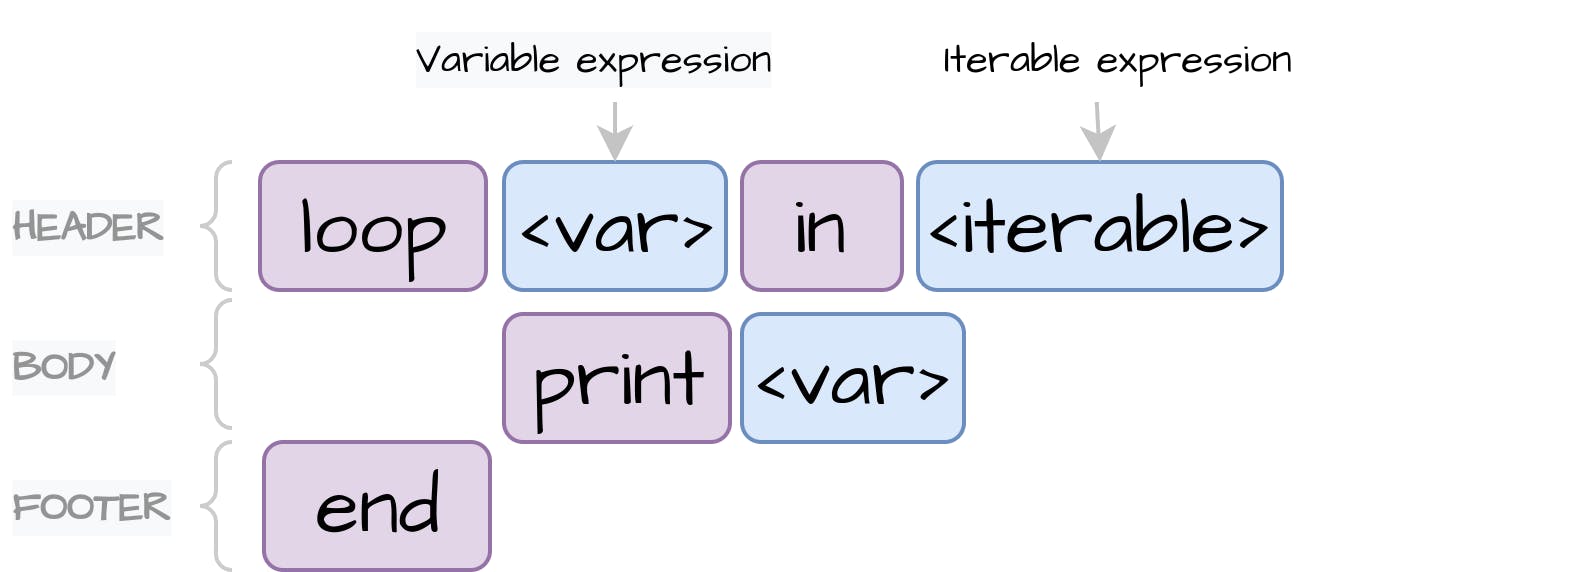
1 Lexical analysis
In the first section, we will cover lexical analysis. It’s a process to divide the source code into language lexemes, such as keyword, identifier/variable, operator, etc. To make our lexical analysis work with loop constructions, we add the following Keyword lexemes: loop, in, by to the TokenType enum:
1
2
3
4
5
6
7
8
| package org.example.toylanguage.token;
...
public enum TokenType {
...
Keyword("(if|elif|else|then|end|print|input|struct|fun|return|loop|in|by)(?=\\s|$)"),
...
}
|
Then, in order to separate the lower and upper bounds of the For loop range, we add the two-dot GroupDivider lexeme: [.]{2}
1
2
3
4
5
6
| ...
public enum TokenType {
...
GroupDivider("(\\[|\\]|\\,|\\{|}|[.]{2})"),
...
}
|
And finally, if we don’t want the Numeric lexeme to catch the two-dot GroupDivider lexeme declared after the loop’s lower bound, we add a negative look ahead construction before the dot expression: (?![.]{2})
1
2
3
4
5
6
| ...
public enum TokenType {
...
Numeric("([-]?(?=[.]?[0-9])[0-9]*(?![.]{2})[.]?[0-9]*)"),
...
}
|
2 Syntax analysis
Let’s move to the next section - the syntax analysis, which will convert the lexemes received from the previous step into the final statements following our language rules. As was said at the beginning, our language will support three types of loops: For, While and Iterable. Therefore, first we will declare the AbstractLoopStatement class, which will contain common execution process for all the loop types:
1
2
3
4
5
6
7
8
9
10
11
| package org.example.toylanguage.statement.loop;
public abstract class AbstractLoopStatement extends CompositeStatement {
protected abstract void init();
protected abstract boolean hasNext();
protected abstract void preIncrement();
protected abstract void postIncrement();
}
|
Inside this class, we declare the following abstract methods, which can have different implementation for each loop type:
init() - it will be invoked to perform initialization operations, like initializing a counter variable when a loop starts the execution.hasNext() - It will be called before each iteration to define that we still have remaining items to iterate.preIncrement() - It’s a prefix operation that will be called before each iteration.postIncrement() - It’s a postfix operation that will be called at the end of each iteration.
Before creating the loop implementations, we complete the Statement#execute() method by utilizing declared abstract methods. To start the execution, we invoke the init() method to initialize the loop state, but before that, we should open the new MemoryScope for the variables declared within the loop, as they shouldn’t be accessed after the loop ends. In the end of the execution, we release the earlier opened MemoryScope:
1
2
3
4
5
6
7
| MemoryContext.newScope();
try {
init();
} finally {
MemoryContext.endScope();
}
|
Next, to iterate a loop, we utilize the abstract hasNext() method. Inside each iteration, we invoke the loop’s inner statements, defined within the inherited CompositeStatement class. When the iteration starts, we invoke the preIncrement() method to perform the prefix increment operations. At the end of each iteration, we call the postIncrement() method to perform the postfix increment operations accordingly:
1
2
3
4
5
6
7
8
9
10
11
12
13
| while (hasNext()) {
preIncrement();
try {
// execute inner statements
for (Statement statement : getStatements2Execute()) {
statement.execute();
}
} finally {
postIncrement();
}
}
|
Next, to make sure that variables declared inside the loop statements are isolated from each iteration, we open the inner MemoryScope during the statements’ execution. And finally, if our loop is defined inside the function and one of the loop’s inner statements contains a return statement, we should stop the iteration immediately because it’s a sign to exit a function. Therefore, we validate that the function’s return statement hasn’t been called after each statement execution. The complete AbstractLoopStatement#execute() method:
1
2
3
4
5
6
7
8
9
10
11
12
13
14
15
16
17
18
19
20
21
22
23
24
25
26
27
28
29
30
31
32
33
34
35
36
37
38
| public abstract class AbstractLoopStatement extends CompositeStatement {
...
@Override
public void execute() {
MemoryContext.newScope();
try {
init();
while (hasNext()) {
preIncrement();
MemoryContext.newScope();
try {
// execute inner statements
for (Statement statement : getStatements2Execute()) {
statement.execute();
if (ReturnContext.getScope().isInvoked())
return;
}
} finally {
MemoryContext.endScope(); // release each iteration memory
postIncrement();
}
}
} finally {
MemoryContext.endScope(); // release loop memory
}
}
}
|
2.1 For loop
Let’s begin with the first For loop implementation. By our language design, it will contain the variable expression, the lower bound, the upper bound, and the step expression:
1
2
3
4
5
6
7
8
9
| package org.example.toylanguage.statement.loop;
@RequiredArgsConstructor
public class ForLoopStatement extends AbstractLoopStatement {
private final VariableExpression variable;
private final Expression lowerBound;
private final Expression uppedBound;
private final Expression step;
}
|
Next, we implement the abstract methods. Within the first init() method, we assign the lower bound to the variable by evaluating an instance of AssignmentOperator, which accepts the variable expression as a first operand and the lowerBound expression as a second operand:
1
2
3
4
5
6
7
8
9
10
| ...
public class ForLoopStatement extends AbstractLoopStatement {
...
@Override
protected void init() {
new AssignmentOperator(variable, lowerBound)
.evaluate();
}
}
|
Next, we override the hasNext(). It should return a boolean value if we remaining have items. To make a compare operation, we create an instance of the LessThenOperator by passing the variable expression as a first operand, and the upperBound as a second operand. As a result, we expect to get the LogicalValue with boolean value inside it:
1
2
3
4
5
6
7
8
9
10
11
| ...
public class ForLoopStatement extends AbstractLoopStatement {
...
@Override
protected boolean hasNext() {
LessThanOperator hasNext = new LessThanOperator(variable, uppedBound);
Value<?> value = hasNext.evaluate();
return value instanceof LogicalValue && ((LogicalValue) value).getValue();
}
}
|
Lastly, to perform the increment operations for each iteration, we need to implement the preIncrement() and postIncrement() methods. The For loop should use the step increment only at the end of each iteration. Therefore, we perform the increment only within the postIncrement() method. To implement the increment operation, we create an instance of the AdditionOperator, which will sum up the variable value with the step value, and assign the result to the variable expression again using an instance of the AssignmentOperator. If the step expression hasn’t been provided, we accumulate the NumericValue instance with the default value equal to 1.0 :
1
2
3
4
5
6
7
8
9
10
11
12
13
14
15
| ...
public class ForLoopStatement extends AbstractLoopStatement {
...
@Override
protected void preIncrement() {
}
@Override
protected void postIncrement() {
AdditionOperator stepOperator = new AdditionOperator(variable, Objects.requireNonNullElseGet(step, () -> new NumericValue(1.0)));
new AssignmentOperator(variable, stepOperator)
.evaluate();
}
}
|
2.2 While loop
The next loop implementation is the While loop. It’s more straightforward than the For loop, as we don’t need to perform addition and assignment operations at all. This operator will contain only the hasNext expression, which will only serve to calculate the hasNext() result. The other overridden methods will be empty:
1
2
3
4
5
6
7
8
9
10
11
12
13
14
15
16
17
18
19
20
21
22
23
24
| package org.example.toylanguage.statement.loop;
@RequiredArgsConstructor
public class WhileLoopStatement extends AbstractLoopStatement {
private final Expression hasNext;
@Override
protected void init() {
}
@Override
protected boolean hasNext() {
Value<?> value = hasNext.evaluate();
return value instanceof LogicalValue && ((LogicalValue) value).getValue();
}
@Override
protected void preIncrement() {
}
@Override
protected void postIncrement() {
}
}
|
2.3 Iterable loop
The last loop implementation is the Iterable loop. It will allow us to perform the for-each iterations with arrays and structures.
First, we define the new Value implementation, which will override the java.util.Iterable interface and, accordingly, will provide us with the java.util.Iterator implementation:
1
2
3
4
5
6
7
| package org.example.toylanguage.expression.value;
public abstract class IterableValue<T> extends Value<T> implements Iterable<Value<?>> {
public IterableValue(T value) {
super(value);
}
}
|
Next, we extend the ArrayValue by implementing IterableValue and passing array values to the Iterator instance:
1
2
3
4
5
6
7
8
9
10
| package org.example.toylanguage.expression.value;
public class ArrayValue extends IterableValue<List<Value<?>>> {
...
@Override
public Iterator<Value<?>> iterator() {
return getValue().iterator();
}
}
|
And we do the same extension for StructureValue as well. For now, we will iterate only the structure’s values. Later, we can introduce the dictionary data type to operate with key-value types:
1
2
3
4
5
6
7
8
9
10
| package org.example.toylanguage.expression.value;
public class StructureValue extends IterableValue<Map<String, Value<?>>> {
...
@Override
public Iterator<Value<?>> iterator() {
return getValue().values().iterator();
}
}
|
Now we have the two IterableValue implementations which can provide us with the Iterator instance, we can complete the Iterable loop with the corresponding implementation. It will contain the variable expression and the iterable expression. Also, we declare an auxiliary non-final Iterator<Value<?> field that will be used to iterate the loop:
1
2
3
4
5
6
7
8
9
| package org.example.toylanguage.expression.value;
@RequiredArgsConstructor
public class IterableLoopStatement extends AbstractLoopStatement {
private final VariableExpression variable;
private final Expression iterableExpression;
private Iterator<Value<?>> iterator;
}
|
Next, we override and resolve the abstract methods. Inside the init() method, we initialize the iterator field using the IterableValue’s iterator() method:
1
2
3
4
5
6
7
8
9
10
11
12
| ...
public class IterableLoopStatement extends AbstractLoopStatement {
...
@Override
protected void init() {
Value<?> value = iterableExpression.evaluate();
if (!(value instanceof IterableValue))
throw new ExecutionException(String.format("Unable to loop non IterableValue `%s`", value));
this.iterator = ((IterableValue<?>) value).iterator();
}
}
|
The hasNext() method will utilize the Iterator#hasNext() implementation. Lastly, we should perform the prefix increment operation to know the value that is currently being iterated. Within preIncrement(), we create an instance of the AssignmentOperator, which will accept the variable as a first operand, and the value received from the iterator as a second operand:
1
2
3
4
5
6
7
8
9
10
11
12
13
14
15
16
17
18
19
20
21
| ...
public class IterableLoopStatement extends AbstractLoopStatement {
...
@Override
protected boolean hasNext() {
return iterator.hasNext();
}
@Override
protected void preIncrement() {
Value<?> next = iterator.next();
new AssignmentOperator(variable, next)
.evaluate();
}
@Override
protected void postIncrement() {
}
}
|
2.4 StatementParser
To make the loop statements work, we need to map the loop lexemes to the defined statements using the StatementParser class. All the loops defined by the language grammar start with the loop keyword. Therefore, inside the parseExpression() method, we add a new loop case for the corresponding Keyword lexeme:
1
2
3
4
5
6
7
8
9
10
11
12
13
14
15
16
17
18
19
20
21
22
23
24
25
26
27
28
29
30
31
32
33
| package org.example.toylanguage;
public class StatementParser {
...
private Statement parseExpression() {
Token token = tokens.next(TokenType.Keyword, TokenType.Variable, TokenType.Operator);
switch (token.getType()) {
case Variable:
case Operator:
...
case Keyword:
switch (token.getValue()) {
case "print":
...
case "input":
...
case "if":
...
case "struct":
...
case "fun":
...
case "return":
...
case "loop":
...
}
default:
...
}
}
}
|
After the loop Keyword, we read the next expression using the Dijkstra Two-Stack algorithm defined within the ExpressionReader class. If we read the For or the Iterable loop, we expect this expression to be only a variable. If we read the While loop, this expression will act as a loop condition, which can be an instance of any Expression implementation, including operator or function invocation. Therefore, we split the execution. In case the expression is the VariableExpression instance and the next lexeme is the in Keyword, we continue to read the For and Iterable loop. In the negative case, we build the WhileLoopStatement using the condition expression:
1
2
3
4
5
6
7
8
9
10
| case "loop": {
Expression loopExpression = new ExpressionReader().readExpression();
AbstractLoopStatement loopStatement;
if (loopExpression instanceof VariableExpression && tokens.peek(TokenType.Keyword, "in")) {
// loop <variable> in <bounds>
} else {
// loop <condition>
loopStatement = new WhileLoopStatement(loopExpression);
}
|
Inside the For and Iterable loop clause, we skip the next in Keyword lexeme, and then read the following bounds expression. This expression can be an instance of any Expression implementation which can be evaluated to the lower bound value or IterableValue only when the code will be executed. To define which loop type it is, we can rely on the next lexeme. In the case of the For loop, after the lower bound expression, we expect to read the two-dot GroupDivider as a spliterator for lower and upper bounds. In the negative condition, we build the IterableLoopStatement:
1
2
3
4
5
6
7
8
9
10
11
12
13
14
| if (loopExpression instanceof VariableExpression && tokens.peek(TokenType.Keyword, "in")) {
// loop <variable> in <bounds>
VariableExpression variable = (VariableExpression) loopExpression;
tokens.next(TokenType.Keyword, "in");
Expression bounds = new ExpressionReader().readExpression();
if (tokens.peek(TokenType.GroupDivider, "..")) {
// loop <variable> in <lower_bound>..<upper_bound>
} else {
// loop <variable> in <iterable>
loopStatement = new IterableLoopStatement(variable, bounds);
}
}
|
To build the last For loop statement, we skip the two-dot GroupDivider and read the upper bound expression. In our language grammar, for the For loop, we can define the step expression with the by keyword. Therefore, if the next expression is the by lexeme, we read the following step expression. At the end, we build an instance of the ForLoopStatement:
1
2
3
4
5
6
7
8
9
10
11
12
13
14
| if (tokens.peek(TokenType.GroupDivider, "..")) {
// loop <variable> in <lower_bound>..<upper_bound>
tokens.next(TokenType.GroupDivider, "..");
Expression upperBound = new ExpressionReader().readExpression();
Expression step = null;
if (tokens.peek(TokenType.Keyword, "by")) {
// loop <variable> in <lower_bound>..<upper_bound> by <step>
tokens.next(TokenType.Keyword, "by");
step = new ExpressionReader().readExpression();
}
loopStatement = new ForLoopStatement(variable, bounds, upperBound, step);
}
|
We have read every loop type declaration. Finally, we can read the body of the loop. To gather all internal statements, we invoke the recursive StatementParser#parseExpression() method, which will return an instance of the Statement interface. We should stop the process when we reach the finalizing end lexeme:
1
2
3
4
| while (!tokens.peek(TokenType.Keyword, "end")) {
Statement statement = parseExpression();
loopStatement.addStatement(statement);
}
|
At the end, we skip this end keyword and return the loopStatement. The complete loop clause:
1
2
3
4
5
6
7
8
9
10
11
12
13
14
15
16
17
18
19
20
21
22
23
24
25
26
27
28
29
30
31
32
33
34
35
36
37
38
39
40
41
42
43
| case "loop": {
Expression loopExpression = new ExpressionReader().readExpression();
AbstractLoopStatement loopStatement;
if (loopExpression instanceof VariableExpression && tokens.peek(TokenType.Keyword, "in")) {
// loop <variable> in <bounds>
VariableExpression variable = (VariableExpression) loopExpression;
tokens.next(TokenType.Keyword, "in");
Expression bounds = new ExpressionReader().readExpression();
if (tokens.peek(TokenType.GroupDivider, "..")) {
// loop <variable> in <lower_bound>..<upper_bound>
tokens.next(TokenType.GroupDivider, "..");
Expression upperBound = new ExpressionReader().readExpression();
Expression step = null;
if (tokens.peek(TokenType.Keyword, "by")) {
// loop <variable> in <lower_bound>..<upper_bound> by <step>
tokens.next(TokenType.Keyword, "by");
step = new ExpressionReader().readExpression();
}
loopStatement = new ForLoopStatement(variable, bounds, upperBound, step);
} else {
// loop <variable> in <iterable>
loopStatement = new IterableLoopStatement(variable, bounds);
}
} else {
// loop <condition>
loopStatement = new WhileLoopStatement(loopExpression);
}
while (!tokens.peek(TokenType.Keyword, "end")) {
Statement statement = parseExpression();
loopStatement.addStatement(statement);
}
tokens.next(TokenType.Keyword, "end");
return loopStatement;
}
|
3 Tests
We have finished embedding loops in both lexical and syntax analyzers. Now we should be able to perform For, While and Iterable loops. Let’s create and test a more real task - the bubble sort algorithm:
1
2
3
4
5
6
7
8
9
10
11
12
13
14
15
16
17
18
19
20
21
22
23
24
25
26
27
28
29
30
31
32
33
| fun bubble_sort [ arr, n ]
loop i in 0..n - 1
loop j in 0..n - i - 1
if arr{j+1} < arr{j} then
temp = arr{j}
arr{j} = arr{j + 1}
arr{j + 1} = temp
end
end
end
end
fun is_sorted [ arr, n ]
loop i in 0..n - 1
if arr{i} > arr{i+1} then
return false
end
end
return true
end
arr = {}
arr_len = 20
loop i in 0..arr_len by 1
arr << i * 117 % 17 - 1
end
print arr # [-1, 14, 12, 10, 8, 6, 4, 2, 0, 15, 13, 11, 9, 7, 5, 3, 1, -1, 14, 12]
print is_sorted [ arr, arr_len ] # false
bubble_sort [ arr, arr_len ]
print arr # [-1, -1, 0, 1, 2, 3, 4, 5, 6, 7, 8, 9, 10, 11, 12, 12, 13, 14, 14, 15]
print is_sorted [ arr, arr_len ] # true
|
Building Your Own Programming Language From Scratch: Part VII - Classes
In this part of creating your own programming language, we will implement classes as an extension over the previously defined structures. Please check out the previous parts:
- Building Your Own Programming Language From Scratch
- Building Your Own Programming Language From Scratch: Part II - Dijkstra’s Two-Stack Algorithm
- Build Your Own Programming Language Part III: Improving Lexical Analysis with Regex Lookaheads
- Building Your Own Programming Language From Scratch Part IV: Implementing Functions
- Building Your Own Programming Language From Scratch: Part V - Arrays
- Building Your Own Programming Language From Scratch: Part VI - Loops
The full source code is available over on GitHub.
1. Lexical Analysis
In the first section, we will cover lexical analysis. In short, it’s a process to divide the source code into language lexemes, such as keyword, variable, operator, etc.
You may remember from the previous parts that I was using the regex expressions in the TokenType enum to define all the lexeme types.
Let’s look at the following class prototype and add the missing regex parts to our TokenType lexemes:
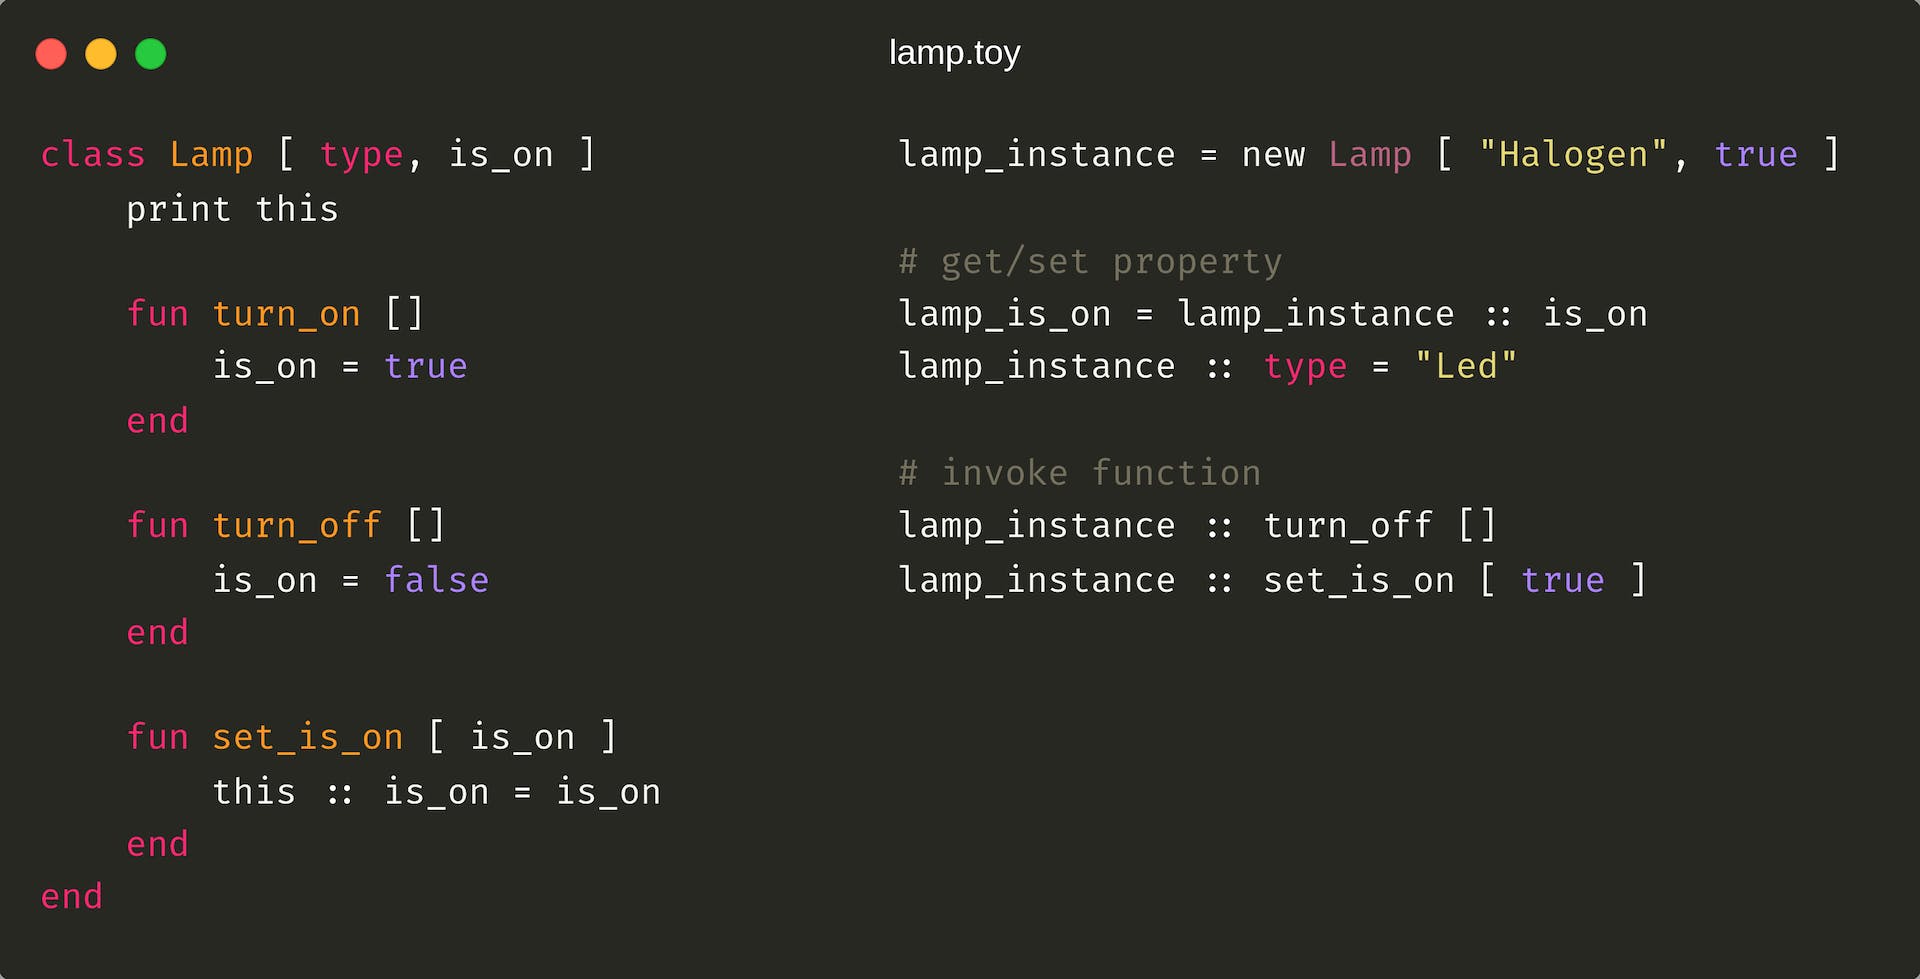
- First, we need to put the
class word in the Keyword lexeme’s expression to let the lexical analyzer know where our class declaration begins:
1
2
3
4
5
6
7
8
9
10
| package org.example.toylanguage.token;
...
public enum TokenType {
...
Keyword("(if|elif|else|end|print|input|fun|return|loop|in|by|break|next|class)(?=\\s|$)"),
...
private final String regex;
}
|
- Second, we need the new
This lexeme as a marker for a reference to the current object:
1
2
3
4
5
6
| public enum TokenType {
...
This("(this)(?=,|\\s|$)");
private final String regex;
}
|
2. Syntax Analysis
In the second section, we will transform the lexemes received from the lexical analyzer into the final statements following our language rules.
2.1 Definition Scope
When we declare a class or a function, this declaration should be available within the defined isolated bounds. For example, if we declare a function named turn_on [] in the following listing, it will be available for execution after declaration:
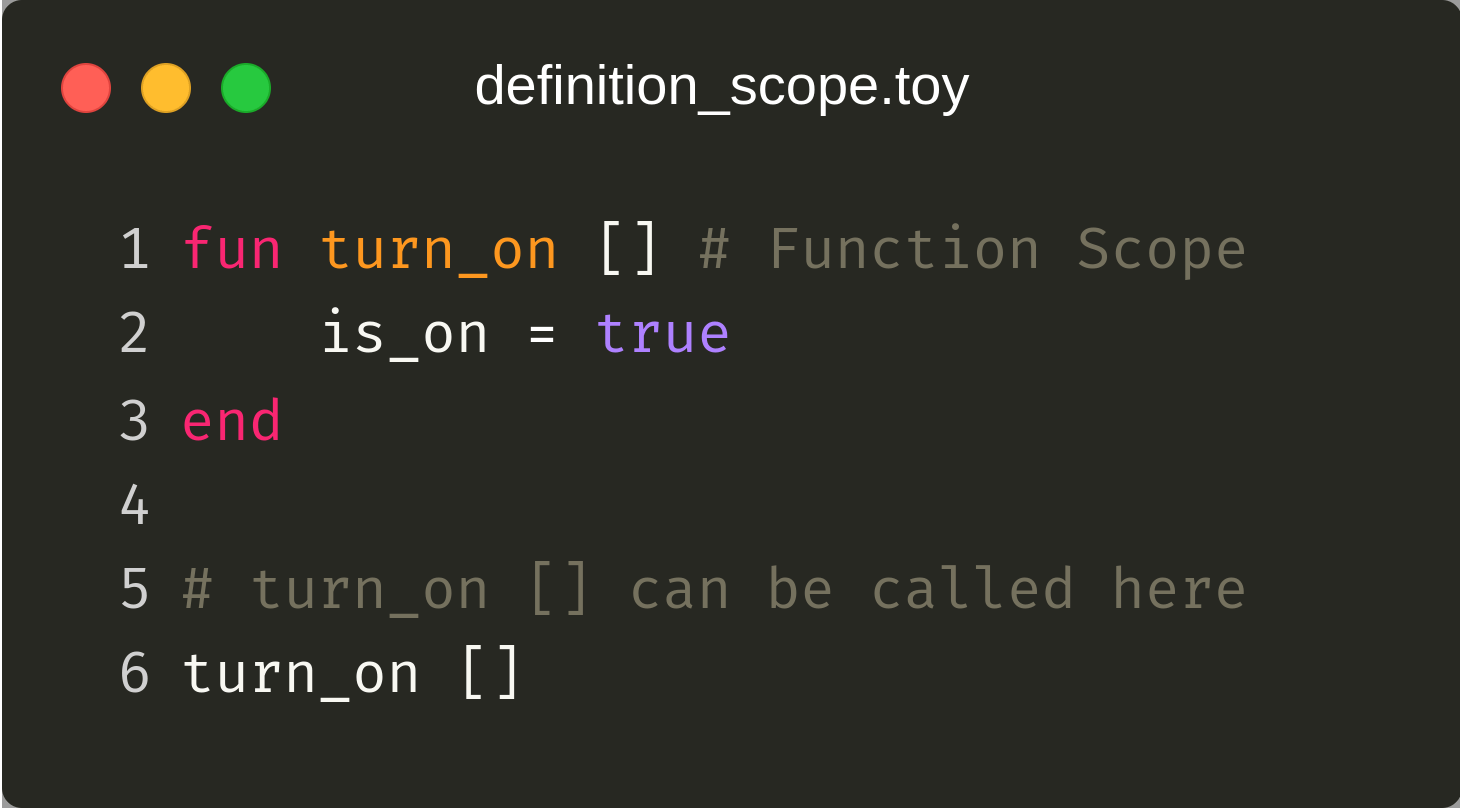
But if we declare the same function inside a class scope, this function will no longer be accessed directly from the main block:
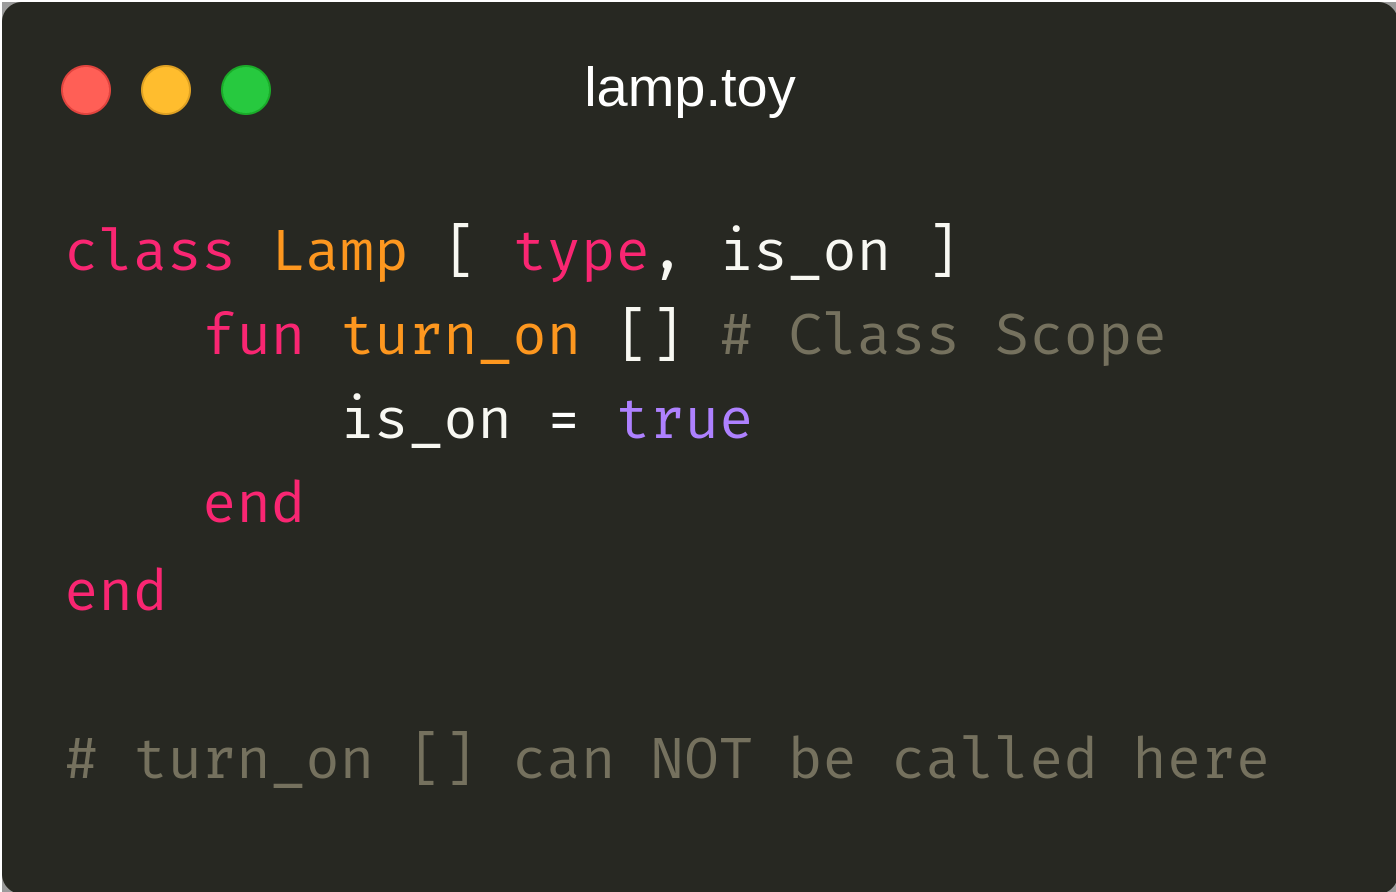
- To implement these definition bounds, we’ll create the
DefinitionScope class and store all the declared definitions inside two sets for classes and functions:
1
2
3
4
5
6
7
8
9
10
11
| package org.example.toylanguage.context.definition;
public class DefinitionScope {
private final Set<ClassDefinition> classes;
private final Set<FunctionDefinition> functions;
public DefinitionScope() {
this.classes = new HashSet<>();
this.functions = new HashSet<>();
}
}
|
- In addition, we may want to access the parent’s definition scope. For example, if we declare two separate classes and create an instance of the first class inside the second one:
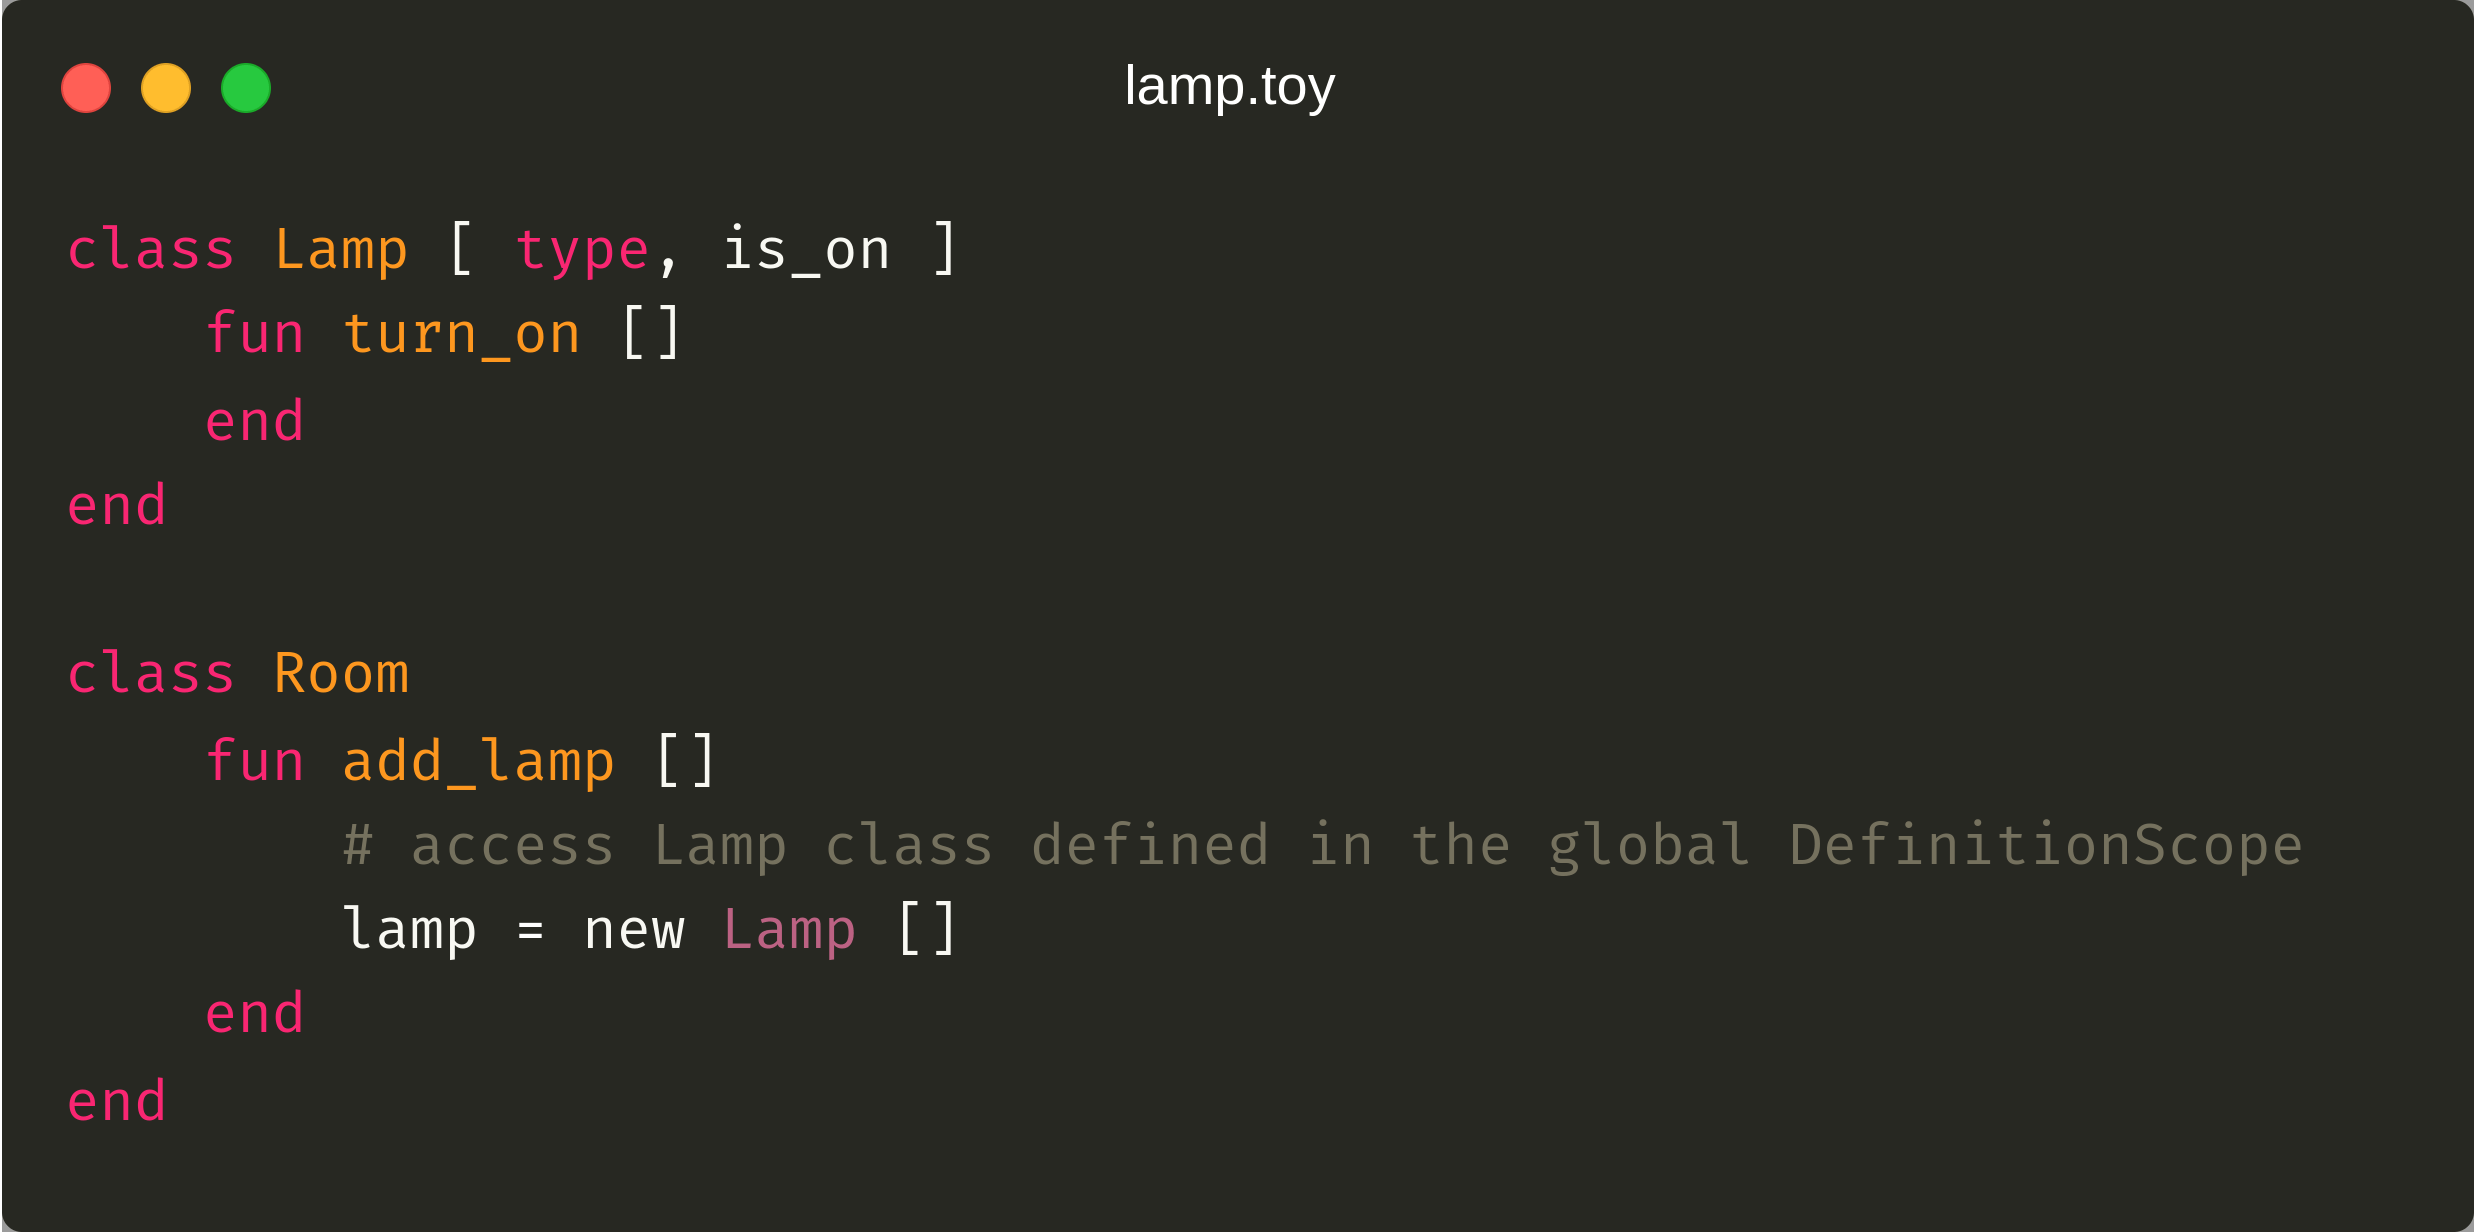
To provide this ability, we will add the DefinitionScope parent instance as a reference to the upper layer, which we will use to climb to the top definition layer.
1
2
3
4
5
6
7
8
9
10
11
| public class DefinitionScope {
private final Set<ClassDefinition> classes;
private final Set<FunctionDefinition> functions;
private final DefinitionScope parent;
public DefinitionScope(DefinitionScope parent) {
this.classes = new HashSet<>();
this.functions = new HashSet<>();
this.parent = parent;
}
}
|
- Now, let’s finish the implementation by providing the interfaces to add a definition and retrieve it by name using parent scope:
1
2
3
4
5
6
7
8
9
10
11
12
13
14
15
16
17
18
19
20
21
22
23
24
25
26
27
28
29
30
31
32
33
34
35
| public class DefinitionScope {
…
public ClassDefinition getClass(String name) {
Optional<ClassDefinition> classDefinition = classes.stream()
.filter(t -> t.getName().equals(name))
.findAny();
if (classDefinition.isPresent())
return classDefinition.get();
else if (parent != null)
return parent.getClass(name);
else
throw new ExecutionException(String.format("Class is not defined: %s", name));
}
public void addClass(ClassDefinition classDefinition) {
classes.add(classDefinition);
}
public FunctionDefinition getFunction(String name) {
Optional<FunctionDefinition> functionDefinition = functions.stream()
.filter(t -> t.getName().equals(name))
.findAny();
if (functionDefinition.isPresent())
return functionDefinition.get();
else if (parent != null)
return parent.getFunction(name);
else
throw new ExecutionException(String.format("Function is not defined: %s", name));
}
public void addFunction(FunctionDefinition functionDefinition) {
functions.add(functionDefinition);
}
}
|
- Finally, to manage declared definition scopes and switch between them, we create the context class using
java.util.Stack collection (LIFO):
1
2
3
4
5
6
7
8
9
10
11
12
13
14
15
16
17
18
19
20
21
| package org.example.toylanguage.context.definition;
public class DefinitionContext {
private final static Stack<DefinitionScope> scopes = new Stack<>();
public static DefinitionScope getScope() {
return scopes.peek();
}
public static DefinitionScope newScope() {
return new DefinitionScope(scopes.isEmpty() ? null : scopes.peek());
}
public static void pushScope(DefinitionScope scope) {
scopes.push(scope);
}
public static void endScope() {
scopes.pop();
}
}
|
2.2 Memory scope
In this section, we will cover the MemoryScope to manage class and function variables.
- Each declared variable, similarly to the class or function definition, should be accessible only within an isolated block of code. For example, if we define a variable in the following listing, you can access it right after the declaration:
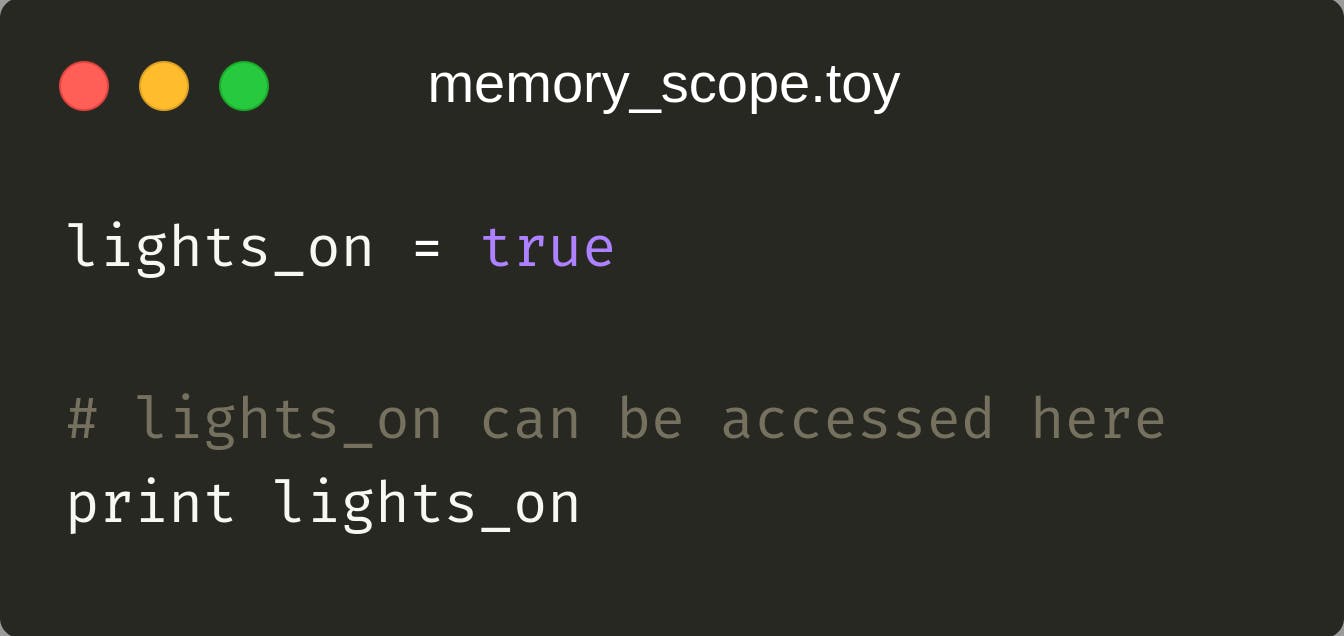
But if we declare a variable within a function or a class, the variable will no longer be available from the main (upper) block of code:
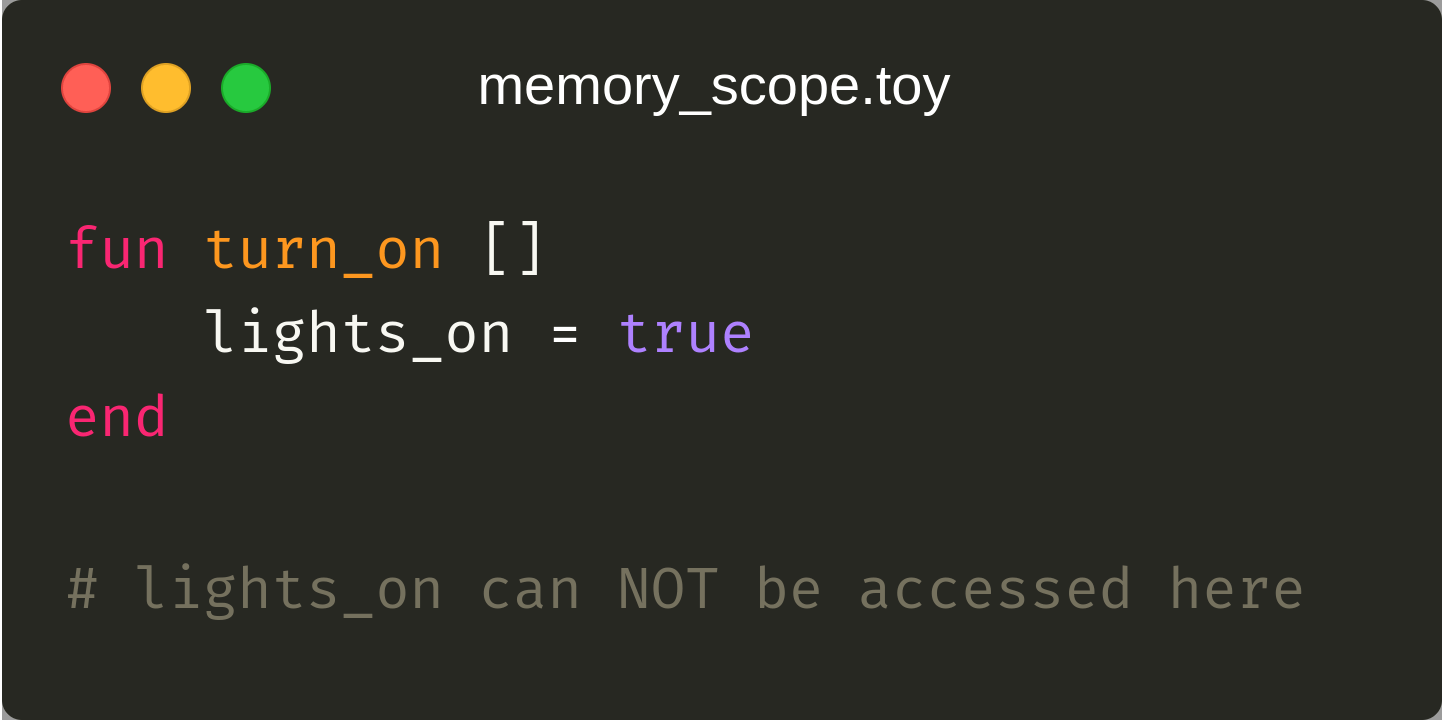
To implement this logic and store variables defined in a specific scope, we create the MemoryScope class that will contain a map with the variable name as a key and the variable Value as a value:
1
2
3
4
5
6
7
| public class MemoryScope {
private final Map<String, Value<?>> variables;
public MemoryScope() {
this.variables = new HashMap<>();
}
}
|
- Next, similarly to the
DefinitionScope, we provide access to the parent’s scope variables:
1
2
3
4
5
6
7
8
9
| public class MemoryScope {
private final Map<String, Value<?>> variables;
private final MemoryScope parent;
public MemoryScope(MemoryScope parent) {
this.variables = new HashMap<>();
this.parent = parent;
}
}
|
- Next, we add methods to get and set variables. When we set a variable, we always re-assign the previously set value if there is already a defined variable in the upper
MemoryScope layer:
1
2
3
4
5
6
7
8
9
10
11
12
13
14
15
16
17
18
19
20
21
22
23
24
25
26
27
28
| public class MemoryScope {
...
public Value<?> get(String name) {
Value<?> value = variables.get(name);
if (value != null)
return value;
else if (parent != null)
return parent.get(name);
else
return NullValue.NULL_INSTANCE;
}
public void set(String name, Value<?> value) {
MemoryScope variableScope = findScope(name);
if (variableScope == null) {
variables.put(name, value);
} else {
variableScope.variables.put(name, value);
}
}
private MemoryScope findScope(String name) {
if (variables.containsKey(name))
return this;
return parent == null ? null : parent.findScope(name);
}
}
|
- In addition to the
set and get methods, we add two more implementations to interact with the current (local) layer of MemoryScope:
1
2
3
4
5
6
7
8
9
10
11
| public class MemoryScope {
...
public Value<?> getLocal(String name) {
return variables.get(name);
}
public void setLocal(String name, Value<?> value) {
variables.put(name, value);
}
}
|
These methods will be used later to initialize function arguments or class’s instance arguments. For example, if we create an instance of the Lamp class and pass the predefined global type variable, this variable shouldn’t be changed when we try to update the lamp_instance :: type property:
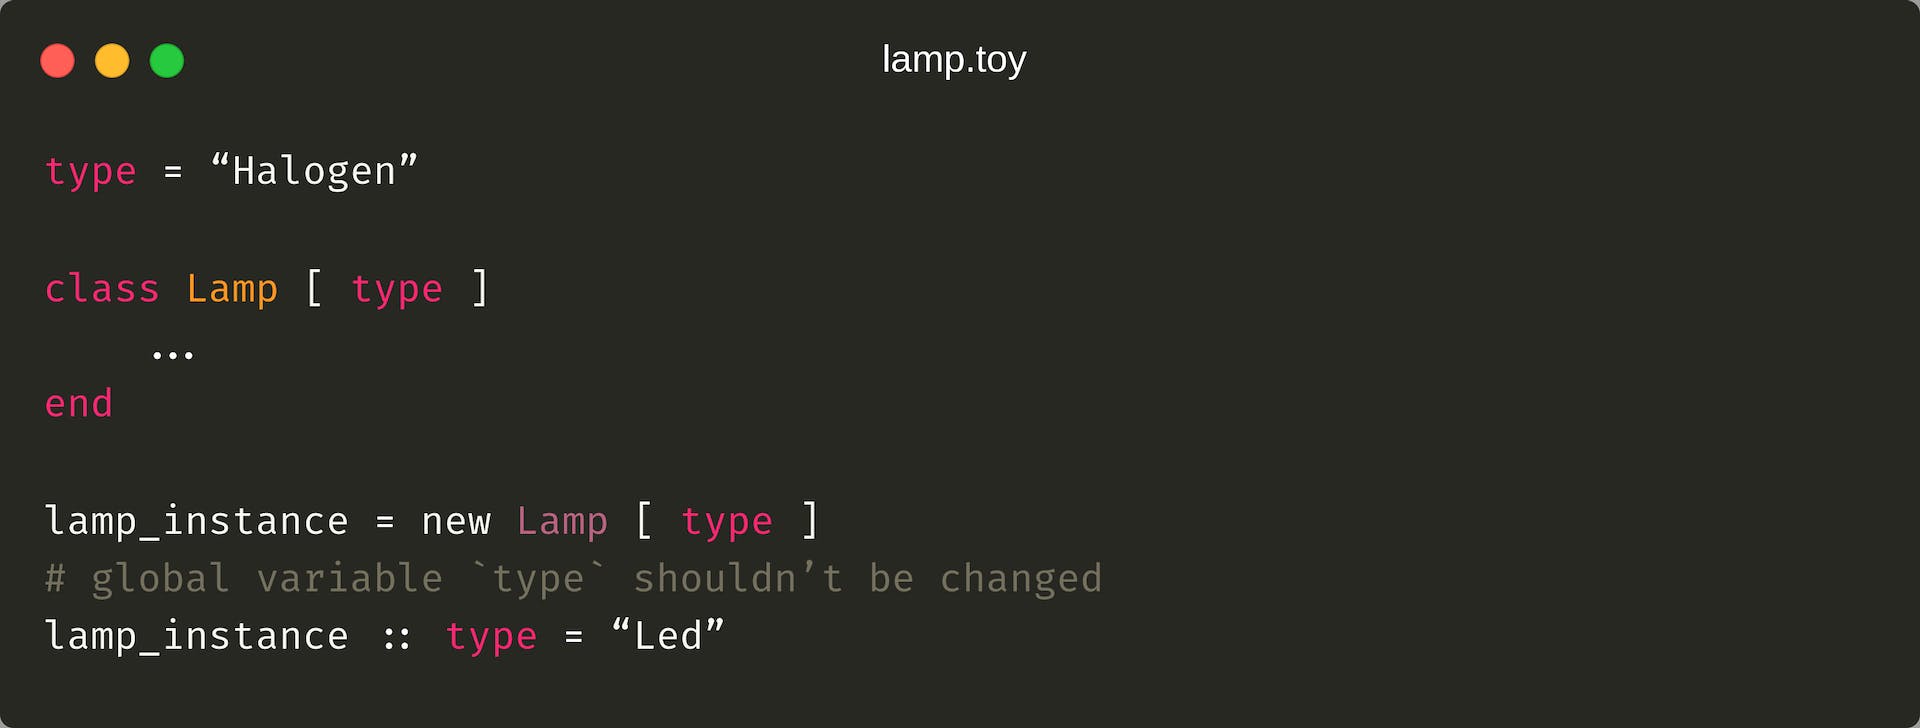
- Finally, to manage variables and switch between memory scopes, we create the
MemoryContext implementation using java.util.Stack collection:
1
2
3
4
5
6
7
8
9
10
11
12
13
14
15
16
17
18
19
20
21
| package org.example.toylanguage.context;
public class MemoryContext {
private static final Stack<MemoryScope> scopes = new Stack<>();
public static MemoryScope getScope() {
return scopes.peek();
}
public static MemoryScope newScope() {
return new MemoryScope(scopes.isEmpty() ? null : scopes.peek());
}
public static void pushScope(MemoryScope scope) {
scopes.push(scope);
}
public static void endScope() {
scopes.pop();
}
}
|
2.3 Class Definition
In this section, we will read and store class definitions.
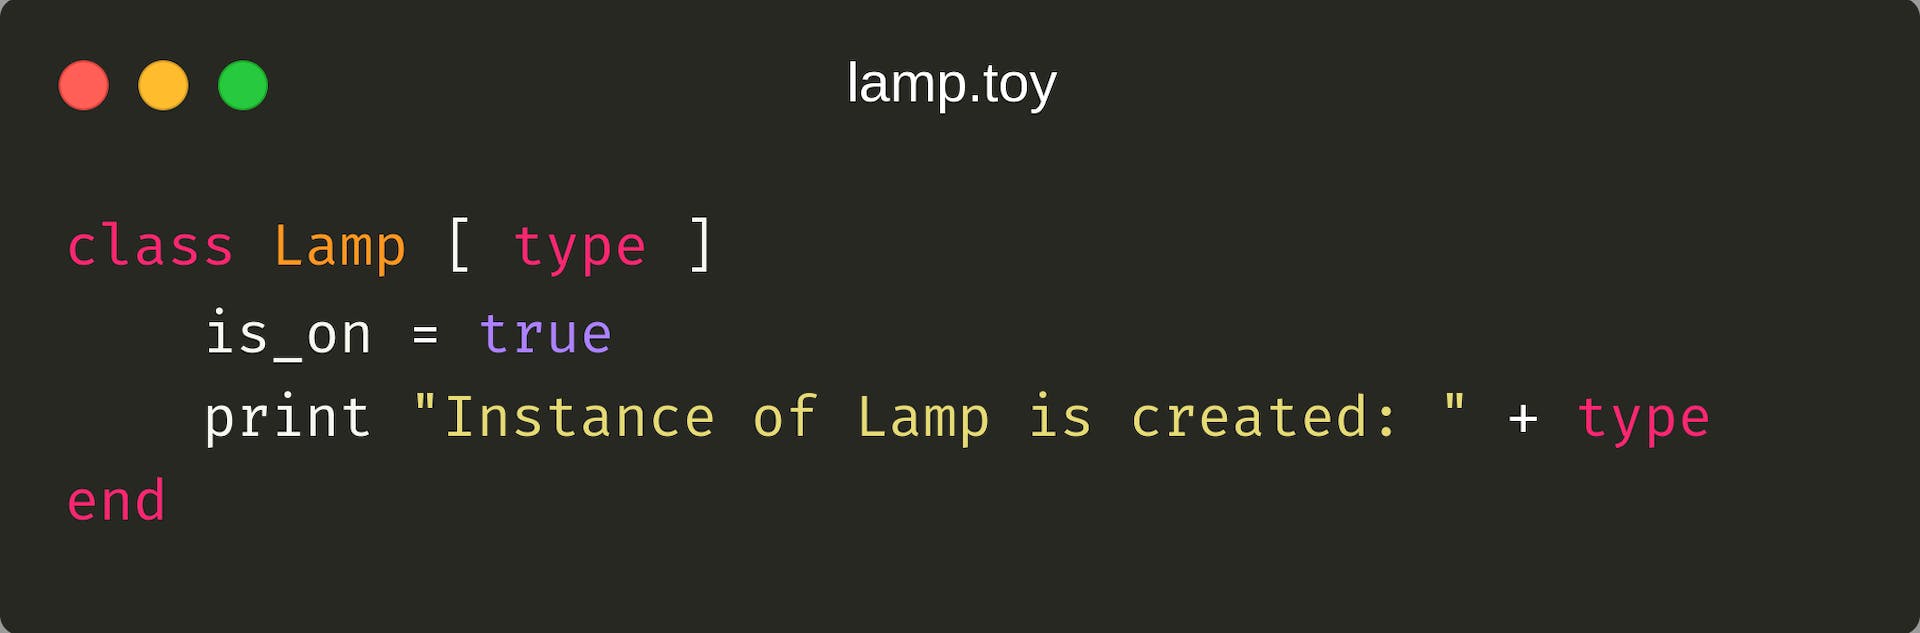
- First, we create the Statement implementation. This statement will be executed every time we create a class’s instance:
1
2
3
4
| package org.example.toylanguage.statement;
public class ClassStatement {
}
|
- Each class can contain nested statements for the initialization and other operations, like a constructor. To store these statements, we extend the CompositeStatement which contains the list of nested statements to execute:
1
2
| public class ClassStatement extends CompositeStatement {
}
|
- Next, we declare the
ClassDefinition to store the class name, its arguments, constructor statements, and the definition scope with the class’s functions:
1
2
3
4
5
6
7
8
9
10
11
12
13
14
| package org.example.toylanguage.context.definition;
import java.util.List;
@RequiredArgsConstructor
@Getter
@EqualsAndHashCode(onlyExplicitlyIncluded = true)
public class ClassDefinition implements Definition {
@EqualsAndHashCode.Include
private final String name;
private final List<String> arguments;
private final ClassStatement statement;
private final DefinitionScope definitionScope;
}
|
- Now, we’re ready to read the class declaration using StatementParser. When we meet the Keyword lexeme with
class value, first we need to read the class name and its arguments inside the square brackets:
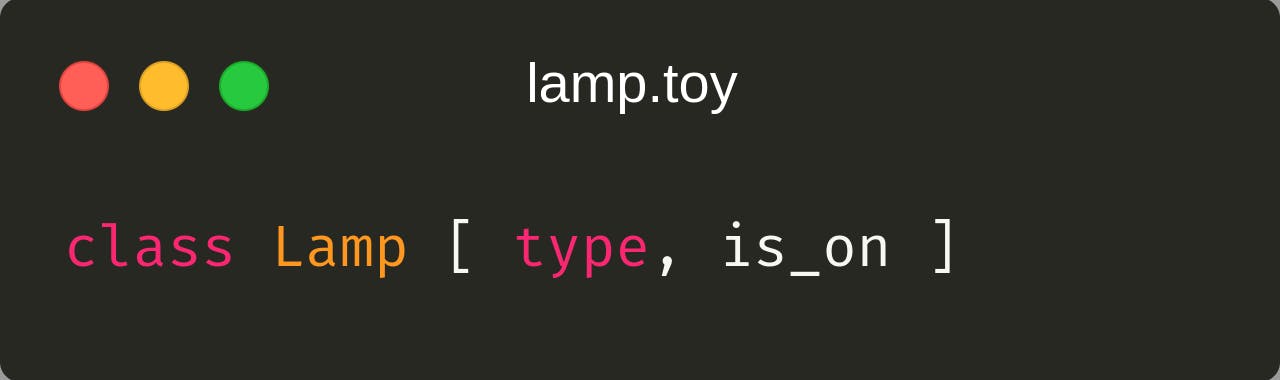
1
2
3
4
5
6
7
8
9
10
11
12
13
14
15
16
17
18
19
20
21
22
23
24
25
26
27
| package org.example.toylanguage;
public class StatementParser {
...
private void parseClassDefinition() {
Token type = tokens.next(TokenType.Variable);
List<String> arguments = new ArrayList<>();
if (tokens.peek(TokenType.GroupDivider, "[")) {
tokens.next(TokenType.GroupDivider, "["); //skip opening square bracket
while (!tokens.peek(TokenType.GroupDivider, "]")) {
Token argumentToken = tokens.next(TokenType.Variable);
arguments.add(argumentToken.getValue());
if (tokens.peek(TokenType.GroupDivider, ","))
tokens.next();
}
tokens.next(TokenType.GroupDivider, "]"); //skip closing square bracket
}
}
}
|
- After the arguments, we expect to read the nested constructor statements:
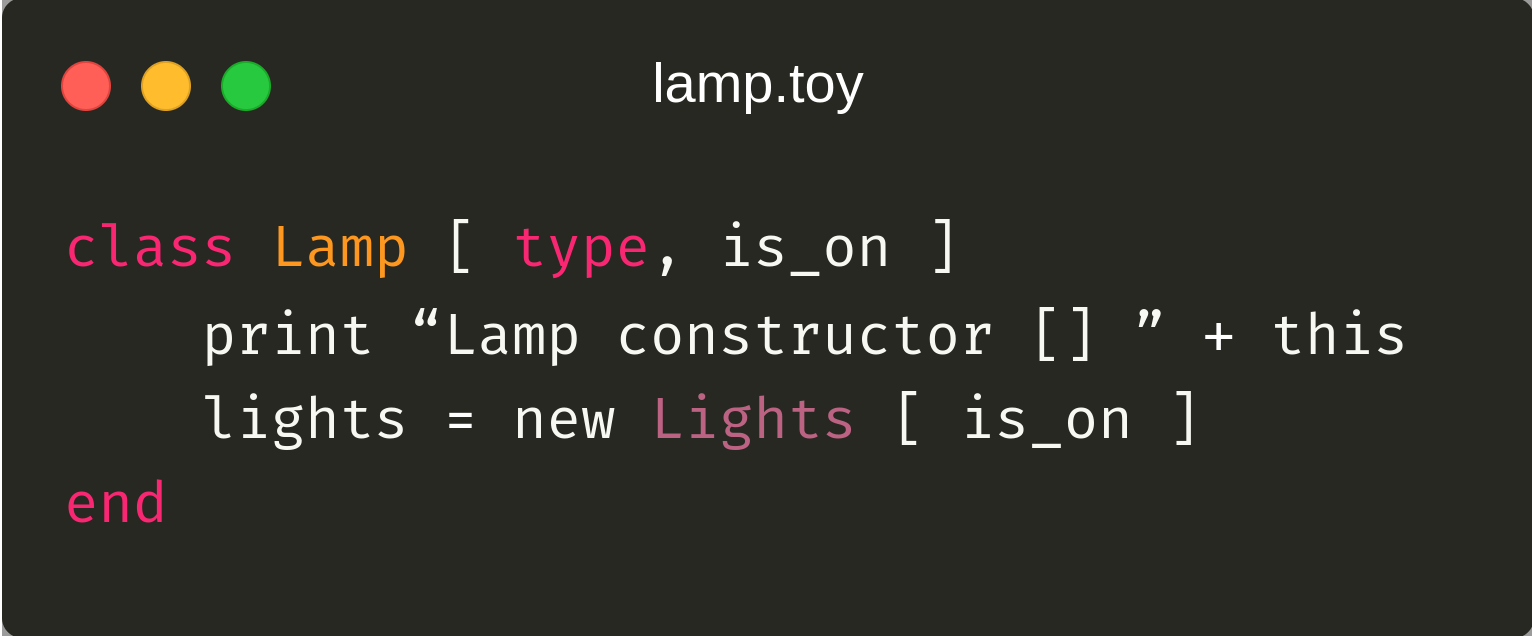
To store these statements, we create an instance of the previously defined ClassStatement:
1
2
3
4
5
| private void parseClassDefinition() {
...
ClassStatement classStatement = new ClassStatement();
}
|
- In addition to arguments and nested statements, our classes can also contain functions. To make these functions accessible only within the class definition, we initialize a new layer of
DefinitionScope:
1
2
3
4
5
6
| private void parseClassDefinition() {
...
ClassStatement classStatement = new ClassStatement();
DefinitionScope classScope = DefinitionContext.newScope();
}
|
- Next, we initialize an instance of
ClassDefinition and put it to the DefinitionContext:
1
2
3
4
5
6
7
8
| private void parseClassDefinition() {
...
ClassStatement classStatement = new ClassStatement();
DefinitionScope classScope = DefinitionContext.newScope();
ClassDefinition classDefinition = new ClassDefinition(type.getValue(), arguments, classStatement, classScope);
DefinitionContext.getScope().addClass(classDefinition);
}
|
- Finally, to read the class constructor statements and functions, we call the static StatementParser#parse() method that will collect statements inside
classStatement instance until we meet the finalizing end lexeme that must be skipped at the end:
1
2
3
4
5
6
7
| private void parseClassDefinition() {
...
//parse class statements
StatementParser.parse(this, classStatement, classScope);
tokens.next(TokenType.Keyword, "end");
}
|
2.4 Class Instance
At this point, we can already read class definitions with constructor statements and functions. Now, let’s parse the class’s instance:
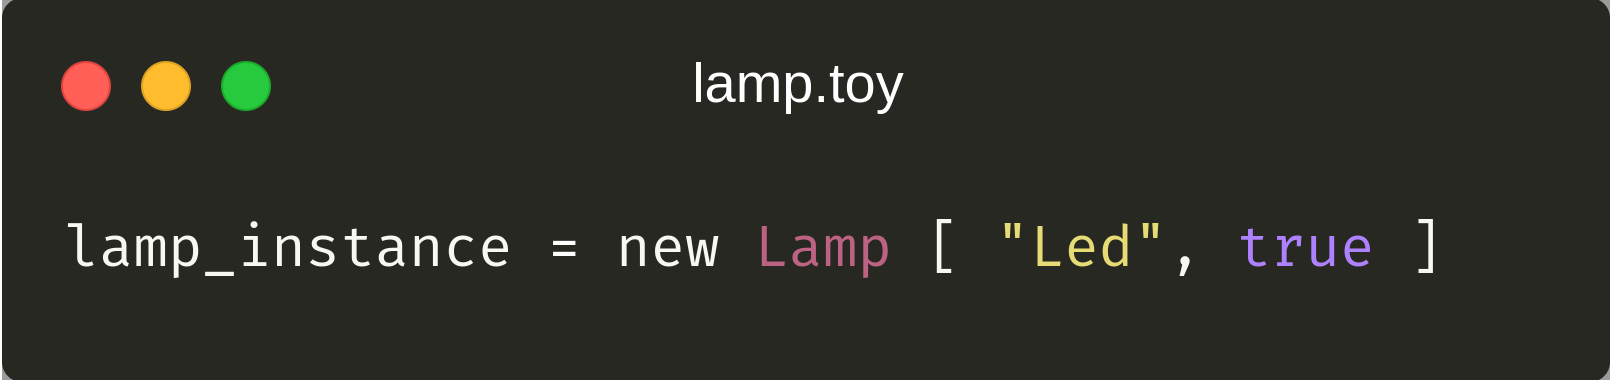
- First, we define
ClassValue, which will contain the state of each class instance. Classes, unlike functions, should have a permanent MemoryScope and this scope should be available with all the class’s instance arguments and state variables every time we interact with the class instance:
1
2
3
4
5
6
7
8
| public class ClassValue extends IterableValue<ClassDefinition> {
private final MemoryScope memoryScope;
public ClassValue(ClassDefinition definition, MemoryScope memoryScope) {
super(definition);
this.memoryScope = memoryScope;
}
}
|
- Next, we provide methods to work with the class’s instance properties using
MemoryContext:
1
2
3
4
5
6
7
8
9
10
11
12
13
14
15
16
17
18
19
20
21
22
23
24
| public class ClassValue extends IterableValue<ClassDefinition> {
private final MemoryScope memoryScope;
public ClassValue(ClassDefinition definition, MemoryScope memoryScope) {
super(definition);
this.memoryScope = memoryScope;
}
@Override
public String toString() {
return getValue().getArguments().stream()
.map(t -> t + " = " + getValue(t))
.collect(Collectors.joining(", ", getValue().getName() + " [ ", " ]"));
}
public Value<?> getValue(String name) {
Value<?> result = MemoryContext.getScope().getLocal(name);
return result != null ? result : NULL_INSTANCE;
}
public void setValue(String name, Value<?> value) {
MemoryContext.getScope().setLocal(name, value);
}
}
|
- Please notice that by calling the
MemoryScope#getLocal() and MemoryScope#setLocal() methods, we work with the current layer of MemoryScope variables. But before accessing the class’s instance state, we need to put its MemoryScope to the MemoryContext and release it when we finish:
1
2
3
4
5
6
7
8
9
10
11
12
13
14
15
16
17
18
19
20
21
22
| public class ClassValue extends IterableValue<ClassDefinition> {
...
public Value<?> getValue(String name) {
MemoryContext.pushScope(memoryScope);
try {
Value<?> result = MemoryContext.getScope().getLocal(name);
return result != null ? result : NULL_INSTANCE;
} finally {
MemoryContext.endScope();
}
}
public void setValue(String name, Value<?> value) {
MemoryContext.pushScope(memoryScope);
try {
MemoryContext.getScope().setLocal(name, value);
} finally {
MemoryContext.endScope();
}
}
}
|
- Next, we can implement the remaining
ClassExpression that will be used to construct defined class instances during syntax analysis. To declare class’s instance definition, we provide the ClassDefinition and list of Expression arguments that will be transformed into the final Value instances during statement execution:
1
2
3
4
5
6
7
8
9
10
11
12
13
| package org.example.toylanguage.expression;
@RequiredArgsConstructor
@Getter
public class ClassExpression implements Expression {
private final ClassDefinition definition;
private final List<Expression> arguments;
@Override
public Value<?> evaluate() {
...
}
}
|
- Let’s implement the
Expression#evaluate() method that will be used during execution to create an instance of the previously defined ClassValue. First, we evaluate the Expression arguments into the Value arguments:
1
2
3
4
5
6
7
| @Override
public Value<?> evaluate() {
//initialize class arguments
List<Value<?>> values = arguments.stream()
.map(Expression::evaluate)
.collect(Collectors.toList());
}
|
- Next, we create an empty memory scope that should be isolated from the other variables and can contain only the class’s instance state variables:
1
2
3
4
5
6
7
8
9
10
11
12
13
14
15
16
17
18
| @Override
public Value<?> evaluate() {
//initialize class arguments
List<Value<?>> values = arguments.stream().map(Expression::evaluate).collect(Collectors.toList());
//get class's definition and statement
ClassStatement classStatement = definition.getStatement();
//set separate scope
MemoryScope classScope = new MemoryScope(null);
MemoryContext.pushScope(classScope);
try {
...
} finally {
MemoryContext.endScope();
}
}
|
- Next, we create an instance of
ClassValue and write the class’s Value arguments to the isolated memory scope:
1
2
3
4
5
6
7
8
9
10
11
12
| try {
//initialize constructor arguments
ClassValue classValue = new ClassValue(definition, classScope);
IntStream.range(0, definition.getArguments().size()).boxed()
.forEach(i -> MemoryContext.getScope()
.setLocal(definition.getArguments().get(i), values.size() > i ? values.get(i) : NullValue.NULL_INSTANCE));
...
} finally {
MemoryContext.endScope();
}
|
Please notice that we transformed the Expression arguments into the Value arguments before setting up an empty MemoryScope. Otherwise, we will not be able to access the class’s instance arguments, for example:
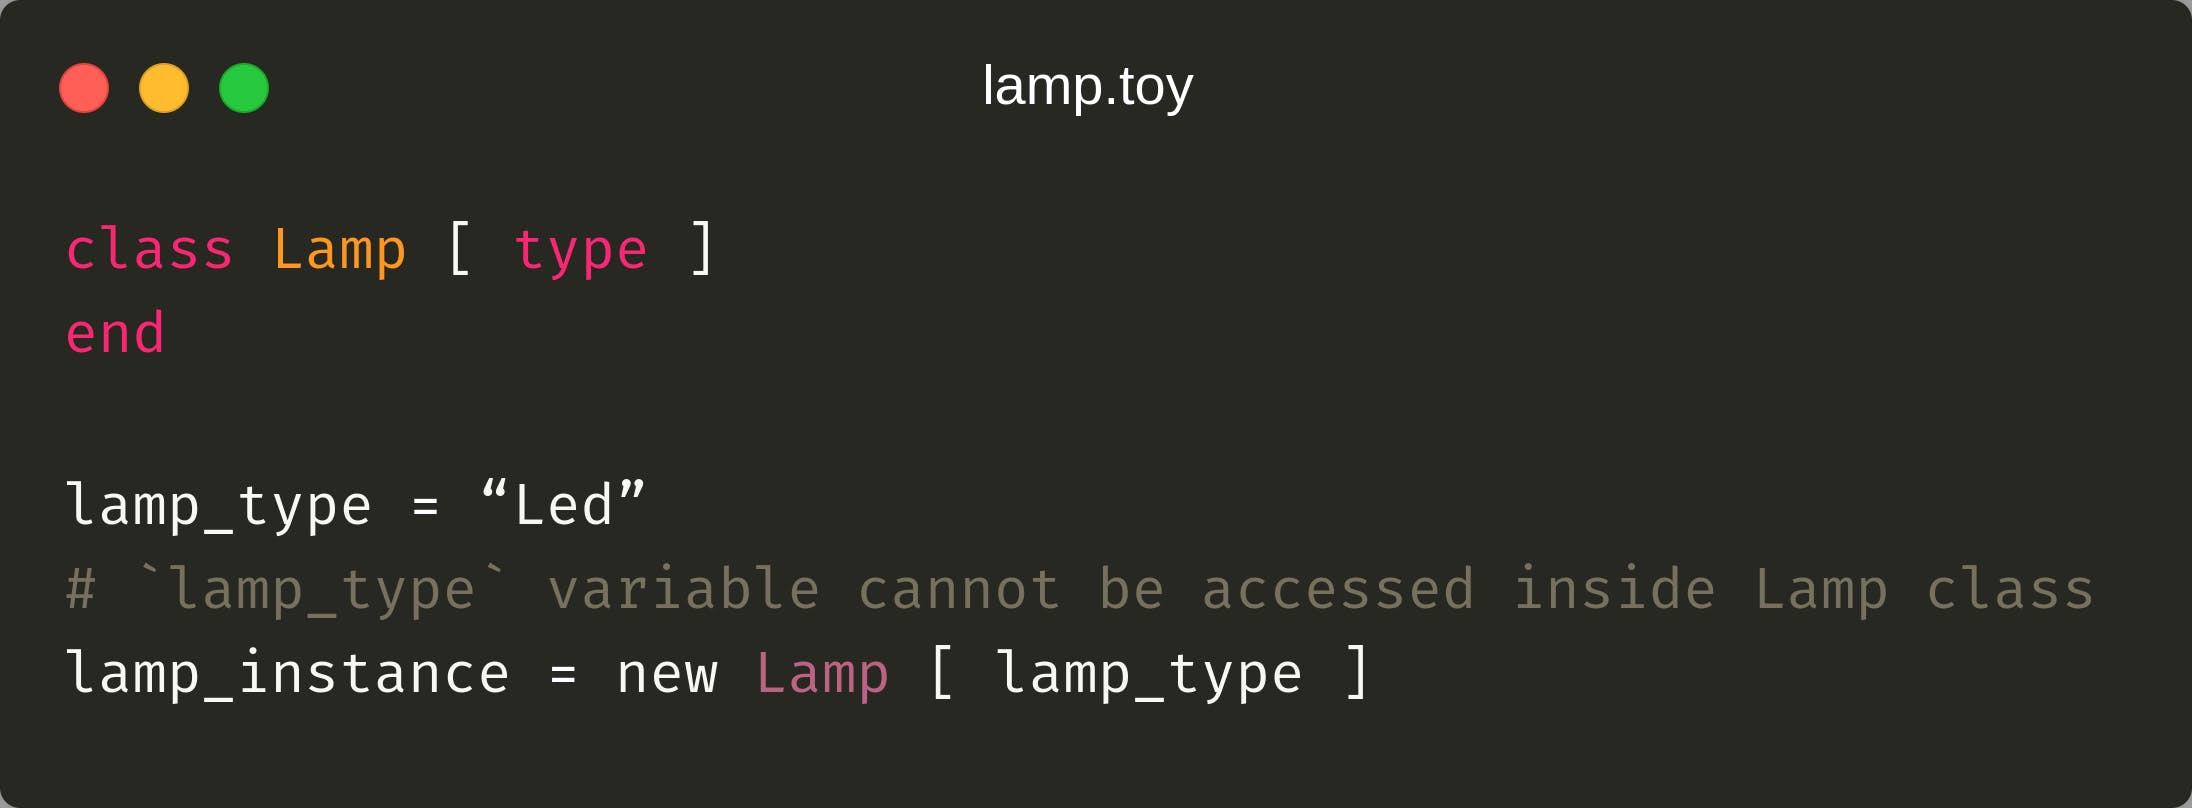
- And finally, we can execute the
ClassStatement. But before that, we should set the class’s DefinitionScope to be able to access the class’s functions within constructor statements:
1
2
3
4
5
6
7
8
9
10
11
12
13
14
15
16
17
18
19
20
21
| try {
//initialize constructor arguments
ClassValue classValue = new ClassValue(definition, classScope);
ClassInstanceContext.pushValue(classValue);
IntStream.range(0, definition.getArguments().size()).boxed()
.forEach(i -> MemoryContext.getScope()
.setLocal(definition.getArguments().get(i), values.size() > i ? values.get(i) : NullValue.NULL_INSTANCE));
//execute function body
DefinitionContext.pushScope(definition.getDefinitionScope());
try {
classStatement.execute();
} finally {
DefinitionContext.endScope();
}
return classValue;
} finally {
MemoryContext.endScope();
ClassInstanceContext.popValue();
}
|
- One last thing, we can make the classes more flexible and allow a user to create class instances before declaring the class definition:

This can be done by delegating the ClassDefinition initialization to the DefinitionContext and access it only when we evaluate an expression:
1
2
3
4
5
6
7
8
9
10
11
| public class ClassExpression implements Expression {
private final String name;
private final List<Expression> arguments;
@Override
public Value<?> evaluate() {
//get class's definition and statement
ClassDefinition definition = DefinitionContext.getScope().getClass(name);
...
}
}
|
You can do the same delegation for the FunctionExpression to invoke functions before definition.
- Finally, we can finish reading the class instances with the
ExpressionReader. There is no difference between the previously defined structure instances. We just need to read the Expression arguments and construct the ClassExpression:
1
2
3
4
5
6
7
8
9
10
11
12
13
14
15
16
17
18
19
20
21
22
23
| public class ExpressionReader
...
// read class instance: new Class[arguments]
private ClassExpression readClassInstance(Token token) {
List<Expression> arguments = new ArrayList<>();
if (tokens.peekSameLine(TokenType.GroupDivider, "[")) {
tokens.next(TokenType.GroupDivider, "["); //skip opening square bracket
while (!tokens.peekSameLine(TokenType.GroupDivider, "]")) {
Expression value = ExpressionReader.readExpression(this);
arguments.add(value);
if (tokens.peekSameLine(TokenType.GroupDivider, ","))
tokens.next();
}
tokens.next(TokenType.GroupDivider, "]"); //skip closing square bracket
}
return new ClassExpression(token.getValue(), arguments);
}
}
|
2.5 Class Function
At this moment, we can create a class and execute the class’s constructor statements. But we are still unable to execute the class’s functions.
- Let’s overload the
FunctionExpression#evaluate method that will accept the ClassValue as a reference to the class instance we want to invoke a function from:
1
2
3
4
5
6
7
8
| package org.example.toylanguage.expression;
public class FunctionExpression implements Expression {
...
public Value<?> evaluate(ClassValue classValue) {
}
}
|
- The next step is to transform the function
Expression arguments into the Value arguments using current MemoryScope:
1
2
3
4
5
6
| public Value<?> evaluate(ClassValue classValue) {
//initialize function arguments
List<Value<?>> values = argumentExpressions.stream()
.map(Expression::evaluate)
.collect(Collectors.toList());
}
|
- Next, we need to pass the class’s
MemoryScope and DefinitionScope to the context:
1
2
3
4
5
6
7
8
9
| ...
//get definition and memory scopes from class definition
ClassDefinition classDefinition = classValue.getValue();
DefinitionScope classDefinitionScope = classDefinition.getDefinitionScope();
//set class's definition and memory scopes
DefinitionContext.pushScope(classDefinitionScope);
MemoryContext.pushScope(memoryScope);
|
- Lastly for this implementation, we invoke default FunctionExpression#evaluate(List> values) method and pass evaluated
Value arguments:
1
2
3
4
5
6
7
8
9
10
11
12
13
14
15
16
17
18
19
20
21
| public Value<?> evaluate(ClassValue classValue) {
//initialize function arguments
List<Value<?>> values = argumentExpressions.stream().map(Expression::evaluate).collect(Collectors.toList());
//get definition and memory scopes from class definition
ClassDefinition classDefinition = classValue.getValue();
DefinitionScope classDefinitionScope = classDefinition.getDefinitionScope();
MemoryScope memoryScope = classValue.getMemoryScope();
//set class's definition and memory scopes
DefinitionContext.pushScope(classDefinitionScope);
MemoryContext.pushScope(memoryScope);
try {
//proceed function
return evaluate(values);
} finally {
DefinitionContext.endScope();
MemoryContext.endScope();
}
}
|
- To invoke the class’s function, we will use the double colon
:: operator. Currently, this operator is managed by the ClassPropertyOperator (StructureValueOperator) implementation, which is responsible for accessing the class’s properties:
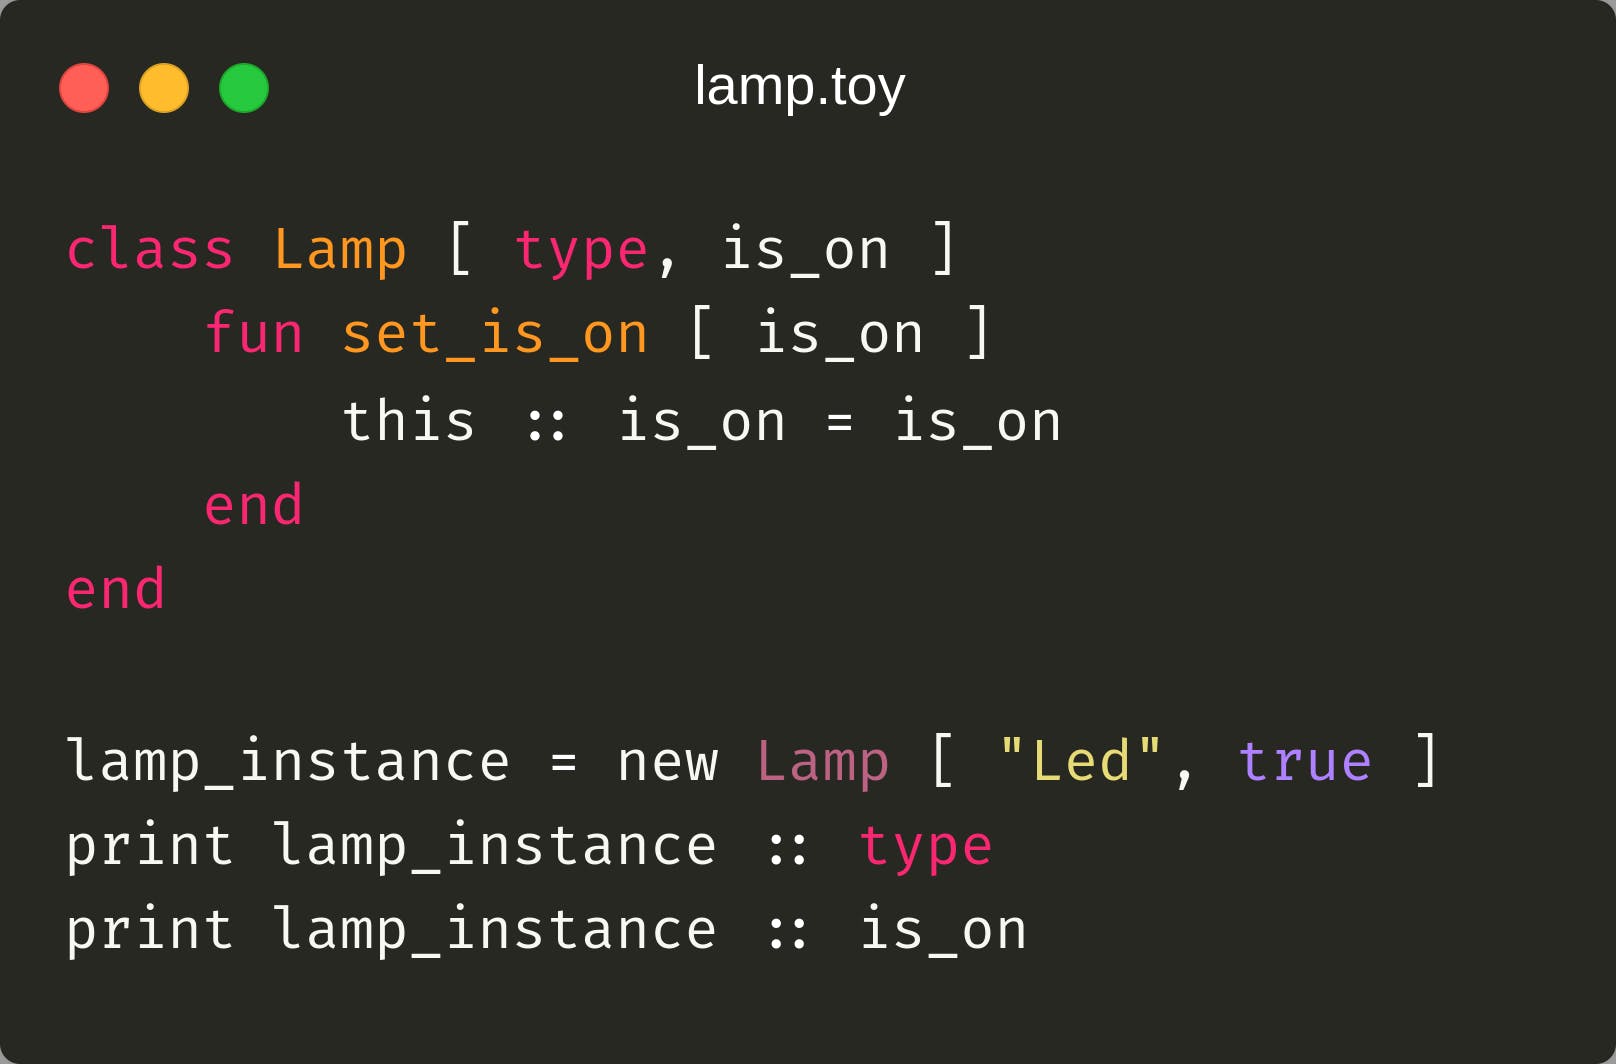
Let’s improve it to support function invocations with the same double colon :: character:
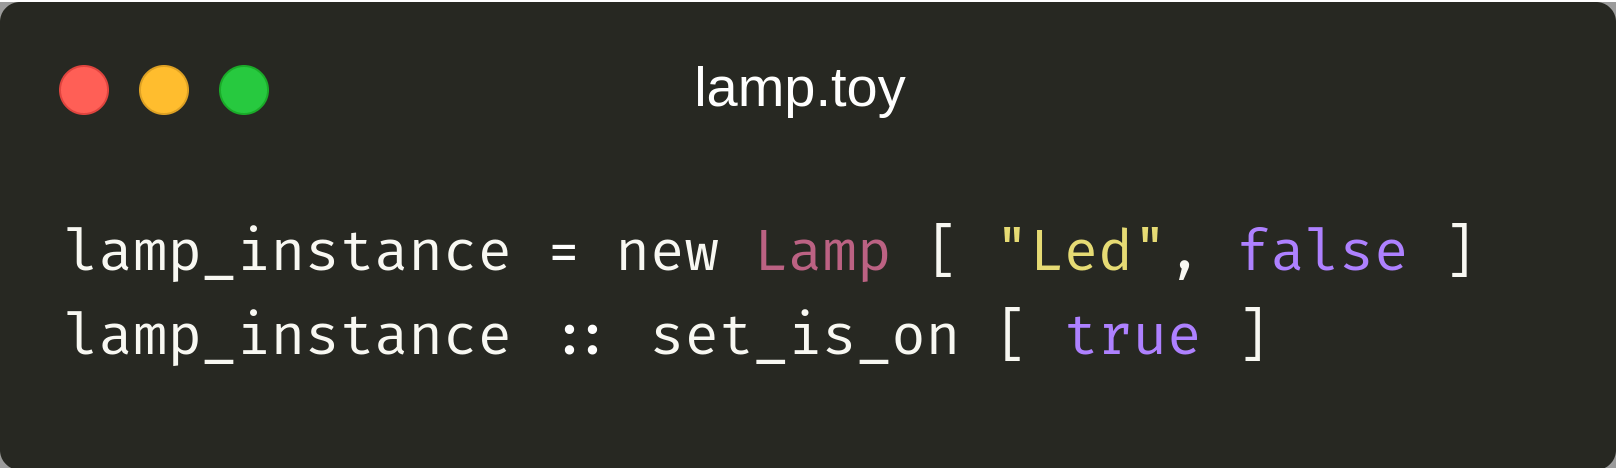
Class’s function can be managed by this operator only when the left expression is the ClassExpression and the second one is the FunctionExpression:
1
2
3
4
5
6
7
8
9
10
11
12
13
14
15
16
17
18
19
20
21
22
23
24
25
26
27
28
29
30
31
32
33
34
35
36
| package org.example.toylanguage.expression.operator;
public class ClassPropertyOperator extends BinaryOperatorExpression implements AssignExpression {
public ClassPropertyOperator(Expression left, Expression right) {
super(left, right);
}
@Override
public Value<?> evaluate() {
Value<?> left = getLeft().evaluate();
if (left instanceof ClassValue) {
if (getRight() instanceof VariableExpression) {
// access class's property
// new ClassInstance[] :: class_argument
return ((ClassValue) left).getValue(((VariableExpression) getRight()).getName());
} else if (getRight() instanceof FunctionExpression) {
// execute class's function
// new ClassInstance[] :: class_function []
return ((FunctionExpression) getRight()).evaluate((ClassValue) left);
}
}
throw new ExecutionException(String.format("Unable to access class's property `%s``", getRight()));
}
@Override
public void assign(Value<?> value) {
Value<?> left = getLeft().evaluate();
if (left instanceof ClassValue && getRight() instanceof VariableExpression) {
String propertyName = ((VariableExpression) getRight()).getName();
((ClassValue) left).setValue(propertyName, value);
}
}
}
|
3. Wrap Up
In this part, we implemented classes. We can now create more complex things, such as stack implementation:
1
2
3
4
5
6
7
8
9
10
11
12
13
14
15
16
17
18
19
20
21
22
23
24
25
26
27
28
29
30
31
32
33
34
35
36
| main []
fun main []
stack = new Stack []
loop num in 0..5
# push 0,1,2,3,4
stack :: push [ num ]
end
size = stack :: size []
loop i in 0..size
# should print 4,3,2,1,0
print stack :: pop []
end
end
class Stack []
arr = {}
n = 0
fun push [ item ]
this :: arr << item
n = n + 1
end
fun pop []
n = n - 1
item = arr { n }
arr { n } = null
return item
end
fun size []
return this :: n
end
end
|
Building Your Own Programming Language From Scratch: Part VIII - Nested Classes

In this part of creating your own programming language, we’ll continue improving our language by implementing nested classes and slightly upgrading the classes introduced in the previous part. Please check out the previous parts:
- Building Your Own Programming Language From Scratch
- Building Your Own Programming Language From Scratch: Part II - Dijkstra’s Two-Stack Algorithm
- Build Your Own Programming Language Part III: Improving Lexical Analysis with Regex Lookaheads
- Building Your Own Programming Language From Scratch Part IV: Implementing Functions
- Building Your Own Programming Language From Scratch: Part V - Arrays
- Building Your Own Programming Language From Scratch: Part VI - Loops
- Building Your Own Programming Language From Scratch: Part VII - Classes
The full source code is available over on GitHub.
1 Lexical Analysis
In the first section, we will cover lexical analysis. In short, it’s a process to divide the source code into language lexemes, such as keyword, variable, operator, etc.
You may remember from the previous parts that I was using the regex expressions listed in the TokenType enum to define all the lexeme types:
1
2
3
4
5
6
7
8
9
10
11
12
13
14
15
16
17
18
| package org.example.toylanguage.token;
public enum TokenType {
Comment("\\#.*"),
LineBreak("[\\n\\r]"),
Whitespace("[\\s\\t]"),
Keyword("(if|elif|else|end|print|input|class|fun|return|loop|in|by|break|next)(?=\\s|$)"),
GroupDivider("(\\[|\\]|\\,|\\{|}|[.]{2})"),
Logical("(true|false)(?=\\s|$)"),
Numeric("([-]?(?=[.]?[0-9])[0-9]*(?![.]{2})[.]?[0-9]*)"),
Null("(null)(?=,|\\s|$)"),
This("(this)(?=,|\\s|$)"),
Text("\"([^\"]*)\""),
Operator("(\\+|-|\\*|/{1,2}|%|>=|>|<=|<{1,2}|={1,2}|!=|!|:{2}|\\(|\\)|(new|and|or)(?=\\s|$))"),
Variable("[a-zA-Z_]+[a-zA-Z0-9_]*");
private final String regex;
}
|
Let’s look into this nested classes prototype, and add the missing regex expressions into our TokenType lexemes:
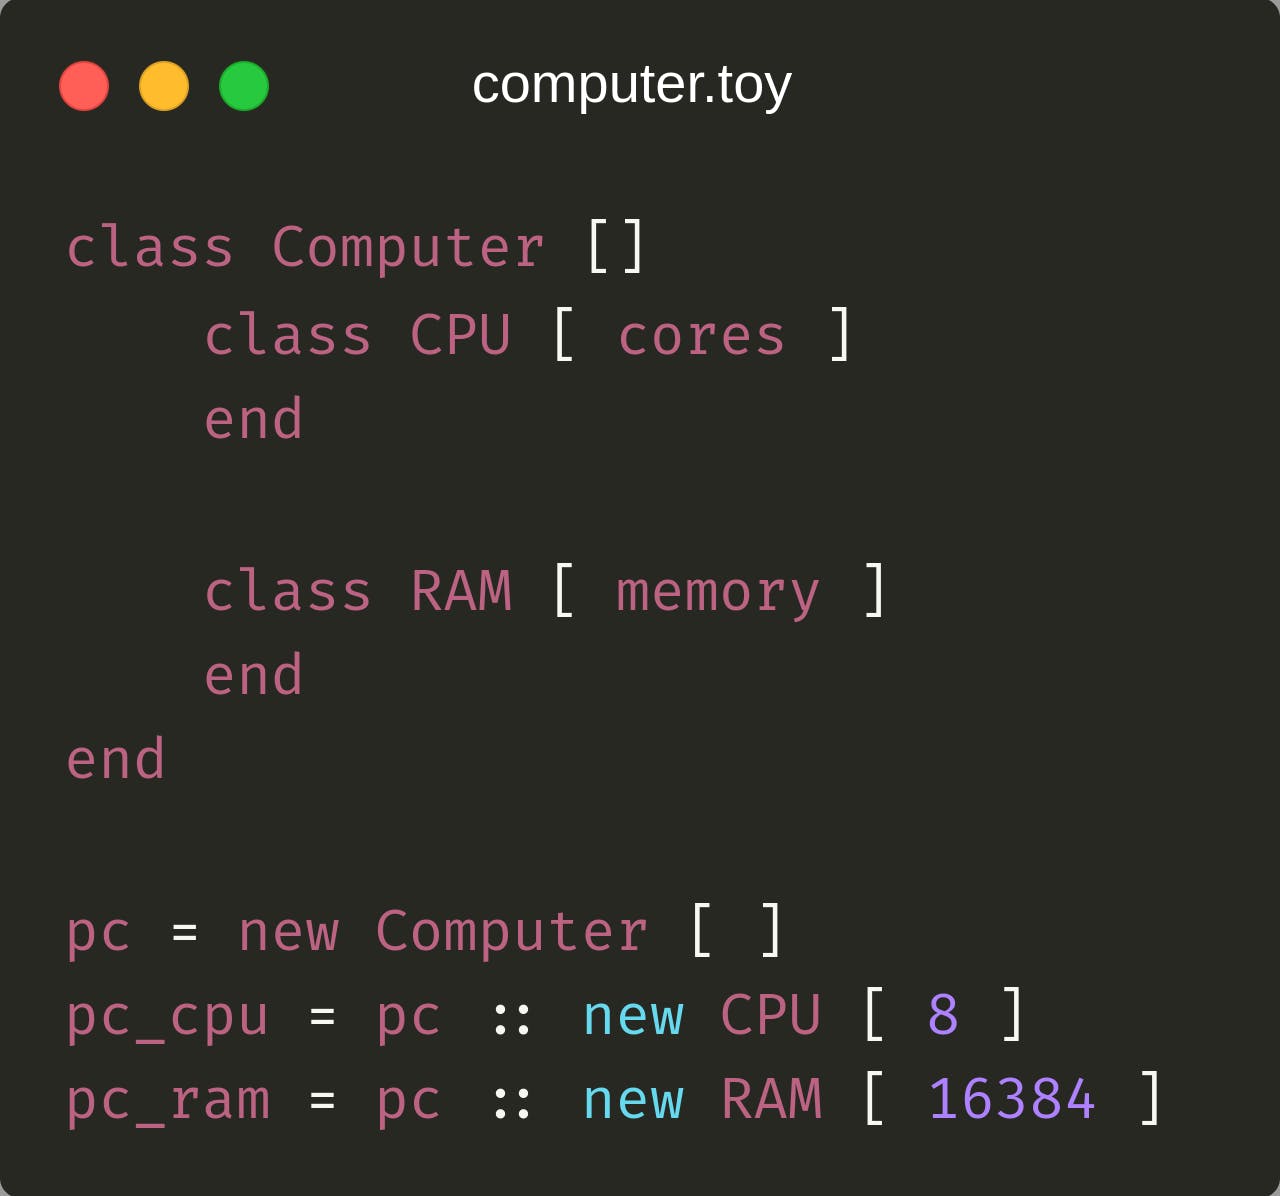
When we create an instance of a nested class, we use the following construction with two expressions and one operator between them:

The left expression class_instance is an instance of the class we are referring to get a nested class from. The right expression NestedClass [args] is a nested class with the properties to create an instance.
Lastly, as an operator to create a nested class, I’ll be using the following expression: :: new, meaning that we refer to the class instance property with the two colon :: operator, and then we create an instance with the new operator.
With the current set of lexemes, we only need to add a regular expression for the :: new operator. This operator can be validated by the following regex expression:
Let’s add this expression in the Operator lexeme as OR expression before the :{2} part standing for accessing class property:
1
2
3
4
5
| public enum TokenType {
...
Operator("(\\+|-|\\*|/{1,2}|%|>=|>|<=|<{1,2}|={1,2}|!=|!|:{2}\\s+new|:{2}|\\(|\\)|(new|and|or)(?=\\s|$))"),
...
}
|
2 Syntax Analysis
In the second section, we will convert lexemes received from the lexical analyzer into the final statements following our language rules.
2.1 OperatorExpression
To evaluate math expressions, we’re using Dijkstra’s Two-Stack algorithm. Each operation in this algorithm can be presented by a unary operator with one operand or by a binary operator with respectively two operands:
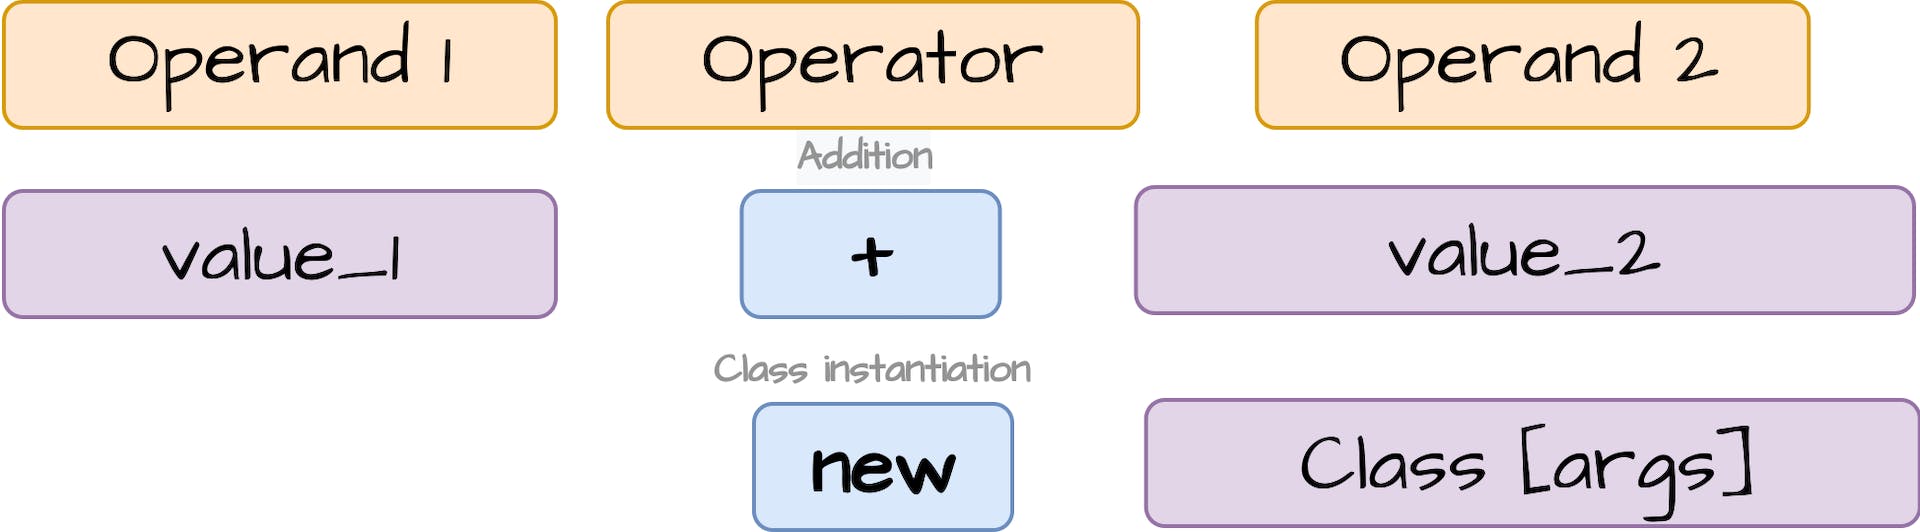
Nested class’s instantiation is a binary operation where the left operand is a class instance we use to refer to the class where the nested class is defined, and the second operand is a nested class we create an instance of:

Let’s create the NestedClassInstanceOperator implementation by extending
BinaryOperatorExpression:
1
2
3
4
5
6
7
8
9
10
11
12
| package org.example.toylanguage.expression.operator;
public class NestedClassInstanceOperator extends BinaryOperatorExpression {
public NestedClassInstanceOperator(Expression left, Expression right) {
super(left, right);
}
@Override
public Value<?> evaluate() {
...
}
}
|
Next, we should complete the evaluate() method that will perform nested class instantiation:
First, we evaluate the left operand’s expression into the Value expression:
1
2
3
4
5
| @Override
public Value<?> evaluate() {
// ClassExpression -> ClassValue
Value<?> left = getLeft().evaluate();
}
|
Next, we need to evaluate() the right operand. In this case, we can’t directly invoke Expression#evaluate() because the nested classes’ definitions are declared in the parent class’s DefinitionScope (in the left operand).
To access the definitions of nested classes, we should create an auxiliary ClassExpression#evaluate(ClassValue) method that will take the left operand and use its DefinitionScope to access the nested class definition and create an instance of:
1
2
3
4
5
6
7
8
9
10
11
12
| @Override
public Value<?> evaluate() {
Value<?> left = getLeft().evaluate();
if (left instanceof ClassValue && getRight() instanceof ClassExpression) {
// instantiate nested class
// new Class [] :: new NestedClass []
return ((ClassExpression) getRight()).evaluate((ClassValue) left);
} else {
throw new ExecutionException(String.format("Unable to access class's nested class `%s``", getRight()));
}
}
|
Lastly, let’s implement the missing ClassExpression#evaluate(ClassValue) method.
This implementation will be similar to the ClassExpression#evaluate() method with the only difference being that we should set the ClassDefinition#getDefinitionScope() in order to retrieve nested class definitions:
1
2
3
4
5
6
7
8
9
10
11
12
13
14
15
16
17
18
19
20
21
22
23
24
25
26
27
28
29
30
31
32
33
34
35
36
37
38
39
40
41
42
43
44
45
46
47
48
49
50
51
52
53
54
55
56
57
58
59
60
61
62
63
64
65
66
| package org.example.toylanguage.expression;
…
public class ClassExpression implements Expression {
private final String name;
private final List<Expression> argumentExpressions;
@Override
public Value<?> evaluate() {
//initialize class arguments
List<Value<?>> values = argumentExpressions.stream().map(Expression::evaluate).collect(Collectors.toList());
return evaluate(values);
}
/**
* Evaluate nested class
*
* @param classValue instance of the parent class
*/
public Value<?> evaluate(ClassValue classValue) {
//initialize class arguments
List<Value<?>> values = argumentExpressions.stream().map(Expression::evaluate).collect(Collectors.toList());
//set parent class's definition
ClassDefinition classDefinition = classValue.getValue();
DefinitionContext.pushScope(classDefinition.getDefinitionScope());
try {
return evaluate(values);
} finally {
DefinitionContext.endScope();
}
}
private Value<?> evaluate(List<Value<?>> values) {
//get class's definition and statement
ClassDefinition definition = DefinitionContext.getScope().getClass(name);
ClassStatement classStatement = definition.getStatement();
//set separate scope
MemoryScope classScope = new MemoryScope(null);
MemoryContext.pushScope(classScope);
try {
//initialize constructor arguments
ClassValue classValue = new ClassValue(definition, classScope);
ClassInstanceContext.pushValue(classValue);
IntStream.range(0, definition.getArguments().size()).boxed()
.forEach(i -> MemoryContext.getScope()
.setLocal(definition.getArguments().get(i), values.size() > i ? values.get(i) : NullValue.NULL_INSTANCE));
//execute function body
DefinitionContext.pushScope(definition.getDefinitionScope());
try {
classStatement.execute();
} finally {
DefinitionContext.endScope();
}
return classValue;
} finally {
MemoryContext.endScope();
ClassInstanceContext.popValue();
}
}
}
|
2.2 Operator
All the operators we’re using to evaluate math expressions are stored in the Operator enum with the corresponding precedence, character, and OperatorExpression type that we refer to calculate the result of each operation:
1
2
3
4
5
6
7
8
9
10
11
12
13
14
15
16
17
18
19
20
21
22
23
| ...
public enum Operator {
Not("!", NotOperator.class, 7),
ClassInstance("new", ClassInstanceOperator.class, 7),
...
private final String character;
private final Class<? extends OperatorExpression> type;
private final Integer precedence;
Operator(String character, Class<? extends OperatorExpression> type, Integer precedence) {
this.character = character;
this.type = type;
this.precedence = precedence;
}
public static Operator getType(String character) {
return Arrays.stream(values())
.filter(t -> Objects.equals(t.getCharacter(), character))
.findAny().orElse(null);
}
...
}
|
We already have the ClassInstance value for a regular class’s initialization. Let’s add a new value to manage nested class instances.
The new NestedClassInstance value will have the same character expression as we defined in the TokenType earlier and the same precedence as the regular class’s instance.
For the OperatorExpression type, we will use the previously defined NestedClassInstanceOperator:
1
2
3
4
5
6
7
| ...
public enum Operator {
Not("!", NotOperator.class, 7),
ClassInstance("new", ClassInstanceOperator.class, 7),
NestedClassInstance(":{2}\\s+new", NestedClassInstanceOperator.class, 7),
...
}
|
You may notice that we don’t have regex expressions in the character property except for this new operator. To read the NestedClassInstance operator using a regex expression, we should update the Operator#getType() method to match an operator with a regular expression:
1
2
3
4
5
6
7
8
9
| public enum Operator {
...
public static Operator getType(String character) {
return Arrays.stream(values())
.filter(t -> character.matches(t.getCharacter()))
.findAny().orElse(null);
}
...
}
|
Lastly, we should add two backslashes \\ before a character for operations containing the following symbols: +, *, (, ) to make sure these characters are not treated as regex search symbols:
1
2
3
4
| Multiplication("\\*", MultiplicationOperator.class, 6),
Addition("\\+", AdditionOperator.class, 5),
LeftParen("\\(", 3),
RightParen("\\)", 3),
|
After we introduced the NestedClassInstance operator, we should inject it into the ExpressionReader class that actually parses math expressions into operands and operators. We just need to find the line where we read the class instance:
1
2
3
| if (!operators.isEmpty() && operators.peek() == Operator.ClassInstance) {
operand = readClassInstance(token);
}
|
To support reading the NestedClassInstance operator, we add the corresponding condition for the current operator in the operator’s stack:
1
2
3
| if (!operators.isEmpty() && (operators.peek() == Operator.ClassInstance || operators.peek() == Operator.NestedClassInstance)) {
operand = readClassInstance(token);
}
|
The readClassInstance() method will read a nested class’s declaration with properties the same way it reads a regular class declaration. This method returns ClassExpression instance as a whole operand expression.
3. Wrap Up
Everything is ready now. In this part, we implemented nested classes as one more step toward making a complete programming language.
The Web Development and eCommerce Writing Contest is brought to you by Elastic Path in partnership with HackerNoon. Publish your thoughts and experiences on #eCommerce or #web-development to win a cash prize!
Elastic Path is the only commerce company making Composable Commerce accessible for tech teams with unique product merchandising requirements and complex go-to-market strategies. !
Building Your Own Programming Language From Scratch: Part IX - Hybrid Inheritance
Welcome to the next part of creating your own programming language. In this part, we’ll continue improving our toy language by implementing inheritance for the classes introduced earlier. Here are the previous parts:
- Building Your Own Programming Language From Scratch
- Building Your Own Programming Language From Scratch: Part II - Dijkstra’s Two-Stack Algorithm
- Build Your Own Programming Language Part III: Improving Lexical Analysis with Regex Lookaheads
- Building Your Own Programming Language From Scratch Part IV: Implementing Functions
- Building Your Own Programming Language From Scratch: Part V - Arrays
- Building Your Own Programming Language From Scratch: Part VI - Loops
- Building Your Own Programming Language From Scratch: Part VII - Classes
- Building Your Own Programming Language From Scratch: Part VIII - Nested Classes
The full source code is available over on GitHub.
1. Inheritance Model
Let’s start by defining the inheritance rules for our classes:
- To inherit a class, we’ll be using the colon character
: similar to C++ syntax:
1
2
3
4
5
| class Base
end
class Derived: Base
end
|
- We should be able to fill the Base class’s properties with the Derived class’s properties:
1
2
3
4
5
| class Base [base_arg]
end
class Derived [derived_arg1, derived_arg2]: Base [derived_arg2]
end
|
- When we create an instance of the Derived class containing constructor statements, the statements declared in the Base class’s constructor should be executed first:
1
2
3
4
5
6
7
8
9
| class Base
print "Constructor of Base class called"
end
class Derived: Base
print "Constructor of Derived class called"
end
d = new Derived
|
Output:
1
2
| Constructor of Base class called
Constructor of Derived class called
|
- Our classes will support hybrid inheritance and derive a class from multiple types:
1
2
3
4
5
6
7
8
9
10
11
| class A
end
class B
end
class C
end
class Derived: A, B, C
end
|
- To make an Upcasting or Downcasting operation for a class instance, we will use
as operator:
1
2
3
4
5
6
7
8
9
| class Base
end
class Derived: Base
end
d = new Derived
b = d as Base # Downcasting to Base
d2 = b as Derived # Upcasting to Derived
|
- In order to modify the Base class’s properties, we should first downcast an object to the Base type:
1
2
3
4
5
6
7
8
9
10
11
12
13
| class Base [base_arg]
end
class Derived [derived_arg]: Base [derived_arg]
end
d = new Derived [ 1 ]
# Directly changing a property of the Derived type
d :: derived_arg = 2
# Downcasting instance to the Base and then changing Base’s property
d as Base :: base_arg = 3
|
- If we change a property in the Base class, the corresponding reference property in the Derived class should be updated as well, and vice versa, if we change the Derived class’s property that we used to construct the Base class, the corresponding property in this Base class should also be updated:
1
2
3
4
5
6
7
8
9
10
11
12
| class Base [base_arg]
end
class Derived [derived_arg]: Base [derived_arg]
end
d = new Derived [ 1 ]
d as Base :: base_arg = 2
print d
d :: derived_arg = 3
print d as Base
|
Output:
1
2
| Derived [ derived_arg = 2 ]
Base [ base_arg = 3 ]
|
- We won’t be using the
super keyword that we have in Java because, with hybrid inheritance, there could be multiple inherited Base classes, and there is no way to know which super class to refer to without defining it explicitly.
For this kind of action, we will use the cast operator to point the required Base type:
1
2
3
4
5
6
7
8
9
10
11
12
13
14
15
16
17
18
19
20
21
22
| class A
fun action
print "A action"
end
end
class B
fun action
print "B action"
end
end
class C: A, B
fun action
this as B :: action []
this as A :: action []
print "C action"
end
end
c = new C
c :: action []
|
Output:
1
2
3
| B action
A action
C action
|
- Lastly, in this part, we’ll add
is operator to check whether an object is an instance of a particular class or not:
1
2
3
4
5
6
7
8
9
10
11
12
13
14
15
16
| class A
end
class B: A
end
fun check_instance [object]
if object is B
print "Object is type of B"
elif object is A
print "Object is type of A"
end
end
check_instance [ new A ]
check_instance [ new B ]
|
Output:
1
2
| Object is type of A
Object is type of B
|
Now with these defined rules, let’s implement the inheritance model using already created structures from the previous parts. There are two main sections we’ll cover as usual: lexical analysis and syntax analysis.
2. Lexical Analysis
In this section, we will cover lexical analysis. It’s a process to divide the source code into language lexemes, such as keywords, variables, operators, etc. To define the lexemes, I’m using the regex expressions listed in the TokenType enum.
1
2
3
4
5
6
7
8
9
10
11
12
13
14
15
16
17
18
| package org.example.toylanguage.token;
public enum TokenType {
Comment("\\#.*"),
LineBreak("[\\n\\r]"),
Whitespace("[\\s\\t]"),
Keyword("(if|elif|else|end|print|input|class|fun|return|loop|in|by|break|next)(?=\\s|$)(?!_)"),
GroupDivider("(\\[|\\]|\\,|\\{|}|\\.{2})"),
Logical("(true|false)(?=\\s|$)(?!_)"),
Numeric("([-]?(?=[.]?[0-9])[0-9]*(?![.]{2})[.]?[0-9]*)"),
Null("(null)(?=,|\\s|$)(?!_)"),
This("(this)(?=,|\\s|$)(?!_)"),
Text("\"([^\"]*)\""),
Operator("(\\+|-|\\*|/{1,2}|%|>=|>|<=|<{1,2}|={1,2}|!=|!|:{2}\\s+new|:{2}|\\(|\\)|(new|and|or)(?=\\s|$))(?!_)"),
Variable("[a-zA-Z_]+[a-zA-Z0-9_]*");
private final String regex;
}
|
Every line of the toy language’s source code is being processed through these regex expressions; with their help, we can accumulate the list of lexemes.
Let’s add the missing lexemes required for our inheritance model:
- First, we need to add the single colon character
: to signify the class inheritance. We can add it to the GroupDivider lexeme with the 2 backslashes before the colon to make sure it will not be treated as a special character:
1
| GroupDivider("(\\[|\\]|\\,|\\{|}|\\.{2}|\\:)")
|
- Next, we should check if we have the colon expression among already defined lexemes. And indeed, we have the
Operator lexeme with the double colon character :: to signify access to a class’s property or a function. We need to make this double colon :: NOT be treated as the GroupDivider lexeme with a single colon : two times.
The most reliable solution is to put a negative lookahead (?!\\:) after the single colon expression saying that there shouldn’t be a second colon after it:
1
| GroupDivider("(\\[|\\]|\\,|\\{|}|\\.{2}|(\\:(?!\\:)))")
|
- To support Upcasting and Downcasting, we need to add
as operator to the Operator lexeme:
1
| Operator("(\\+|-|\\*|/{1,2}|%|>=|>|<=|<{1,2}|={1,2}|!=|!|:{2}\\s+new|:{2}|\\(|\\)|(new|and|or|as)(?=\\s|$)(?!_))")
|
- Lastly, we put
is as a type check (instance of) operator to the Operator lexeme as well:
1
| Operator("(\\+|-|\\*|/{1,2}|%|>=|>|<=|<{1,2}|={1,2}|!=|!|:{2}\\s+new|:{2}|\\(|\\)|(new|and|or|as|is)(?=\\s|$)(?!_))")
|
We’ve added all the required regex expressions to the TokenType. These changes will be managed by LexicalParser, which will convert source code into tokens and handle them in the following section.
3. Syntax Analysis
In this section, we will convert lexemes received from the lexical analyzer into the final statements following our language rules.
3.1 Class Declaration
Currently, we use the StatementParser to read and transform lexemes into definitions and statements. To parse a class definition, we use the StatementParser#parseClassDefinition() method.
All we are doing here is reading the class name and its arguments within square brackets, and at the end, we build ClassDefinition:
1
2
3
4
5
6
7
8
9
10
11
12
13
14
15
16
17
18
19
20
21
22
23
24
25
26
27
28
29
30
31
| private void parseClassDefinition() {
// read class definition
Token name = tokens.next(TokenType.Variable);
List<String> properties = new ArrayList<>();
if (tokens.peek(TokenType.GroupDivider, "[")) {
tokens.next(); //skip open square bracket
while (!tokens.peek(TokenType.GroupDivider, "]")) {
Token propertyToken = tokens.next(TokenType.Variable);
properties.add(propertyToken.getValue());
if (tokens.peek(TokenType.GroupDivider, ","))
tokens.next();
}
tokens.next(TokenType.GroupDivider, "]"); //skip close square bracket
}
// read base types
...
// add class definition
...
ClassDefinition classDefinition = new ClassDefinition(name, properties, …);
// parse constructor statements
...
tokens.next(TokenType.Keyword, "end");
}
|
For the Derived class, we should read the inherited types and corresponding reference properties.
The base class’s properties and the derived class’s properties can differ, and to store a relation between these properties, we’ll introduce an auxiliary class that will contain the class name and its properties:
1
2
3
4
5
6
7
8
9
10
| package org.example.toylanguage.context.definition;
@RequiredArgsConstructor
@Getter
@EqualsAndHashCode(onlyExplicitlyIncluded = true)
public class ClassDetails {
@EqualsAndHashCode.Include
private final String name;
private final List<String> properties;
}
|
1
2
3
4
5
6
7
8
9
10
11
12
| package org.example.toylanguage.context.definition;
@RequiredArgsConstructor
@Getter
@EqualsAndHashCode(onlyExplicitlyIncluded = true)
public class ClassDefinition implements Definition {
@EqualsAndHashCode.Include
private final ClassDetails classDetails;
private final Set<ClassDetails> baseTypes;
private final ClassStatement statement;
private final DefinitionScope definitionScope;
}
|
Now, let’s fill the inherited classes for our ClassDefinition. We will use LinkedHashSet to keep the order of Base types, which we’ll be using to initialize super constructors in the order defined by a developer:
1
2
3
4
5
6
7
8
9
10
11
12
13
14
15
16
17
18
19
20
21
22
23
24
25
26
27
28
29
30
31
32
33
34
35
36
37
38
39
40
| private void parseClassDefinition() {
// read class definition
...
// read base types
Set<ClassDetails> baseTypes = new LinkedHashSet<>();
if (tokens.peek(TokenType.GroupDivider, ":")) {
while (tokens.peek(TokenType.GroupDivider, ":", ",")) {
tokens.next();
Token baseClassName = tokens.next(TokenType.Variable);
List<String> baseClassProperties = new ArrayList<>();
if (tokens.peek(TokenType.GroupDivider, "[")) {
tokens.next(); //skip open square bracket
while (!tokens.peek(TokenType.GroupDivider, "]")) {
Token baseClassProperty = tokens.next(TokenType.Variable);
baseClassProperties.add(baseClassProperty.getValue());
if (tokens.peek(TokenType.GroupDivider, ","))
tokens.next();
}
tokens.next(TokenType.GroupDivider, "]"); //skip close square bracket
}
ClassDetails baseClassDetails = new ClassDetails(baseClassName.getValue(), baseClassProperties);
baseTypes.add(baseClassDetails);
}
}
// add class definition
...
ClassDetails classDetails = new ClassDetails(name.getValue(), properties);
ClassDefinition classDefinition = new ClassDefinition(classDetails, baseTypes, classStatement, classScope);
// parse constructor statements
...
tokens.next(TokenType.Keyword, "end");
}
|
3.2 Class Instance
After we’ve read and saved the Derived class definition, we should provide the ability to create an instance with the defined inherited types. Currently, to create an instance of a class, we use the ClassExpression and ClassValue implementations.
The first one, the ClassExpression, is being used to create a class instance in the ExpressionReader. The second one, the ClassValue, is being created by the ClassExpression during execution and used to access a class property.
Let’s begin with the second, ClassValue. When we create a class instance and invoke its constructor statements, we may need to access its properties. Each Derived type can have a different set of properties that do not necessarily correspond to the Base type’s properties.
As the next requirement of our inheritance rules, where we need to provide the cast operator to the Base type, we should make an interface to easily switch between Base types and keep variables of each Base class isolated from variables of the Derived type.
We’ll define the Map of relations for the Base types and the Derived type to access the ClassValue by class name:
1
2
3
4
5
6
7
8
9
10
11
12
13
14
15
16
17
18
19
20
21
| @Getter
public class ClassValue extends IterableValue<ClassDefinition> {
private final MemoryScope memoryScope;
private final Map<String, ClassValue> relations;
public ClassValue(ClassDefinition definition, MemoryScope memoryScope, Map<String, ClassValue> relations) {
super(definition);
this.memoryScope = memoryScope;
this.relations = relations;
}
public ClassValue getRelation(String className) {
return relations.get(className);
}
public boolean containsRelation(String className) {
return relations.containsKey(className);
}
...
}
|
These relations will be used for Upcasting, Downcasting, and checking object type. To simplify the process of Upcasting and Downcasting, this map will contain the same values for each Base class in the inheritance chain and will allow Upcasting from the bottom Base type to the top Derived type and vice versa.
Next, let’s modify the ClassExpression that we use to create a class instance. Inside it, we define the Map of relations a second time, which will be used to create a ClassValue and be accumulated by every supertype the Derived class has:
1
2
3
4
5
6
7
8
9
10
11
12
| @RequiredArgsConstructor
@Getter
public class ClassExpression implements Expression {
private final String name;
private final List<? extends Expression> argumentExpressions;
// Base classes and Derived class available to a class instance
private final Map<String, ClassValue> relations;
public ClassExpression(String name, List<Expression> argumentExpressions) {
this(name, argumentExpressions, new HashMap<>());
}
}
|
We should also provide consistency for reference properties. If we modify the Base type’s property, the reference property in the Derived type should also be updated to the same value, and vice versa, if we change the Derived class’s property, the reference property in the Base class should be updated as well:
1
2
3
4
5
6
7
8
9
10
11
12
13
14
15
16
| class A [arg_a]
end
class B [arg_b1, arg_b2]: A [arg_b2]
end
b = new B [ 1, 2 ]
b as A :: arg_a = 3
print b
b :: arg_b2 = 4
print b as A
Output
B [ arg_b1 = 1, arg_b2 = 3 ]
A [ arg_a = 4 ]
|
This reference consistency can be delegated to Java by introducing a new ValueReference wrapper for the Value, a single instance of which will be used by the Derived type to initialize the reference property in the Base types:
1
2
3
4
5
6
7
8
9
10
11
12
13
14
15
16
17
18
19
20
21
22
23
24
25
26
27
28
29
30
31
32
33
34
35
36
37
38
39
40
41
42
43
44
45
46
47
| package org.example.toylanguage.context;
/**
* Wrapper for the Value to keep the properties relation between a Base class and a Derived class
*
* <pre>{@code
* # Declare the Base class A
* class A [a_value]
* end
*
* # Declare the Derived class B that inherits class A and initializes its `a_value` property with the `b_value` parameter
* class B [b_value]: A [b_value]
* end
*
* # Create an instance of class B
* b = new B [ b_value ]
*
* # If we change the `b_value` property, the A class's property `a_value` should be updated as well
* b :: b_value = new_value
*
* # a_new_value should contain `new_value`
* a_new_value = b as A :: a_value
* }</pre>
*/
@Getter
@Setter
public class ValueReference implements Expression {
private Value<?> value;
private ValueReference(Value<?> value) {
this.value = value;
}
public static ValueReference instanceOf(Expression expression) {
if (expression instanceof ValueReference) {
// reuse variable
return (ValueReference) expression;
} else {
return new ValueReference(expression.evaluate());
}
}
@Override
public Value<?> evaluate() {
return value;
}
}
|
Now, let’s initialize the Base classes’ constructors inside the ClassExpression#evaluate(List>) method. This method accepts a list of properties to instantiate the regular classes and the nested ones:
1
2
3
4
5
6
7
8
9
10
11
12
13
14
15
16
17
18
19
20
21
22
23
24
25
26
27
28
29
30
31
| private Value<?> evaluate(List<Value<?>> values) {
//get class's definition and statement
ClassDefinition definition = DefinitionContext.getScope().getClass(name);
ClassStatement classStatement = definition.getStatement();
//set separate scope
MemoryScope classScope = new MemoryScope(null);
MemoryContext.pushScope(classScope);
try {
//initialize constructor arguments
ClassValue classValue = new ClassValue(definition, classScope);
ClassInstanceContext.pushValue(classValue);
IntStream.range(0, definition.getProperties().size()).boxed()
.forEach(i -> MemoryContext.getScope()
.setLocal(definition.getProperties().get(i), values.size() > i ? values.get(i) : NullValue.NULL_INSTANCE));
//execute function body
DefinitionContext.pushScope(definition.getDefinitionScope());
try {
classStatement.execute();
} finally {
DefinitionContext.endScope();
}
return classValue;
} finally {
MemoryContext.endScope();
ClassInstanceContext.popValue();
}
}
|
We will modify the part after we set a separate MemoryScope. First, we need to create an instance of ClassValue, and add it to the relations map:
1
2
3
4
5
6
7
| //set separate scope
MemoryScope classScope = new MemoryScope(null);
MemoryContext.pushScope(classScope);
//initialize constructor arguments
ClassValue classValue = new ClassValue(definition, classScope, relations);
relations.put(name, classValue);
|
Next, we will convert the Value properties into the ValueReference:
1
2
3
| List<ValueReference> valueReferences = values.stream()
.map(ValueReference::instanceOf)
.collect(Collectors.toList());
|
If we instantiate the Derived class’s reference property using ValueReference#instanceOf(Expression), the second time this expression will return the same ValueReference.
After that, we can fill in the missing arguments in case a developer does not provide enough properties defined in the class definition. These absent properties can be set with the NullValue:
1
2
3
4
5
6
7
8
| // fill the missing properties with NullValue.NULL_INSTANCE
// class A [arg1, arg2]
// new A [arg1] -> new A [arg1, null]
// new A [arg1, arg2, arg3] -> new A [arg1, arg2]
List<ValueReference> valuesToSet = IntStream.range(0, definition.getClassDetails().getProperties().size())
.boxed()
.map(i -> values.size() > i ? values.get(i) : ValueReference.instanceOf(NullValue.NULL_INSTANCE))
.collect(Collectors.toList());
|
Lastly, for this method, we need to create a ClassExpression for each Base class using the Derived class’s reference properties, and then execute each constructor by calling ClassExpression#evaluate():
1
2
3
4
5
6
7
8
9
10
11
12
13
14
| //invoke constructors of the base classes
definition.getBaseTypes()
.stream()
.map(baseType -> {
// initialize base class's properties
// class A [a_arg]
// class B [b_arg1, b_arg2]: A [b_arg1]
List<ValueReference> baseClassProperties = baseType.getProperties().stream()
.map(t -> definition.getClassDetails().getProperties().indexOf(t))
.map(valuesToSet::get)
.collect(Collectors.toList());
return new ClassExpression(baseType.getName(), baseClassProperties, relations);
})
.forEach(ClassExpression::evaluate);
|
With this block of code, we can instantiate each Base class we have in the inheritance chain. When we create an instance of the ClassExpression for the Base class, this Base class will behave like a Derived class, with its own inherited Base types, until we reach the Base class that does not inherit any classes.
After we initialized the Base instances, we can finish initializing the Derived instance by setting its properties with MemoryScope#setLocal(ValueReference) and executing constructor statements:
1
2
3
4
5
6
7
8
9
10
11
12
13
14
15
16
17
18
19
| try {
ClassInstanceContext.pushValue(classValue);
IntStream.range(0, definition.getClassDetails().getArguments().size()).boxed()
.forEach(i -> MemoryContext.getScope()
.setLocal(definition.getClassDetails().getArguments().get(i), valuesToSet.get(i)));
//execute constructor statements
DefinitionContext.pushScope(definition.getDefinitionScope());
try {
classStatement.execute();
} finally {
DefinitionContext.endScope();
}
return classValue;
} finally {
MemoryContext.endScope();
ClassInstanceContext.popValue();
}
|
With the new ValueReference class as a value wrapper, we need also to update the MemoryScope to be able to set a ValueReference directly and update the Value inside it if we modify the class’ property:
1
2
3
4
5
6
7
8
9
10
11
12
13
14
15
16
17
18
19
20
21
22
23
24
25
26
27
28
29
30
31
32
33
34
35
36
37
38
39
40
41
42
43
44
45
46
47
48
49
50
51
52
53
| public class MemoryScope {
private final Map<String, ValueReference> variables;
private final MemoryScope parent;
public MemoryScope(MemoryScope parent) {
this.variables = new HashMap<>();
this.parent = parent;
}
public Value<?> get(String name) {
ValueReference variable = variables.get(name);
if (variable != null)
return variable.getValue();
else if (parent != null)
return parent.get(name);
else
return NullValue.NULL_INSTANCE;
}
public Value<?> getLocal(String name) {
ValueReference variable = variables.get(name);
return variable != null ? variable.getValue() : null;
}
public void set(String name, Value<?> value) {
MemoryScope variableScope = findScope(name);
if (variableScope == null) {
setLocal(name, value);
} else {
variableScope.setLocal(name, value);
}
}
// set variable as a reference
public void setLocal(String name, ValueReference variable) {
variables.put(name, variable);
}
// update an existent variable
public void setLocal(String name, Value<?> value) {
if (variables.containsKey(name)) {
variables.get(name).setValue(value);
} else {
variables.put(name, ValueReference.instanceOf(value));
}
}
private MemoryScope findScope(String name) {
if (variables.containsKey(name))
return this;
return parent == null ? null : parent.findScope(name);
}
}
|
3.3 Function
This subsection will cover the function invocation in the inheritance model. Currently, to invoke a function, we use the FunctionExpression class.
We’re only interested in the FunctionExpression#evaluate(ClassValue) method, the one that accepts the ClassValue as a type, which we use to execute a function from:
1
2
3
4
5
6
7
8
9
10
11
12
13
14
15
16
17
18
19
20
21
22
23
24
25
26
27
28
| /**
* Evaluate class's function
*
* @param classValue instance of class where the function is placed in
*/
public Value<?> evaluate(ClassValue classValue) {
//initialize function arguments
List<Value<?>> values = argumentExpressions.stream().map(Expression::evaluate).collect(Collectors.toList());
//get definition and memory scopes from class definition
ClassDefinition classDefinition = classValue.getValue();
DefinitionScope classDefinitionScope = classDefinition.getDefinitionScope();
MemoryScope memoryScope = classValue.getMemoryScope();
//set class's definition and memory scopes
DefinitionContext.pushScope(classDefinitionScope);
MemoryContext.pushScope(memoryScope);
ClassInstanceContext.pushValue(classValue);
try {
//proceed function
return evaluate(values);
} finally {
DefinitionContext.endScope();
MemoryContext.endScope();
ClassInstanceContext.popValue();
}
}
|
With the inheritance, we may not have a function declared in the Derived class. This function could be available only in one of the Base classes. In the following example, the function action is only available in the definition of the B class.
1
2
3
4
5
6
7
8
9
10
11
12
13
| class A
end
class B
fun action
end
end
class C: A, B
end
c = new C
c :: action []
|
To find the Base class containing the function with name and number of arguments, we will create the following method:
1
2
3
4
5
6
7
8
9
10
11
12
13
14
| private ClassDefinition findClassDefinitionContainingFunction(ClassDefinition classDefinition, String functionName, int argumentsSize) {
DefinitionScope definitionScope = classDefinition.getDefinitionScope();
if (definitionScope.containsFunction(functionName, argumentsSize)) {
return classDefinition;
} else {
for (ClassDetails baseType : classDefinition.getBaseTypes()) {
ClassDefinition baseTypeDefinition = definitionScope.getClass(baseType.getName());
ClassDefinition functionClassDefinition = findClassDefinitionContainingFunction(baseTypeDefinition, functionName, argumentsSize);
if (functionClassDefinition != null)
return functionClassDefinition;
}
return null;
}
}
|
With this method and with the earlier defined ClassValue#getRelation(String), we can retrieve the ClassValue instance that we can use to invoke the function. Let’s finish the FunctionExpression#evaluate(ClassValue) implementation:
1
2
3
4
5
6
7
8
9
10
11
12
13
14
15
16
17
18
19
20
21
22
23
24
25
26
27
28
29
30
31
32
| /**
* Evaluate class's function
*
* @param classValue instance of class where the function is placed in
*/
public Value<?> evaluate(ClassValue classValue) {
//initialize function arguments
List<Value<?>> values = argumentExpressions.stream().map(Expression::evaluate).collect(Collectors.toList());
// find a class containing the function
ClassDefinition classDefinition = findClassDefinitionForFunction(classValue.getValue(), name, values.size());
if (classDefinition == null) {
throw new ExecutionException(String.format("Function is not defined: %s", name));
}
DefinitionScope classDefinitionScope = classDefinition.getDefinitionScope();
ClassValue functionClassValue = classValue.getRelation(classDefinition.getClassDetails().getName());
MemoryScope memoryScope = functionClassValue.getMemoryScope();
//set class's definition and memory scopes
DefinitionContext.pushScope(classDefinitionScope);
MemoryContext.pushScope(memoryScope);
ClassInstanceContext.pushValue(functionClassValue);
try {
//proceed function
return evaluate(values);
} finally {
DefinitionContext.endScope();
MemoryContext.endScope();
ClassInstanceContext.popValue();
}
}
|
3.4 Cast Type Operator
In this subsection, we will add support for the cast type as operator. We already defined this expression in the TokenType.Operator lexeme.
We need only to create the BinaryOperatorExpression implementation that will transform the initial ClassValue into the Base or Derived type using the ClassValue#relations map:
1
2
3
4
5
6
7
8
9
10
11
12
13
14
15
16
17
18
19
20
21
22
23
24
25
26
27
28
| package org.example.toylanguage.expression.operator;
/**
* Cast a class instance from one type to other
*/
public class ClassCastOperator extends BinaryOperatorExpression {
public ClassCastOperator(Expression left, Expression right) {
super(left, right);
}
@Override
public Value<?> evaluate() {
// evaluate expressions
ClassValue classInstance = (ClassValue) getLeft().evaluate();
String typeToCastName = ((VariableExpression) getRight()).getName();
// retrieve class details
ClassDetails classDetails = classInstance.getValue().getClassDetails();
// check if the type to cast is different from original
if (classDetails.getName().equals(typeToCastName)) {
return classInstance;
} else {
// retrieve ClassValue of other type
return classInstance.getRelation(typeToCastName);
}
}
}
|
And as the last step, we should plug this operator in the Operator enum with the required precedence for this operation:
1
2
3
4
5
6
7
8
9
10
11
12
13
14
15
| @RequiredArgsConstructor
@Getter
public enum Operator {
Not("!", NotOperator.class, 7),
ClassInstance("new", ClassInstanceOperator.class, 7),
NestedClassInstance(":{2}\\s+new", NestedClassInstanceOperator.class, 7),
ClassProperty(":{2}", ClassPropertyOperator.class, 7),
ClassCast("as", ClassCastOperator.class, 7),
...
private final String character;
private final Class<? extends OperatorExpression> type;
private final Integer precedence;
...
}
|
This enum is also built with the regex model and will transform the list of lexemes into the operators’ implementations. The provided precedence will be taken into account with the help of Dijkstra’s Two-Stack Algorithm.
Please check out the ExpressionReader implementation and the second part for more explanation.
3.5 Check Type Operator
In this last subsection of syntax analysis, we’ll define the check type operator. The implementation will be similar to the cast operator, which requires creating the OperatorExpression implementation and plugging it into the Operator enum.
The check type operator should return LogicalValue, which stands for a boolean type containing either true or false:
1
2
3
4
5
6
7
8
9
10
11
12
13
14
15
16
17
18
19
20
21
22
23
24
25
26
27
| package org.example.toylanguage.expression.operator;
import org.example.toylanguage.exception.ExecutionException;
import org.example.toylanguage.expression.Expression;
import org.example.toylanguage.expression.VariableExpression;
import org.example.toylanguage.expression.value.ClassValue;
import org.example.toylanguage.expression.value.LogicalValue;
import org.example.toylanguage.expression.value.Value;
public class ClassInstanceOfOperator extends BinaryOperatorExpression {
public ClassInstanceOfOperator(Expression left, Expression right) {
super(left, right);
}
@Override
public Value<?> evaluate() {
Value<?> left = getLeft().evaluate();
// cat = new Cat
// is_cat_animal = cat is Animal
if (left instanceof ClassValue && getRight() instanceof VariableExpression) {
String classType = ((VariableExpression) getRight()).getName();
return new LogicalValue(((ClassValue) left).containsRelation(classType));
} else {
throw new ExecutionException(String.format("Unable to perform `is` operator for the following operands `%s` and `%s`", left, getRight()));
}
}
}
|
1
2
3
4
5
6
7
8
9
10
11
12
13
14
15
16
| @RequiredArgsConstructor
@Getter
public enum Operator {
Not("!", NotOperator.class, 7),
ClassInstance("new", ClassInstanceOperator.class, 7),
NestedClassInstance(":{2}\\s+new", NestedClassInstanceOperator.class, 7),
ClassProperty(":{2}", ClassPropertyOperator.class, 7),
ClassCast("as", ClassCastOperator.class, 7),
ClassInstanceOf("is", ClassInstanceOfOperator.class, 7),
...
private final String character;
private final Class<? extends OperatorExpression> type;
private final Integer precedence;
...
}
|
You can create your own operators the same way, by defining the regex expression in the TokenType.Operator lexeme and plugging the OperatorExpression implementation in the Operator enum.
4 Wrap Up
That’s all the modifications we needed to make to implement the inheritance. In this part, we created a simple hybrid inheritance model as one more step toward making a complete programming language.
Here are a few examples you can run and test on your own with RunToyLanguage:
1
2
3
4
5
6
7
8
9
10
11
12
13
14
15
16
17
18
19
20
21
| class Animal
fun action
print "Animals can run."
end
end
class Bird
fun action
print "Birds can fly."
end
end
class Parrot: Animal, Bird
fun action
this as Bird :: action []
this as Animal :: action []
print "Parrots can talk."
end
end
new Parrot :: action[]
|
1
2
3
4
5
6
7
8
9
10
11
12
13
14
15
16
17
18
19
20
21
22
23
24
25
26
27
28
29
30
31
32
33
34
35
36
37
38
39
40
41
42
43
44
45
46
47
48
49
50
51
52
53
54
55
| class Add [x, y]
fun sum
return "The sum of " + x + " and " + y + " is " + (x + y)
end
end
class Mul [a, b]
fun mul
return "The multiplication of " + a + " and " + b + " is " + a * b
end
end
class Sub [a, b]
fun sub
return "The subtraction of " + a + " and " + b + " is " + (a - b)
end
end
class Div [m, n]
fun div
return "The division of " + m + " and " + n + " is " + m / n
end
end
class Exp [m, n]
fun exp
return "The exponentiation of " + m + " and " + n + " is " + m ** n
end
end
class Fib [ n ]
fun fib
return "The fibonacci number for " + n + " is " + fib [ n ]
end
fun fib [ n ]
if n < 2
return n
end
return fib [ n - 1 ] + fib [ n - 2 ]
end
end
class Calculator [p, q]: Add [p, q], Sub [q, p],
Mul [p, q], Div [q, p],
Exp [p, q], Fib [ q ]
end
calc = new Calculator [2, 10]
print calc :: sum []
print calc :: sub []
print calc :: mul []
print calc :: div []
print calc :: exp []
print calc :: fib []
|
Photo by Uday Awal on Unsplash

 支付宝
支付宝 微信
微信